Introduction
The article explains how to use the "Link by attribute" function to automatically create, update, or delete one or more links between artifacts based on values in the attributes of the artifact.
Learn the process of creating an artifact attribute, associating it with an artifact type, and creating a view with the attribute column. The article provides two scenarios to demonstrate how to link artifacts between modules using the Link by attribute function. This step-by-step guide will help you understand the process in detail. Additionally, we will explore a powerful tool - Link by foreign attribute that can create links between artifacts in selected modules by taking information from custom attributes, making it possible to use any custom IDs used by your partner, customer, or supplier.
Info: This article is part of multi-article series about links. To learn more, check out the Linking Techniques article and Link Constraints article. In scenarios we will be working with modules from one of the DOORS default templates - Automated Meter Reader, but the examples are not content-specific and you can use any modules to follow the scenarios analogously.
Overview and Use Cases
Link by attribute is a perfect way to automatically create, update or delete one or more links between one or more artifacts based on values in the attributes of the artifact. This function can be used in a module, a collection, or an artifact view. By default, there is no artifact attribute created or designated for this function, so as a very first step *we need to create an artifact attribute, where we can later type artifact IDs as a string delimited with a comma.
*Alternatively, we can use any string attribute that may be already created, associated with the artifact type, and not used. That is however not a best practice.
Creating and Associating Artifact Attribute
Step 1 - Create a new attribute called LBA
1.) Navigate to the Administration menu (gear icon) in the upper right corner, and select “Manage component properties” and then click on Manage Project Properties > Link Types. Note: If configuration management is not enabled for your project, select “Manage Project Properties”.
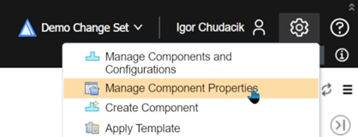
1.) Select "Manage Component Properties"
2.) Select “Artifact Attributes” and choose “New attribute”. Type name for your new attribute - in our example we will use LBA and choose “String” as a data type. The description is optional. Don't forget to save your new attribute.
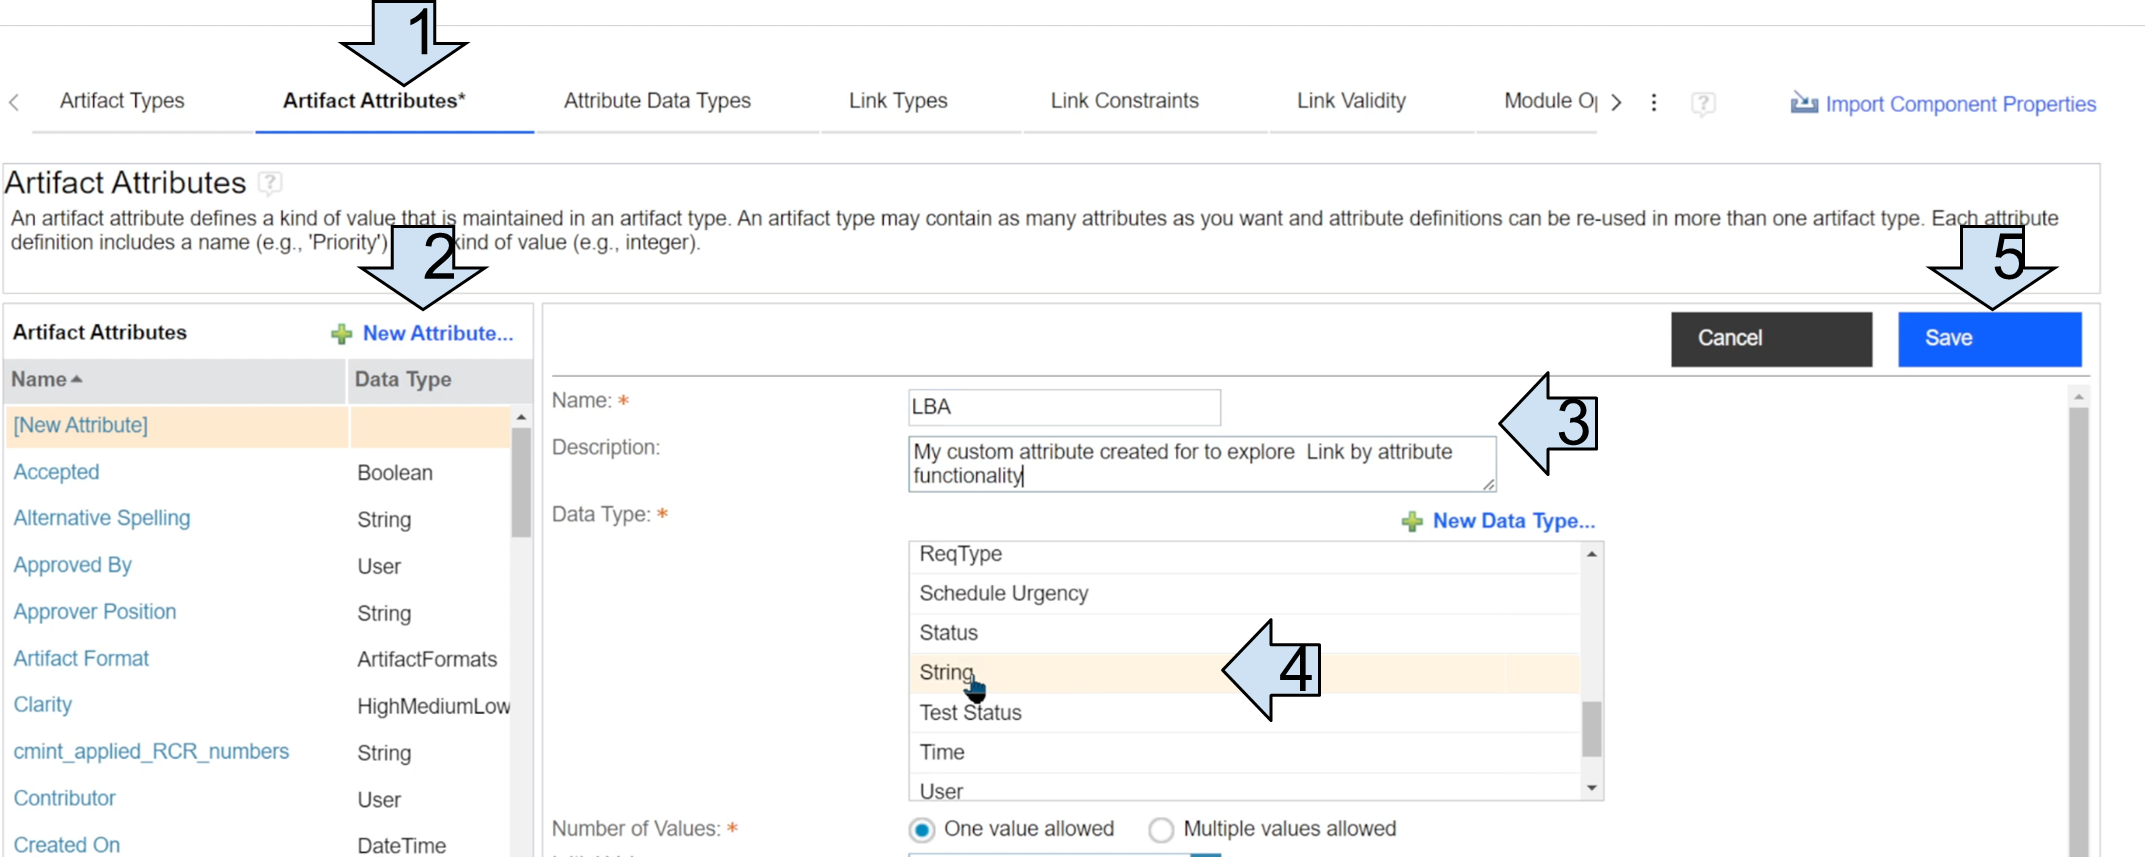
2.) Create and save Attribute
Step 2 - Associate new artifact attribute with Artifact Type
In the following scenario, we will be working with system requirements in the AMR System Requirements Specification module. In this step, we need to associate the newly created LBA attribute with the System Requirement Artifact type.
To do this (still in the manage component properties section) navigate to the “Artifact Types”, find “System Requirement”, and click on “Add Attribute”.
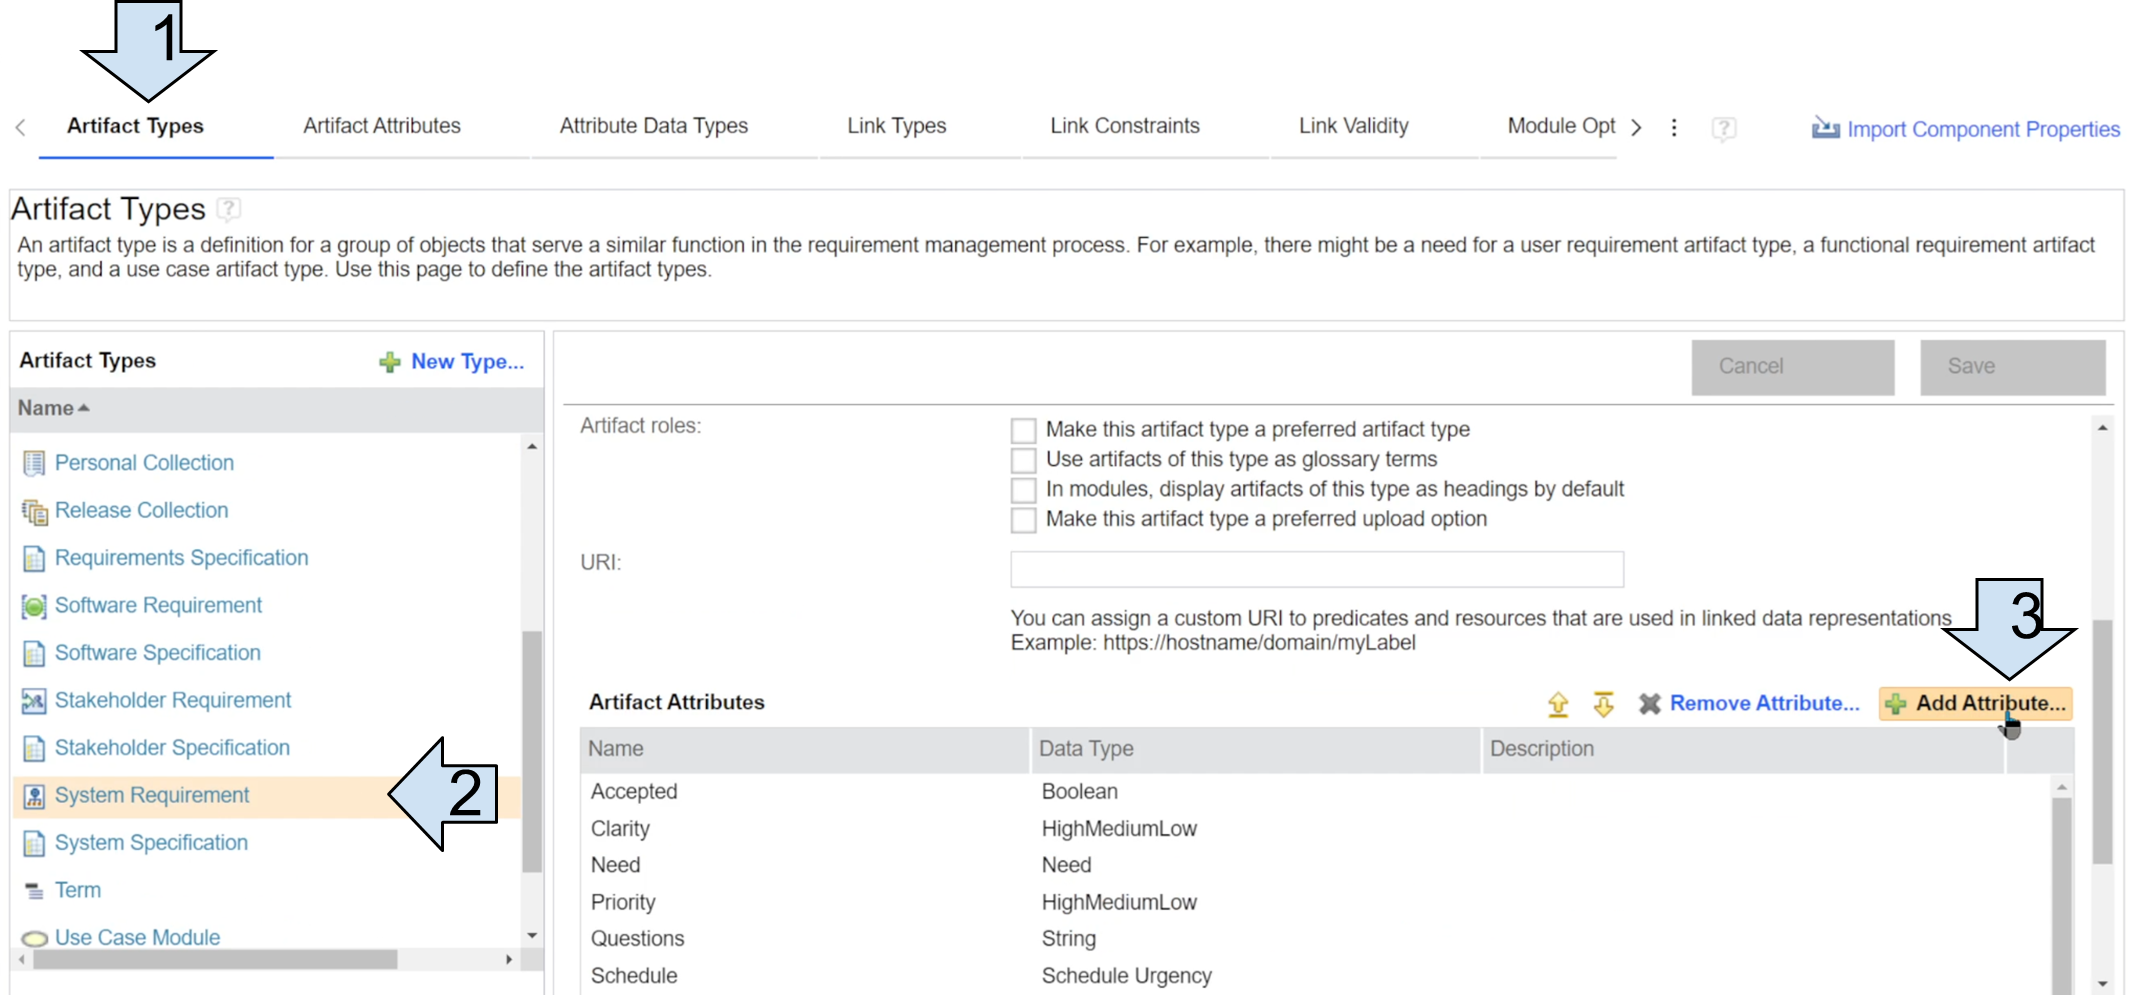
3.) Associate Attribute with Artifact Type - A
Afterward, select LBA, click OK and save the changes.

4.) Associate Attribute with Artifact Type - B
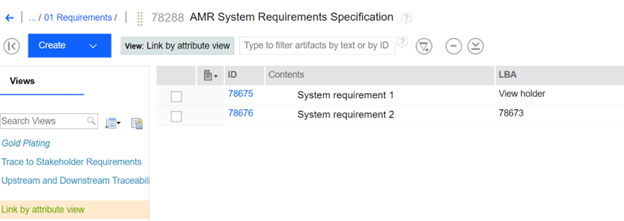
Step 3 - Create a view with the LBA column
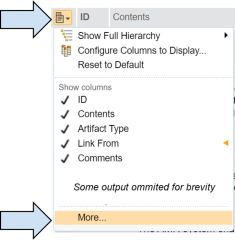
Navigate back to the AMR System Requirements Specification module, click on the “Configure page settings” icon (or alternatively right-click on the grey row), and select “more”.
5.) Add new Attribute to the view - A
Find and select artifact type LBA, click on “Add” and select OK.

6.) Add new Attribute to the View - B
Now we have everything ready to proceed with creating links using the “Link by Attribute” function, which we will go through in the next section.
Observe the whole process in the animation below.

7.) Create and add Attribute to the view - animation
Scenario 1 - Creating Links to Base Artifacts
To make examples as simple as possible, we created some simple requirements in both modules.
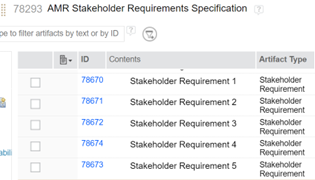
8.) Simple Requirements Module A
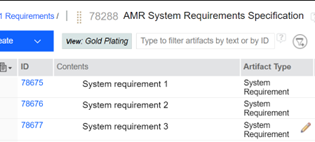
9.) Simple Requirements Module B
In the first scenario, our goal is to link System requirement 1, with Stakeholder requirements 1 and 2, using the link by attribute function. To do this, insert the stakeholder requirement 1 and 2 IDs into the LBU attribute of System requirement 1.
- Step 1 - Click on the pencil icon in the correct cell
- Step 2 - Type IDs 78670 and 78671 delimited by a comma.
- Step 3 - Click OK
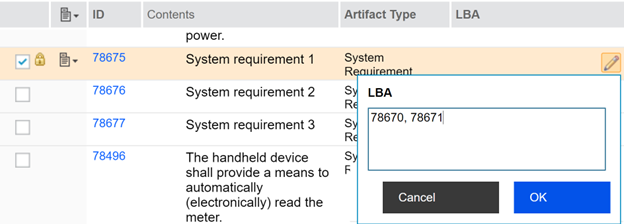
10.) Fill the Attribute with IDs
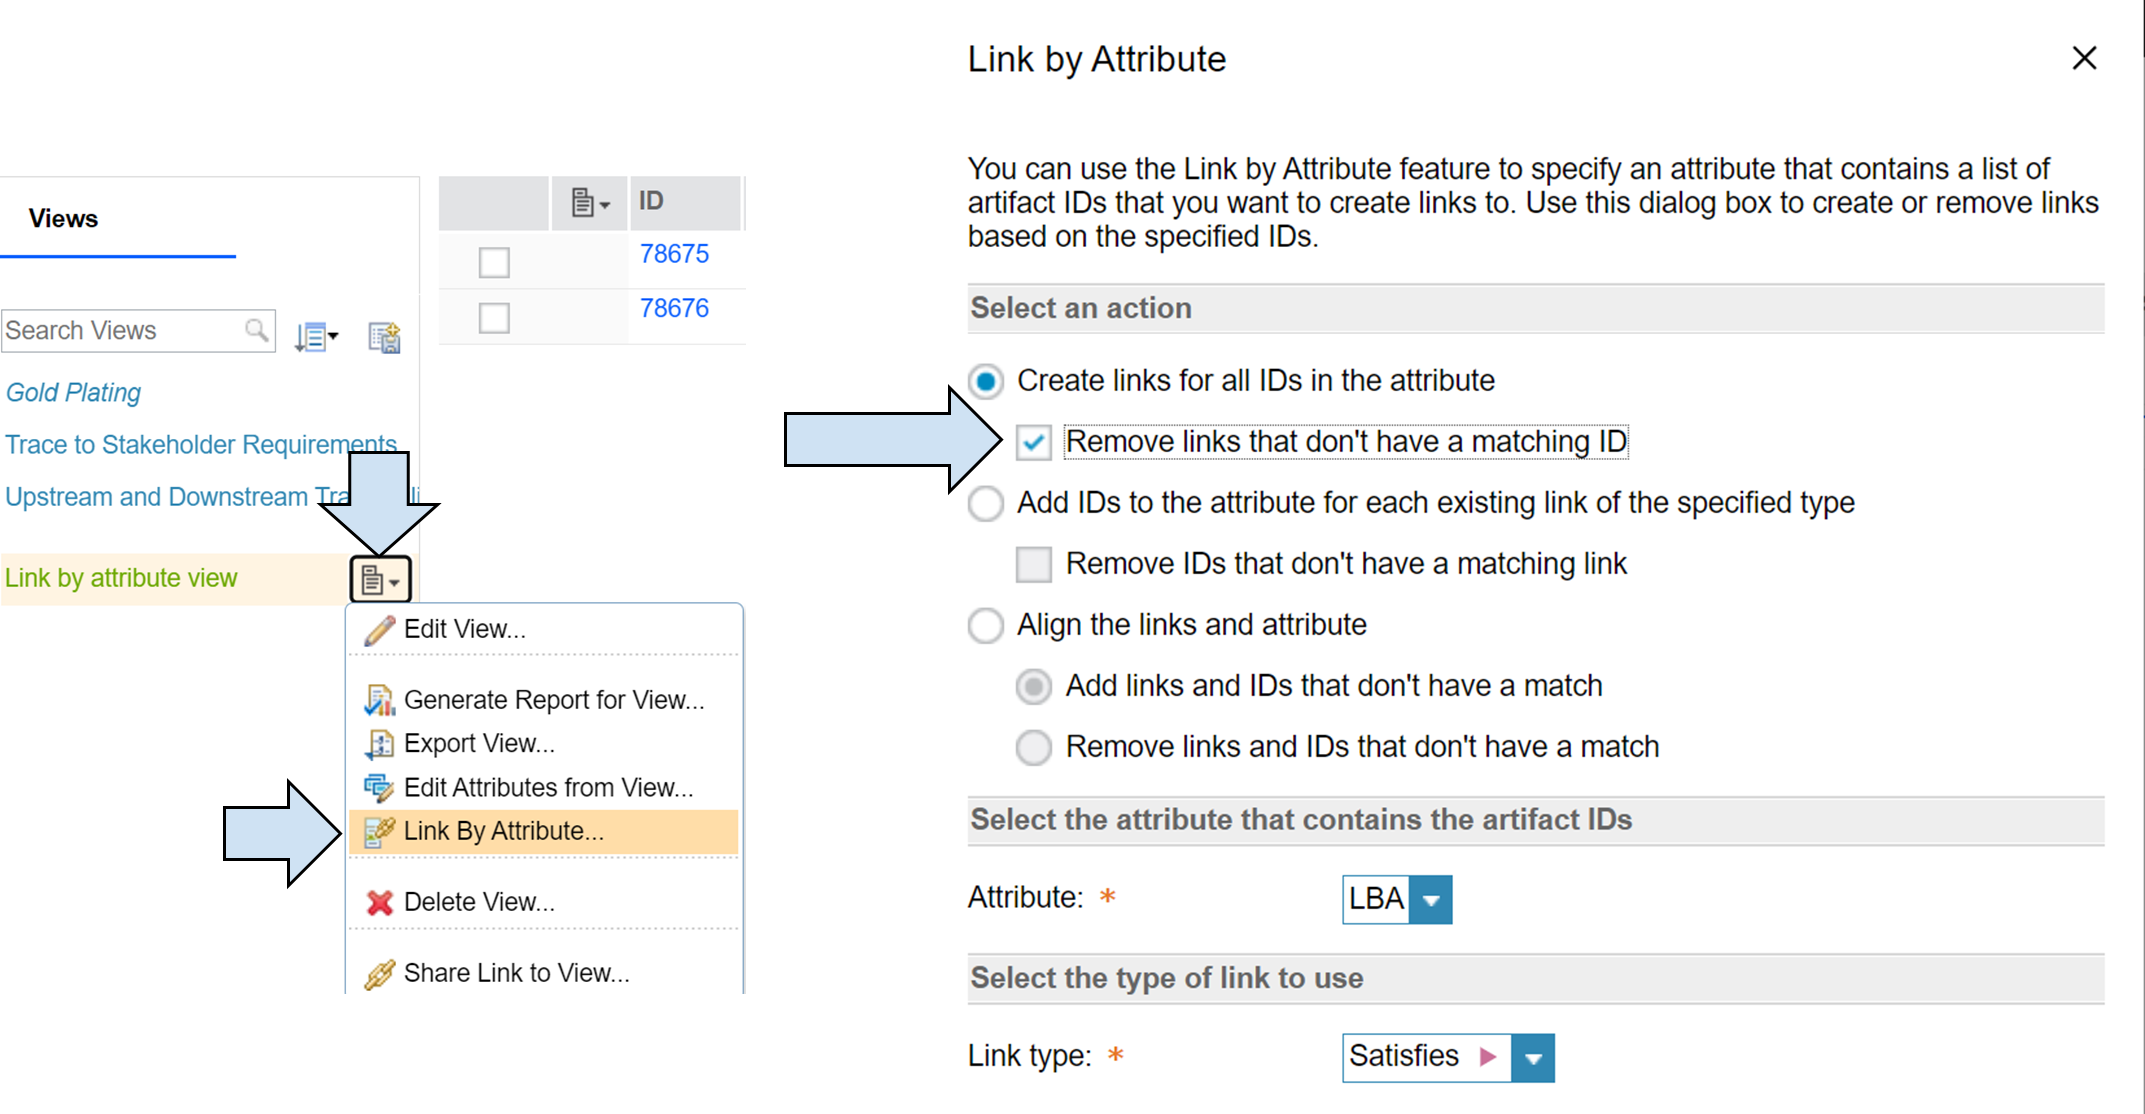
- Step 4 - Click on the “Configure page settings” icon and select “Link by Attribute”.
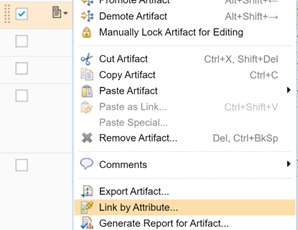
11.) Select "Link By Attribute..."
-
Step 5 - Fill in the options as follows:
- Create links for all IDs in the attribute. Don't select any other action
- Select the attribute that contains the artifact IDs - LBA
- Select the type of the link to use - in our example, we will use “Satisfies”
- Step 6 - Click OK
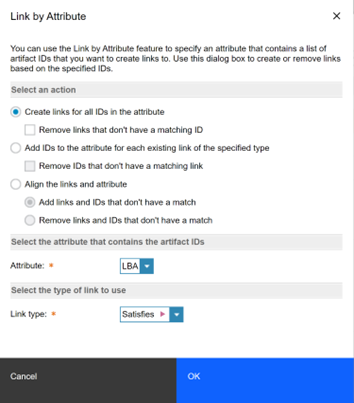
12.) Define the rules
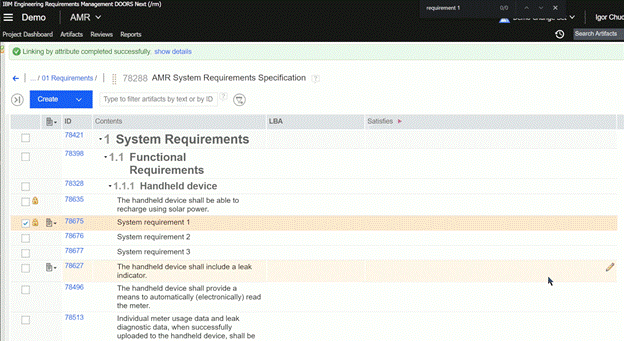
- Step 7 - Now, in the satisfies column we can observe that links were created. If you do not have the “Satisfies” column in your view, please follow step 3 from the preparation section and add it analogously.

13.) Created links
Observe the whole process in the animation below.
14.) Usage of Link By Attribute - animation
Scenario 2 - Creating Links to Module Artifacts
We will continue with the results from scenario 1 and show another way to link artifacts between modules. In the second scenario we will use module ID together with artifact IDs to select requirements we would like to create links to. Afterward, we will explain the differences between options in scenarios 1 and 2.
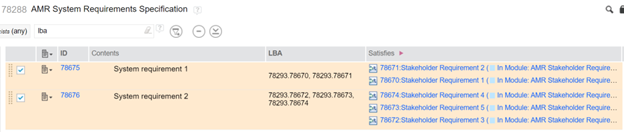
Our goal is to create links between System requirement 2, with Stakeholder requirements 3 and 4, using the link by attribute function.
- Step 1 - Click on the pencil icon in the correct cell
- Step 2 - Type IDs 78293.78672 and 78293.78674 delimited by a comma, where 78293 is the ID of the AMR Stakeholder Requirements Specification module.
- Step 3 - Click OK
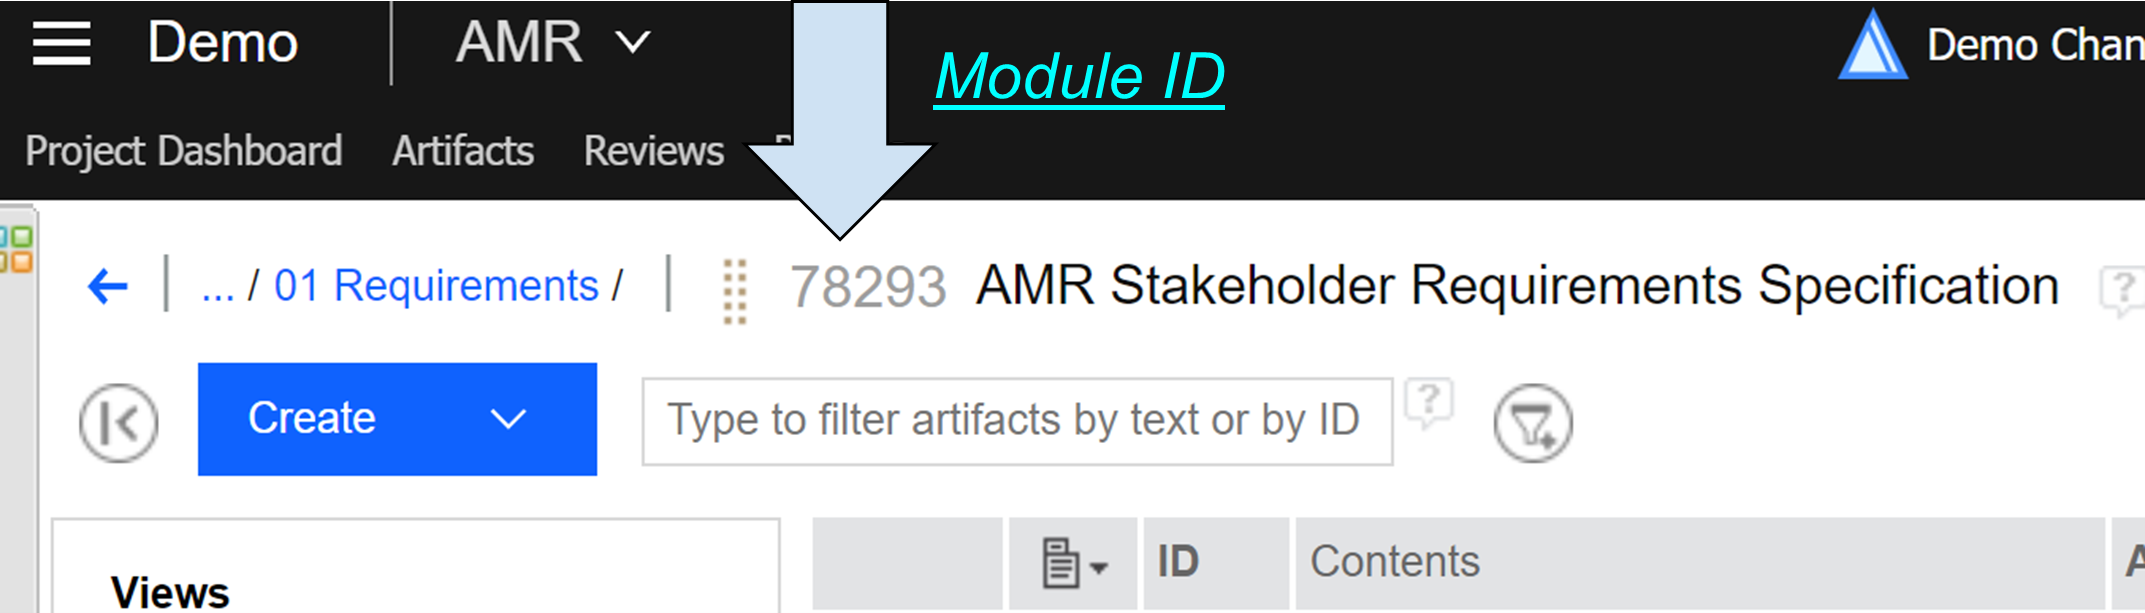
15.) Module ID
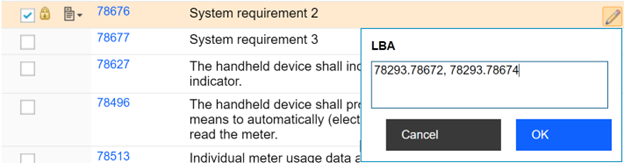
16.) Fill the Attribute wIth IDs together with Module ID
Create the link the same way as in steps 4,5, and 6 in scenario 1.
Observe the whole process in the animation below.

17.) Fill the Attribute with IDs together with Module ID - animation
- Step 7 - Now, in the satisfies column we can verify that additional links were created.

18.) Created links to Module Artifacts
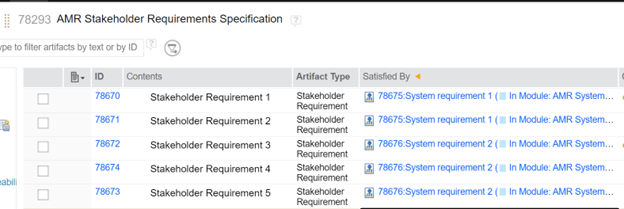
Observe that links were successfully created regardless of the option used. From this perspective, it looks like two analogous options, however, the first difference could be seen. Next, go to the AMR Stakeholder Requirements Specification module.
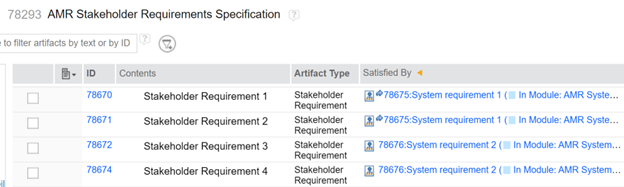
19.) Base Artifacts links
Here we can see an important difference.
- Using option from scenario 1, where only artifacts IDs were used, we created links between base artifact 78575 and base artifacts 78670, 78671. The link to the base artifact is represented by the blue arrow on the left to the artifact ID.
- Using option from scenario 2, where we used a combination of ModuleID.ArtifactID, we created links between module artifacts.
Detailed information about differences can be found in our article Module vs Base Artifact, but to make a long story short, it is important to know that module and base artifact are two separate entries in the database and although most of the parameters are propagated between artifacts, some parameters such as links, comments, and tags are not propagated from the module artifact to the base artifact.
Is one of the options better to create links?
The simple answer is NO, as it depends on the particular use-case, however, most of the customers in most of the use-cases create links between module artifacts, so the ModuleID.ArtifactID combination is preferred unless there is a specific use-case where a link to the base artifact is needed.
Scenario 3 - Problem with Potential Consequences
Let's build upon results from scenarios 1 and 2. In this example, we will show what problem may arise when the incorrect linking option is used. We will create two comments - one for the Stakeholder requirement 1, where the link between base artifacts was created, and the second comment for the Stakeholder requirement 3, where the link between module artifacts where used.
* To add a comment column please follow step 3 from the preparation section and add it analogously.
- Step 1 - In the AMR Stakeholder Requirements Specification module click on the comment icon and add comments for stakeholder requirement 1 and then for stakeholder requirement 3.
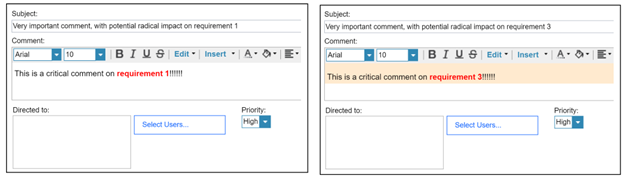
20.) Add comments to Requirements
- Step 2 - Navigate to the AMR System Requirements Specification module, find system requirement 1 and click on the link to artifact 78672: Stakeholder Requirement 1

21.) Click on the linked Artifact
- Step 3 - Clicking on the link brought us to module artifact #78672 and we can see our comment on the right.
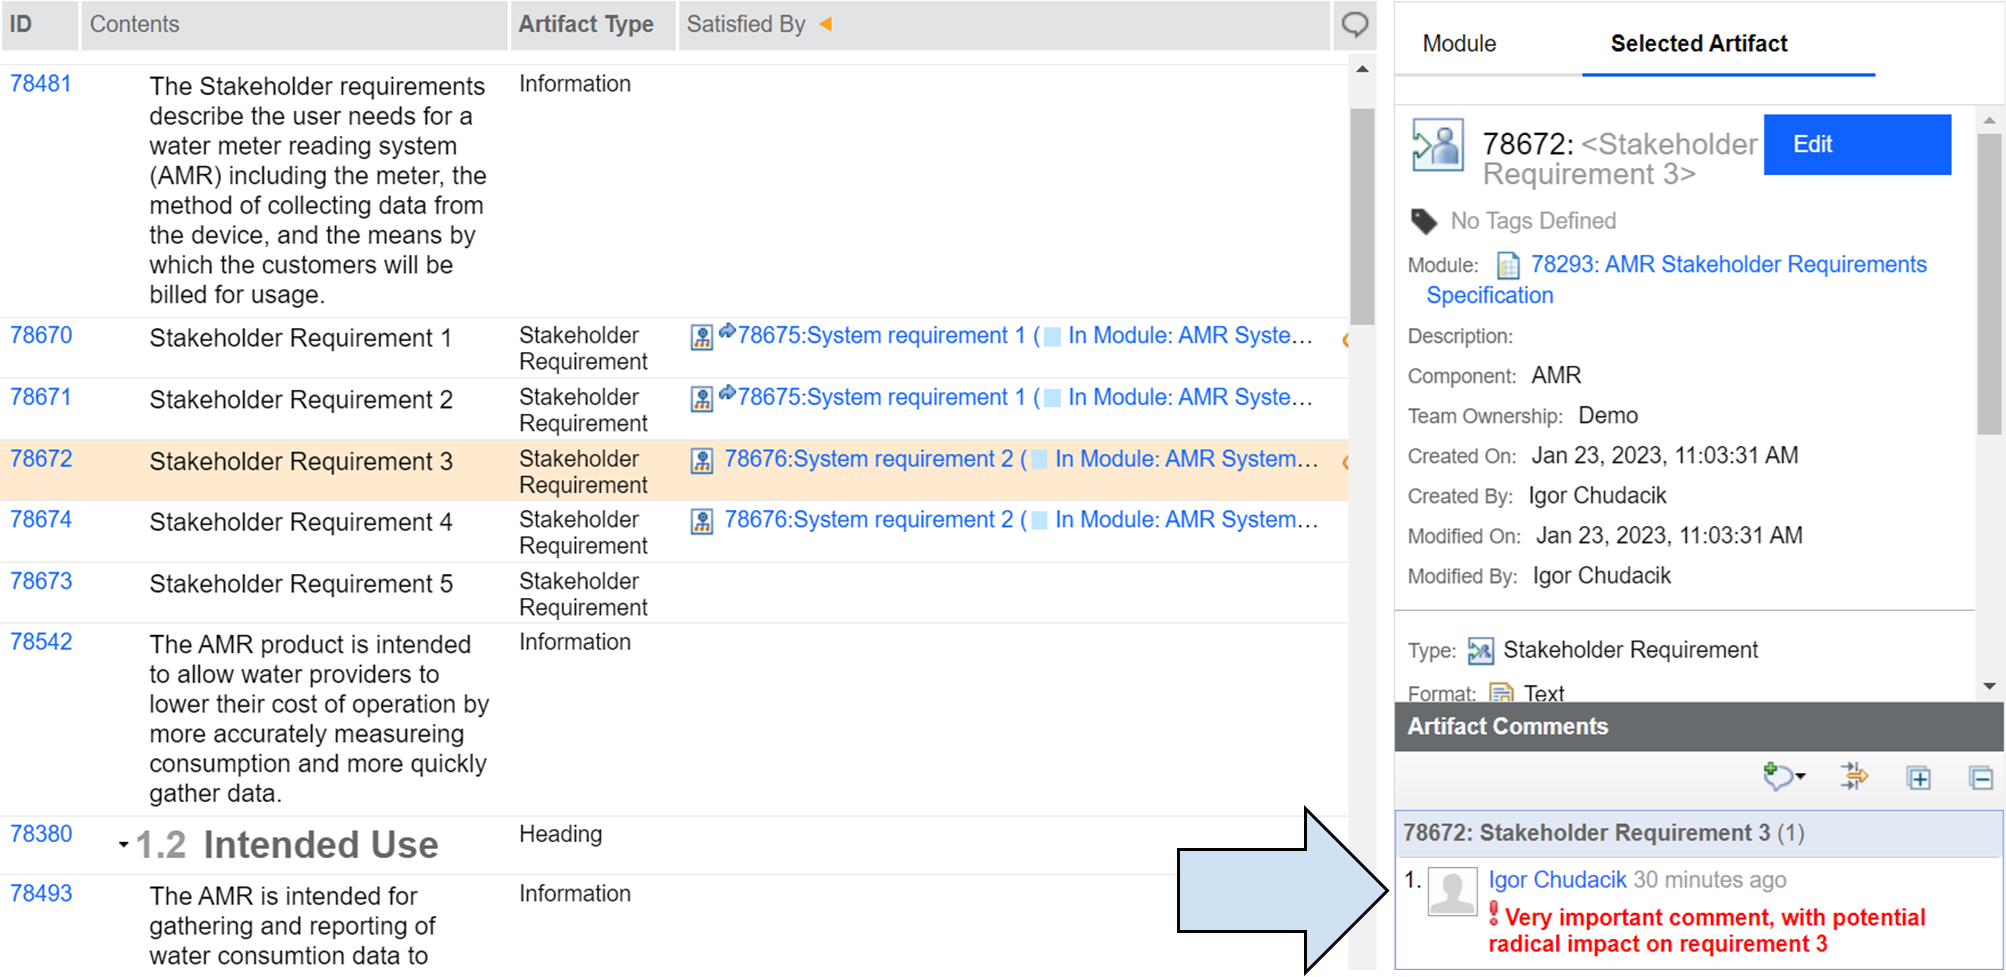
22.) Comment in the linked Artifact
-
Step 4 - Navigate back to the AMR System Requirements Specification module, find system requirement 1 and click on the link to artifact 78670: Stakeholder Requirement 1

23.) Click on another link
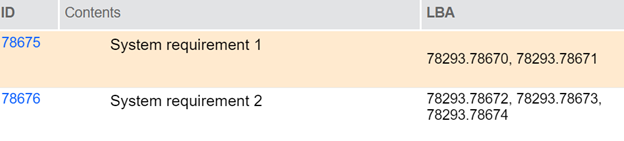
- Step 5 - Clicking on the link brought us to the base artifact #78670. The important thing to notice is that although we created a very important comment in the module artifact, it is not displayed here.
This is an expected result, because comments created for module artifacts are not propagated to the base artifacts, however, it can have serious consequences if we did not expect this behavior.

24.) Comment missing
Scenario 4 - Using Views for Link By Attribute
In this scenario we will show another way how to create multiple links between multiple artifacts at the same time. In case you are following these scenarios in your environment, please delete the links we created so far.
Goal - In the following example, we will show how it is possible to create links between any number of artifacts with a few clicks.
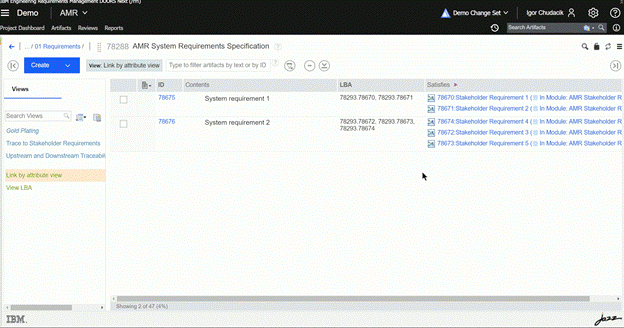
We will create a satisfaction link from artifact #78675 to artifacts 78670, 78671, and at the same time, we will create a satisfaction link from artifact #78676 to artifacts 78672, 78673, and 78674. As an artifact ID, you can use both representations - ArtifactID as well as ModuleID.ArtifactID. In our example, we will be using the second one and thus creating module artifact-to-module artifact linking.
- Step 1 - Type artifacts IDs to the LBA column for both system requirement artifacts.
25.) Fill the Attribute with IDs
-
Step 2. A - One of the options may be to select both artifacts, click on the artifact properties icon, and select “Link by attribute for 2 Artifacts”.
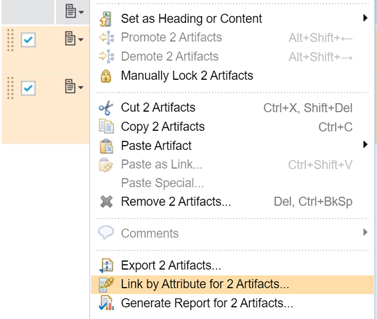
26.) Select "Link by Attribute for 2 Artifacts..."
The process afterward would be exactly the same as Steps 4,5 and 6 in scenario 1. For our demonstration, however, we will use a more advanced method.
- Step 2. B - Step 2.A. is a great alternative with a limited number of artifacts that are easy to find and select. In this step, we will demonstrate how to easily find any number of artifacts regardless of project complexity.
To find all artifacts that need to be linked, we will create a filter and save it as a new view.
To do this navigate to the filter icon, and find the LBA attribute. Next, choose the value “Exists”. This way all artifacts that have any value in the LBA attribute will be shown.
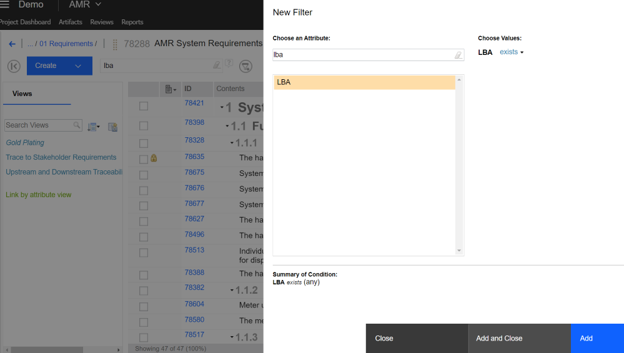
27.) Creating filter for the Attribute
-
Step 3 - Save the current filter as a new view by clicking on the “save as new view” icon and providing any name.
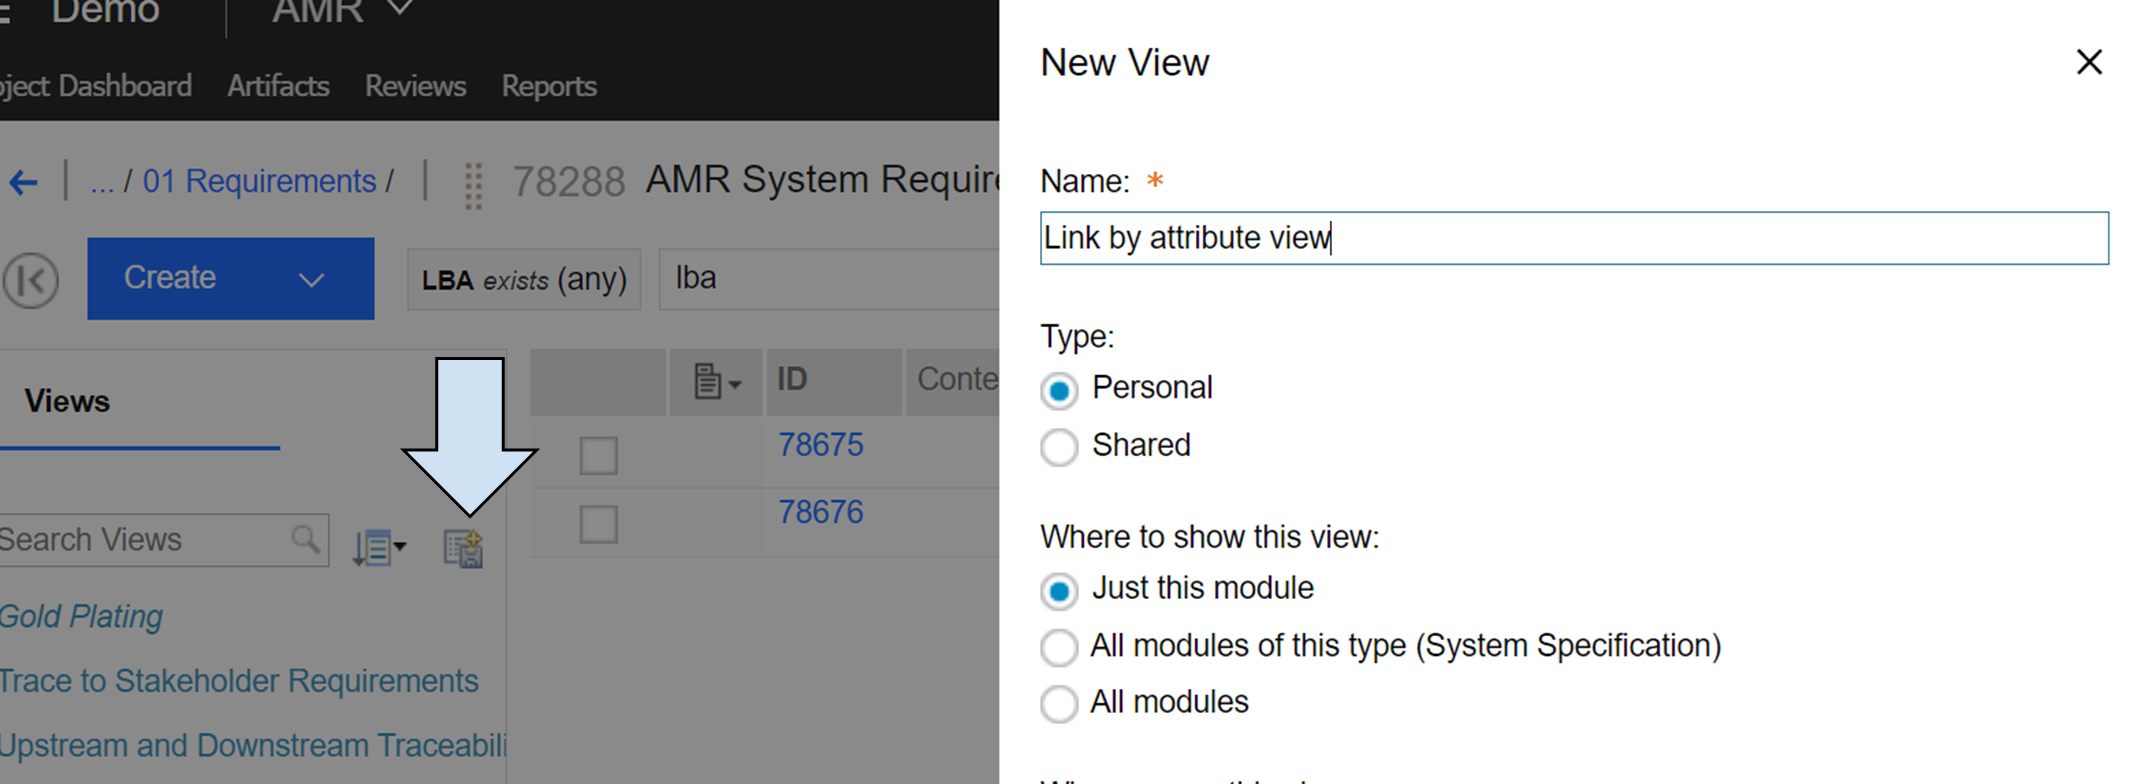
28.) Creating a view
-
Step 4 - Click on the “View options” icon next to your new view, select the link by attribute and continue as in previous scenarios.
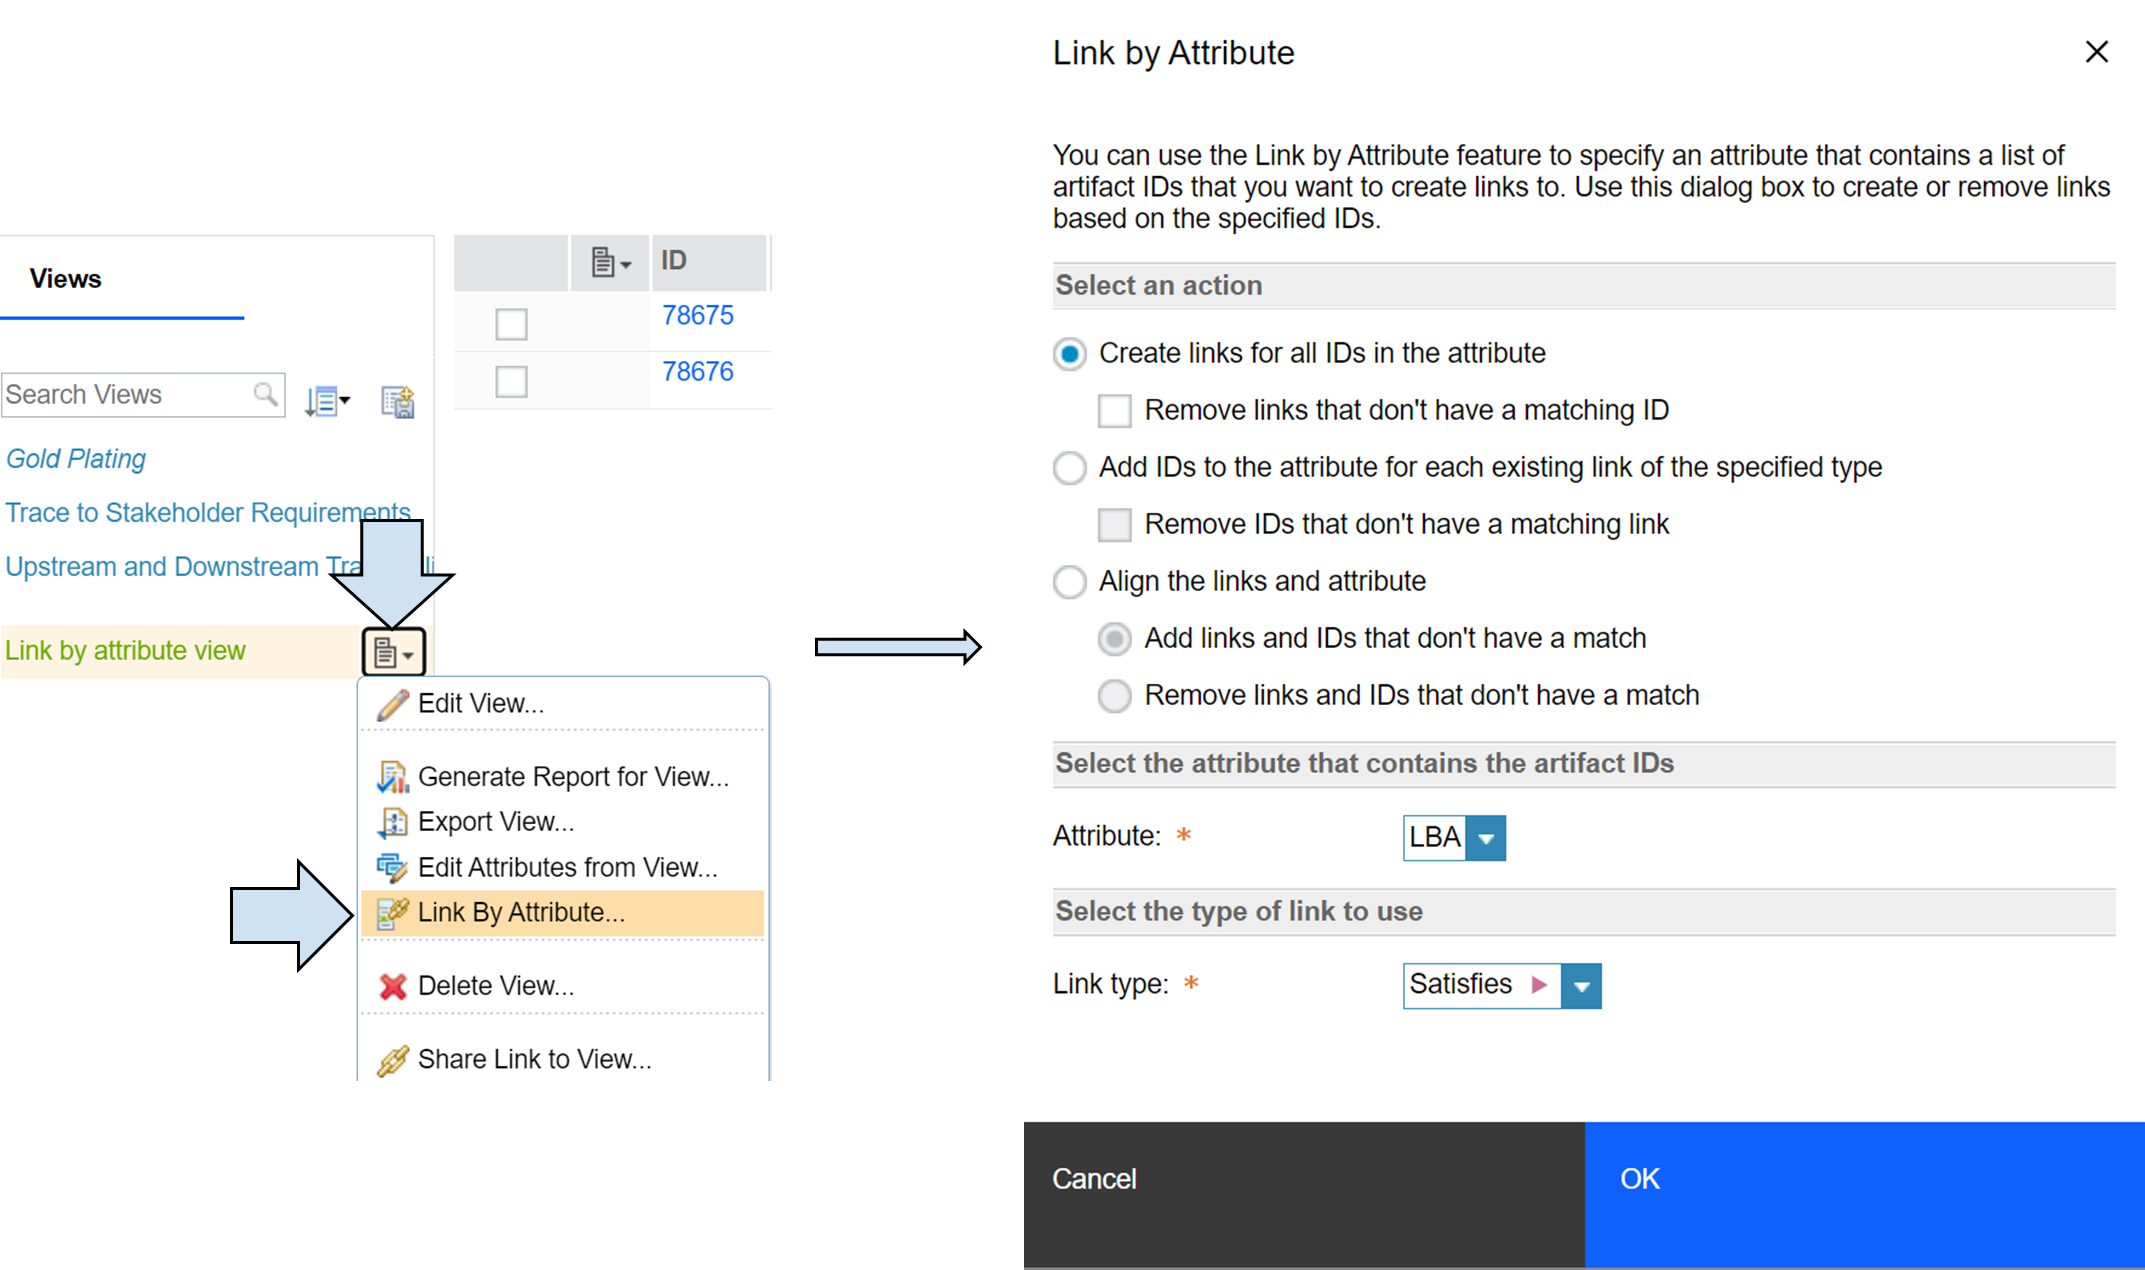
29.) Use Link By Attribute and define the rules
-
Step 5 - Review the changes
We can verify changes by looking at the “Satisfies” column in the AMR Systems Requirements Specification module and the “Satisfied by” column in the AMR Stakeholder Requirements Specification module.
30.) Created out links to the Artifacts in the Module
31.) Created in links for the Artifacts in the Module
This scenario demonstrated that it is quick and easy to connect any number of artifacts using the Link by Attribute functionality.
Observe the whole process in the animation below.
32.) Link By Attribute - creating links to Module Artifacts (animation)
Scenario 5 - Using Link By Attribute for Removing the Links
As you might see, link by attribute functionality provides more actions than just the ability to create links. It can also be used to delete links or to update links. In the next example, we will show how to delete links using the link by attribute functionality. Our starting point is the final state from scenario 4.
Objective -
- Delete all links from System requirement 1
- Modify link for System requirement 2 - leave only one Base Attribute a link to artifact #78673
We can do this in any ways described in this article - one by one, multiple at once using selection, or multiple at once using view. For this example, we will show the last option.
- Step 1 - Modify the attribute values in the LBA column.
- Delete all values for artifact #78675
- Deleting all IDs from the LBA artifact would remove it from the view, as the view filters all artifacts that have any value in the LBA attribute. For the artifact to stay in view, it needs to have any string - in our example, we will use “view holder”
- For artifact #78676 delete values 78293.78670 and 78293.78672
- To change the link relationship from the module artifact link to the base link, delete the module ID number.
- Delete all values for artifact #78675
33.) Create not IDs values for the Attribute
-
Step 2 - Click on the “View options” icon next to your new view, select link by attribute, choose “Create links for all IDs in the attribute”, and also tick the checkbox for “Remove links that don't have a matching ID”.
34.) Using Link By Attribute for removing the links
- Step 3 - Review the changes
As you can see in the pictures below, the changes were successful. Using just a few clicks we were able to delete links and update links from the module to the base artifact at the same time.

35.) Removed out link

36.) Removed in link
Observe the whole process in the animation below.
37.) Using Link By Attribute for removing the links - animation
Softacus Services
We, in Softacus, are experts when it comes to consulting and service delivery of IBM software products and solutions in your business. We help our clients to improve visibility and transparency when licensing and managing commercial software, providing measurable value while increasing efficiency and accountability and we are providing services in different areas (see Softacus Services).
IBM ELM extensions developed by Softacus are free of charge for the customers who ordered IBM ELM licenses via Softacus or for the customers who ordered any of our services. If you are interested in any of our IBM ELM extensions, you found a bug or you have any enhancement request, please let us know at info@softacus.com.
Related and Referenced Topics
Blog Articles:
Basics of Links and Link Types in IBM DOORS Next Generation - learn the basics about the linking and link types in IBM DOORS Next.
Linking Techniques in IBM DOORS Next - article explaining basic concepts and showing multiple ways of creation of links between artifacts.
Link Constraints in IBM DOORS Next - learn how to create link constraints in requirements management to ensure coherence and consistency in your project and how to prevent user errors and inconsistencies when creating links between requirements.
Softacus Widgets:
Link Switcher - widget developed by Softacus, that converts the context of artifacts links in a very short time.
Module Link Statistics - extension that provides users with a quick overview of the amount of the links in specific link types in a module.
Link Type Change- extension developed by Softacus designed to enhance the functionality of DOORS Next Generation by allowing users to manipulate the direction of a link or convert it to another type of link.
Links Builder- extension that allows the users to create a link between two artifacts in DOORS Next Generation according to the certain rules.
Link by Foreign Attribute - this extension allows users to create links between artifacts in the selected module(s), based on the attributes values.
Show Attributes of Linked Artifacts - this extension shows the attributes and links of the artifact that is currently selected.