Introduction
In this article, we will explore the essential part of requirements engineering - conducting an effective requirements review process with IBM DOORS Next. Read on to find out how to create reviews for individual artifacts, collections, and modules, and how to assign roles to team members to participate in the review. In easy-to-follow use-case scenarios, we will explore best practices, tips, and important considerations before and during a review. This is the first article in a series designated for the review process in Doors Next. Whether you're new to DOORS Next or a seasoned user, this article series has something for everyone.
In use-case scenarios we will be working with modules from one of the DOORS default templates - Automated Meter Reader, but the examples are not content-specific and you can use any modules to follow the scenarios analogously.
Reviews and Requirements Engineering
Requirements engineering is one of the most important parts of systems engineering or software development and it is a pivotal part in ensuring the success of the system or software. Reviewing requirements to check their correctness, completeness, uniqueness, consistency, and verifiability is therefore an inherent part of the requirements engineering lifecycle.
In this article, we will explore the built-in review process in a DOORS Next project that doesn't use features of configuration management. This review is a collection of artifacts that you create to be checked, reviewed, and approved.
It is possible to create a review of the following objects:
- Selected individual artifacts
- Collections
- Modules
You can designate one or more team members to participate in the review. In our example scenarios, we will create reviews with 3 reviewers (to cover all three potential roles in the review). Depending on the participant's role, they can approve, disapprove, review, abstain from reviewing each artifact, or potentially do nothing and just observe the review process as their participation is optional. Review participants can have one of the following three roles:
- Reviewer - default role that can comment, review or abstain from reviewing the artifacts. To finalize and close the review, the reviewer must abstain from or review all artifacts in the review.
- Optional reviewer - is role analogous to the reviewer with one distinction - optional reviewer doesn't have to review the artifacts for review to be considered complete a finalized and progress of the optional review does not impact the overall calculated progress of the review
Approver - must approve, disapprove or abstain from every artifact before the review can be considered complete and finalized.
Important Considerations Before Starting the Review
One important decision before starting the review is to choose between creating the review in a stream and creating a project baseline. In the next section, we will cover the pros and cons of both options.
Creating a Review from the Baseline
A baseline is a snapshot of the project at a certain moment in time. Artifacts in a baseline are not modifiable or editable, therefore by creating a review from the baseline you can ensure that artifacts can not be changed during the review process.
- Pros - Artifacts in a baseline are frozen and it is not possible to modify them. It is often the preferred option in tightly regulated industries.
- Cons - The first disadvantage is that conducting a review from the baseline doesn't allow us to create links or save custom views (either personal or shared) even in the review context. The second disadvantage of not being able to implement changes to react to the findings in the review means that our process timeline may look as follows:

1.) Using of Review and Baselines on timeline
- Step 1 - Creation of baseline before the review. No changes can be made to the baseline, therefore we can be sure that the requirements we are reviewing can not be modified.
- Step 2 - Conducting the review
- Step 3 - If there were any findings during the review, we can follow up by implementing the required changes in a stream or changeset.
- Step 4 - Creation of the second baseline - again to freeze the configuration
- Step 5 - Conducting the review to check if this time is everything correct (if not you can do Steps 3 and 4 again)
- Step 6 - Creating “official” baseline - to have a snapshot of configuration that was approved and deemed valid at that point in time.
Creating a Review from the Stream
- Pros - Artifacts are modifiable - It is possible to make or apply any changes and adjustments if there is a finding during the review process. Creating reviews from the stream is often the preferred option by customers using agile methodologies.
- Cons - Artifacts are modifiable - Artifacts selected for the review are not frozen and the team is able to work on the artifacts during the review process. That may have potentially negative consequences. As an example picture scenario, where the team made a high-impact mistake in artifacts that were already checked for correctness and will not be rechecked.
- Workaround - Manually lock artifacts for editing. Use this workaround if you expect that requirements will not change significantly therefore you choose to create a review from the stream, you can ensure consistency of artifact content and attributes by manually locking artifacts that are subject to review. Although a valid workaround, it is not a perfect solution because locked artifacts can still be linked, commented on, promoted/demoted and changed in the hierarchy structure, and even deleted.
Another workaround may be using a workflow with custom permissions, where you don’t permit users to do changes to the artifacts with under review status.
Module Reviews
Before explaining the principles, benefits, best practices, and disadvantages of module reviews note that it is not a special type of review, where only modules can be used. It is possible to combine collection artifacts, base artifacts, and modules in the same review. The reason to include a review of the module to separate article segment is slight a difference in the review workflow. Also note that you may find more information in our second article DNG reviews 2 - tips and tricks.
Conducting a review of a module and its artifacts is the most common use-case. To showcase its workflow, benefits, and limitations we will use the following scenario, where will be using slightly modified* AMR System Requirements specification module. *(Only artifact attribute values were modified, therefore you won't have a problem following the scenario and trying it yourself).
Creating Review
Decide between conducting the review in the stream or in a baseline
The first and very important step is to decide between creating a review from the stream or the baseline.In our scenario, we will be creating a review in the current stream. You can check your current configuration context in the top right corner, where you can also create and switch to baseline.
2.) Local Configuration Name
Creating review
To create the review, you have multiple options.
- Click on the reviews in the upper left corner (You can be in a folder view or in the module) and than click on “Create”
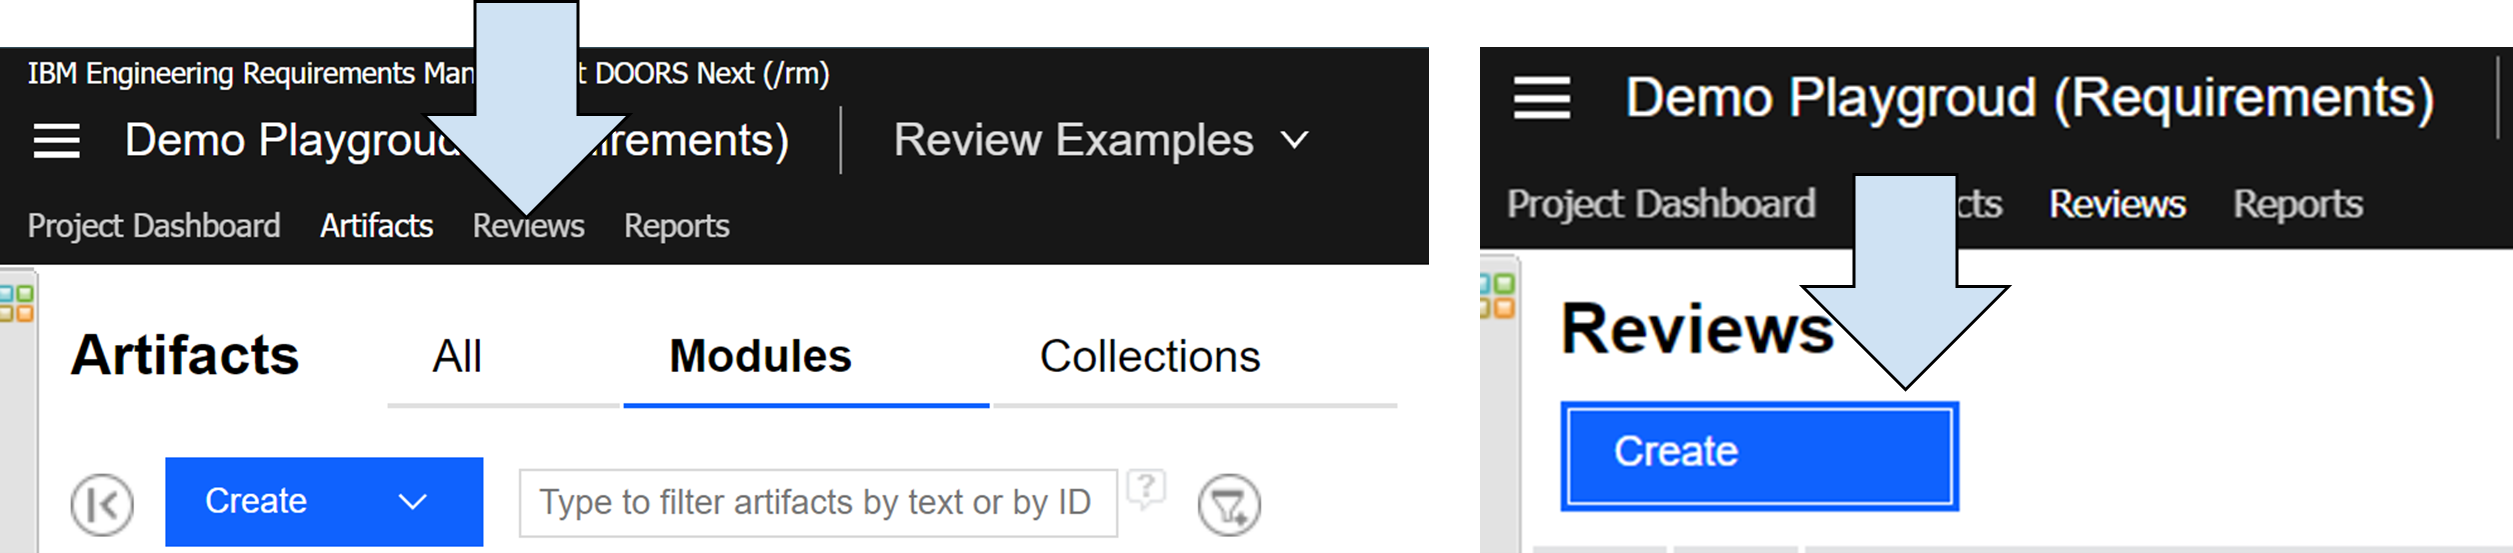
3.) Select Reviews and create the Review
- Second option is to click on the artifact settings button and choose “Create Review Containing Artifact”
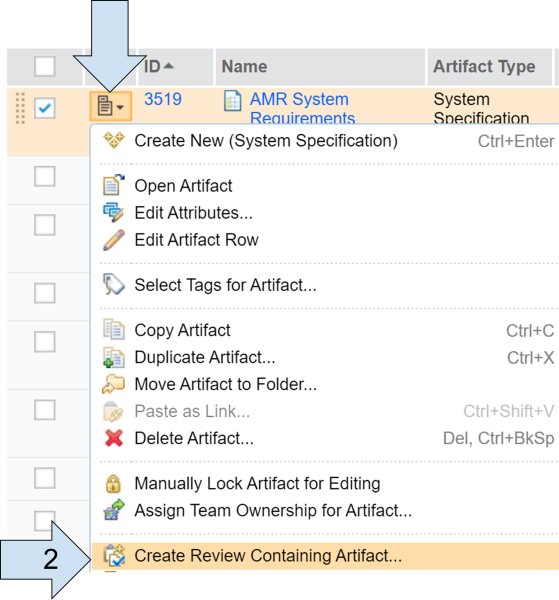
4.) Create Review containing specific Artifact
- Third option is to go inside the module, navigate to the upper right corner, click on “More actions” menu and select “Create review”
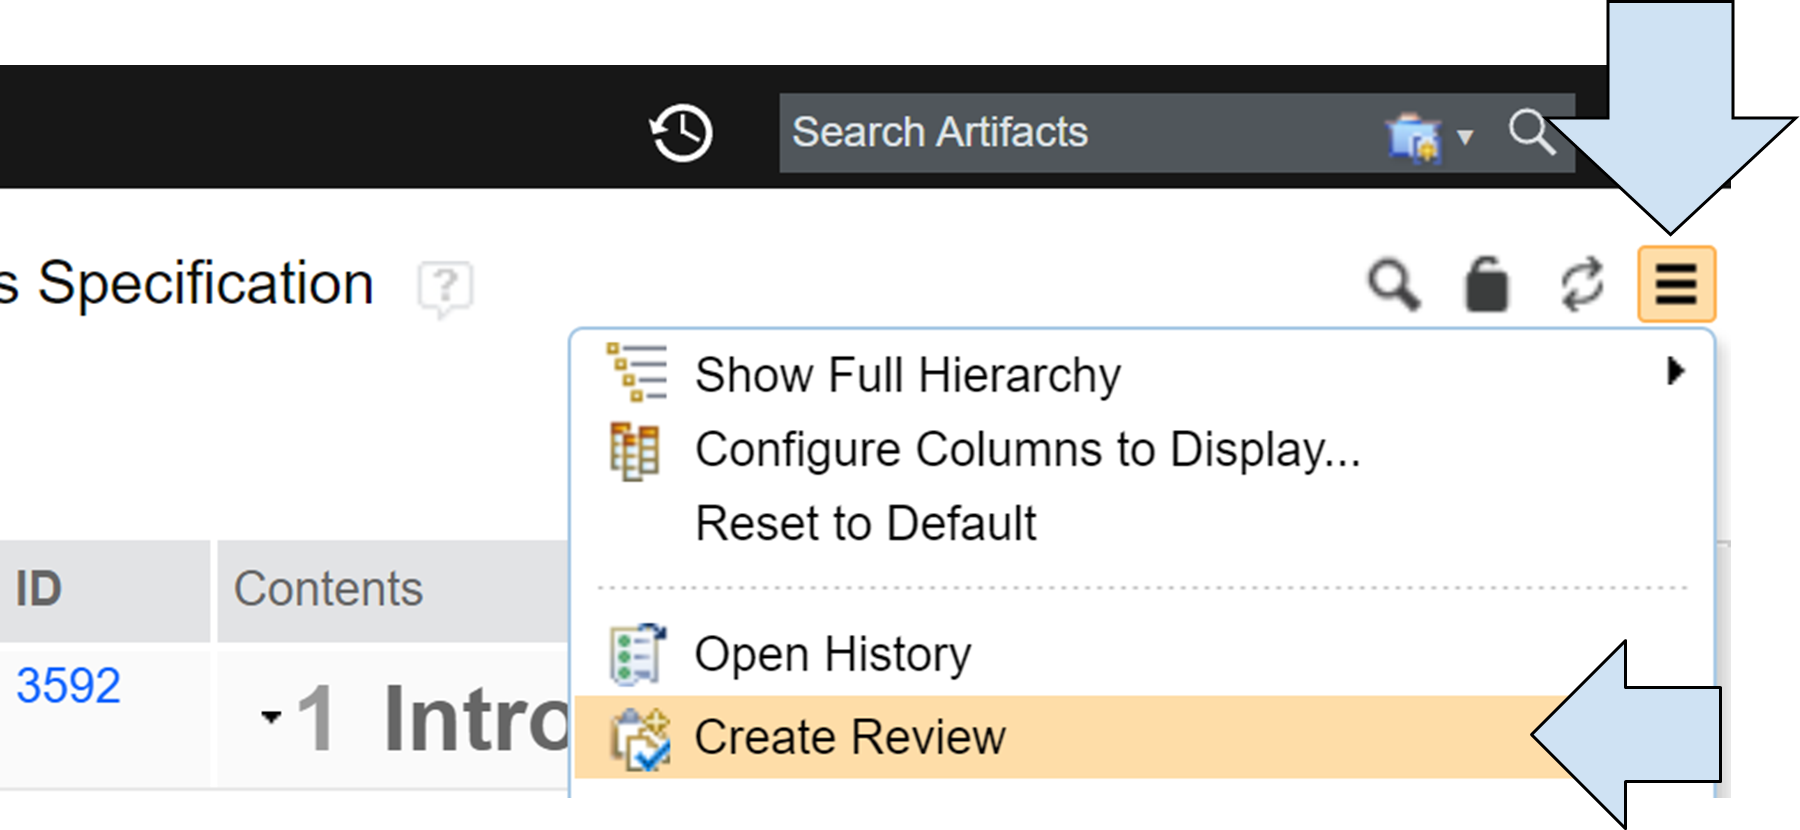
5.) Create Review from Module
Please note, that it is possible to add modules to the review, but it is not possible to select individual module artifacts for the review. In the DNG reviews 2 - tips and tricks article, we will show potential workarounds that can be used if you need to review just selected sections/artifacts.
Name the review, add optional description, and click OK
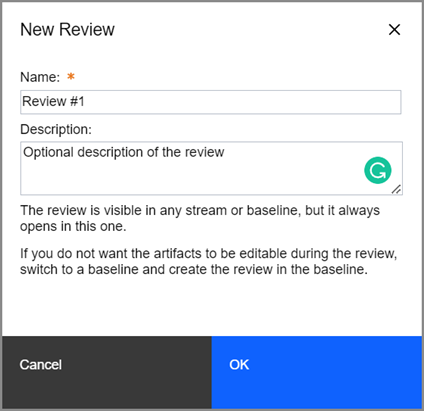
6.) Create Review dialog window
Set up review (participants, roles, instructions, due date, artifacts)
The first - initial state after creating the review is Draft. This is the state where creator will set up details of review.
- Optional steps - Choose due date and include review instructions to reviewers
- Choose due date - by default due day is set to one week from creation of the review.
- Write review instructions to reviewers. It is always beneficial to include additional information to reviewers.
- Save the review
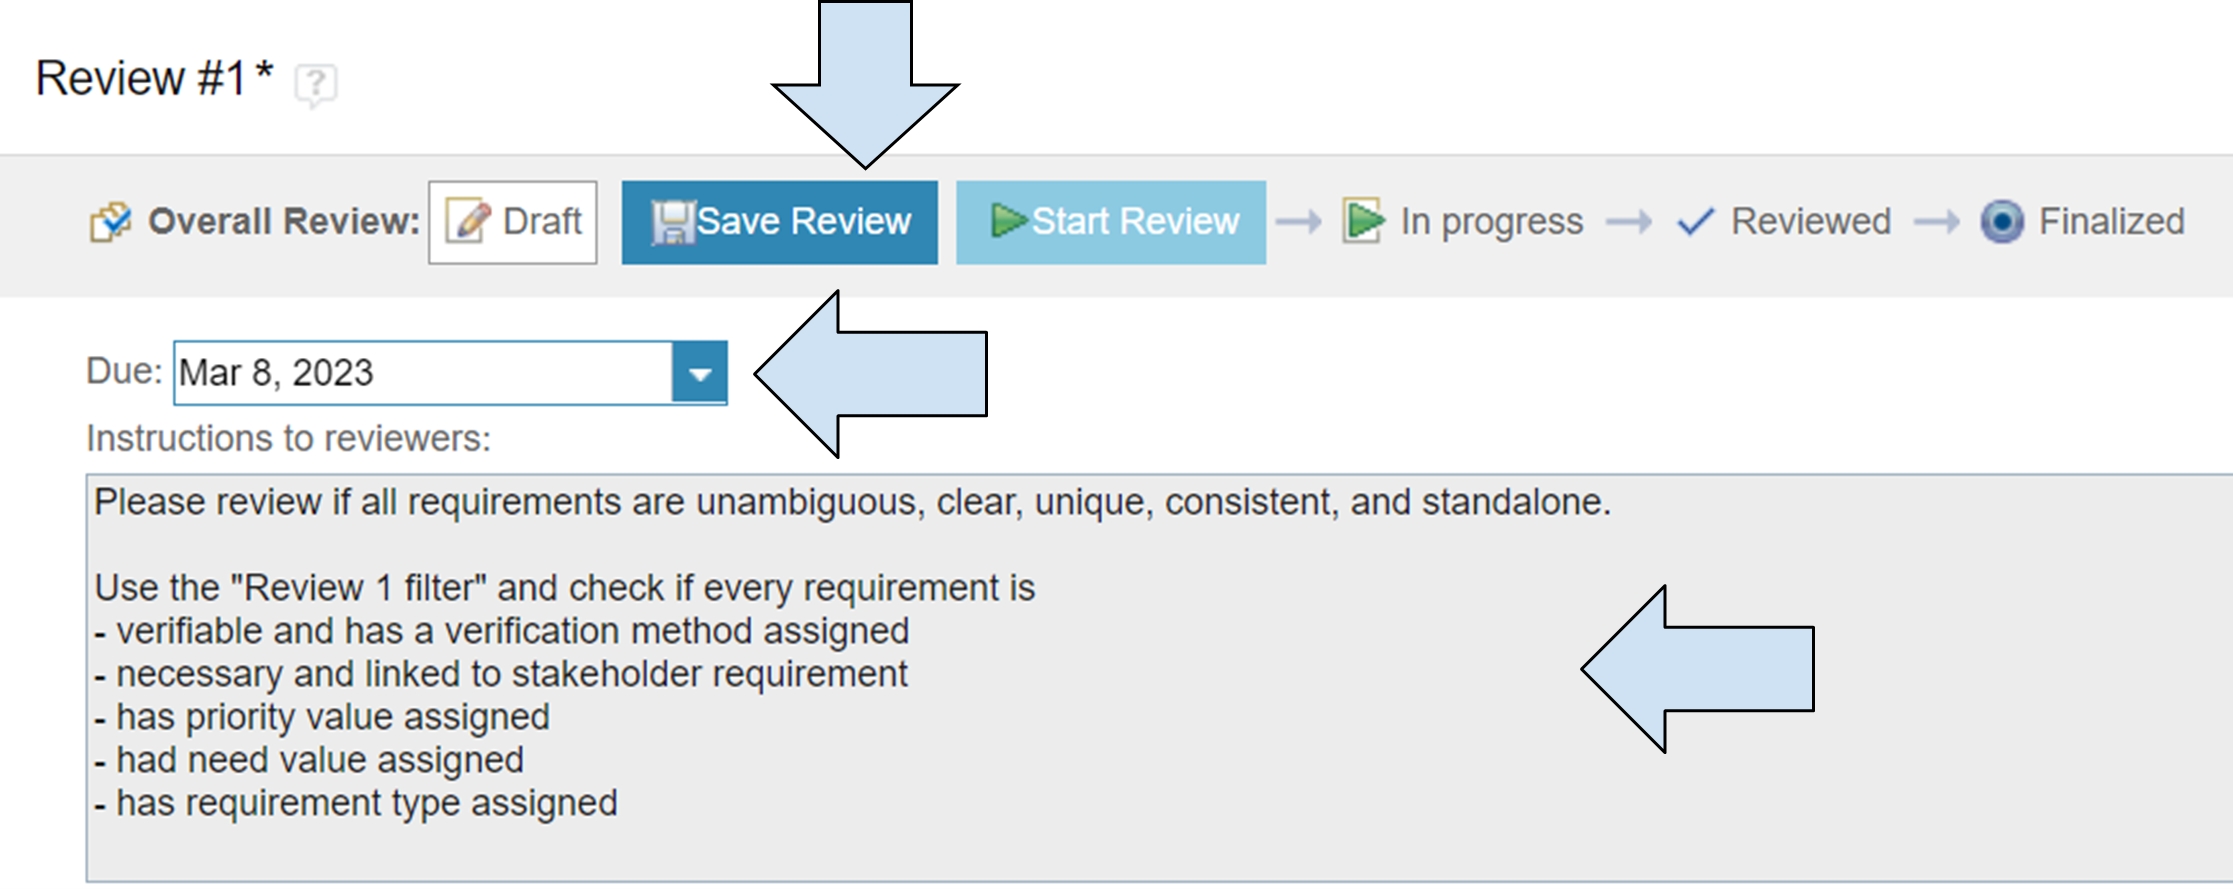
7.) Setup Review
- Add participants
- Click on Add Participants
- Find user/users that will be participating in the review - You can search by name, or use star symbol * to show all users in the project
- Select the users - we selected three users just to demonstrate different reviewer roles
- Click OK
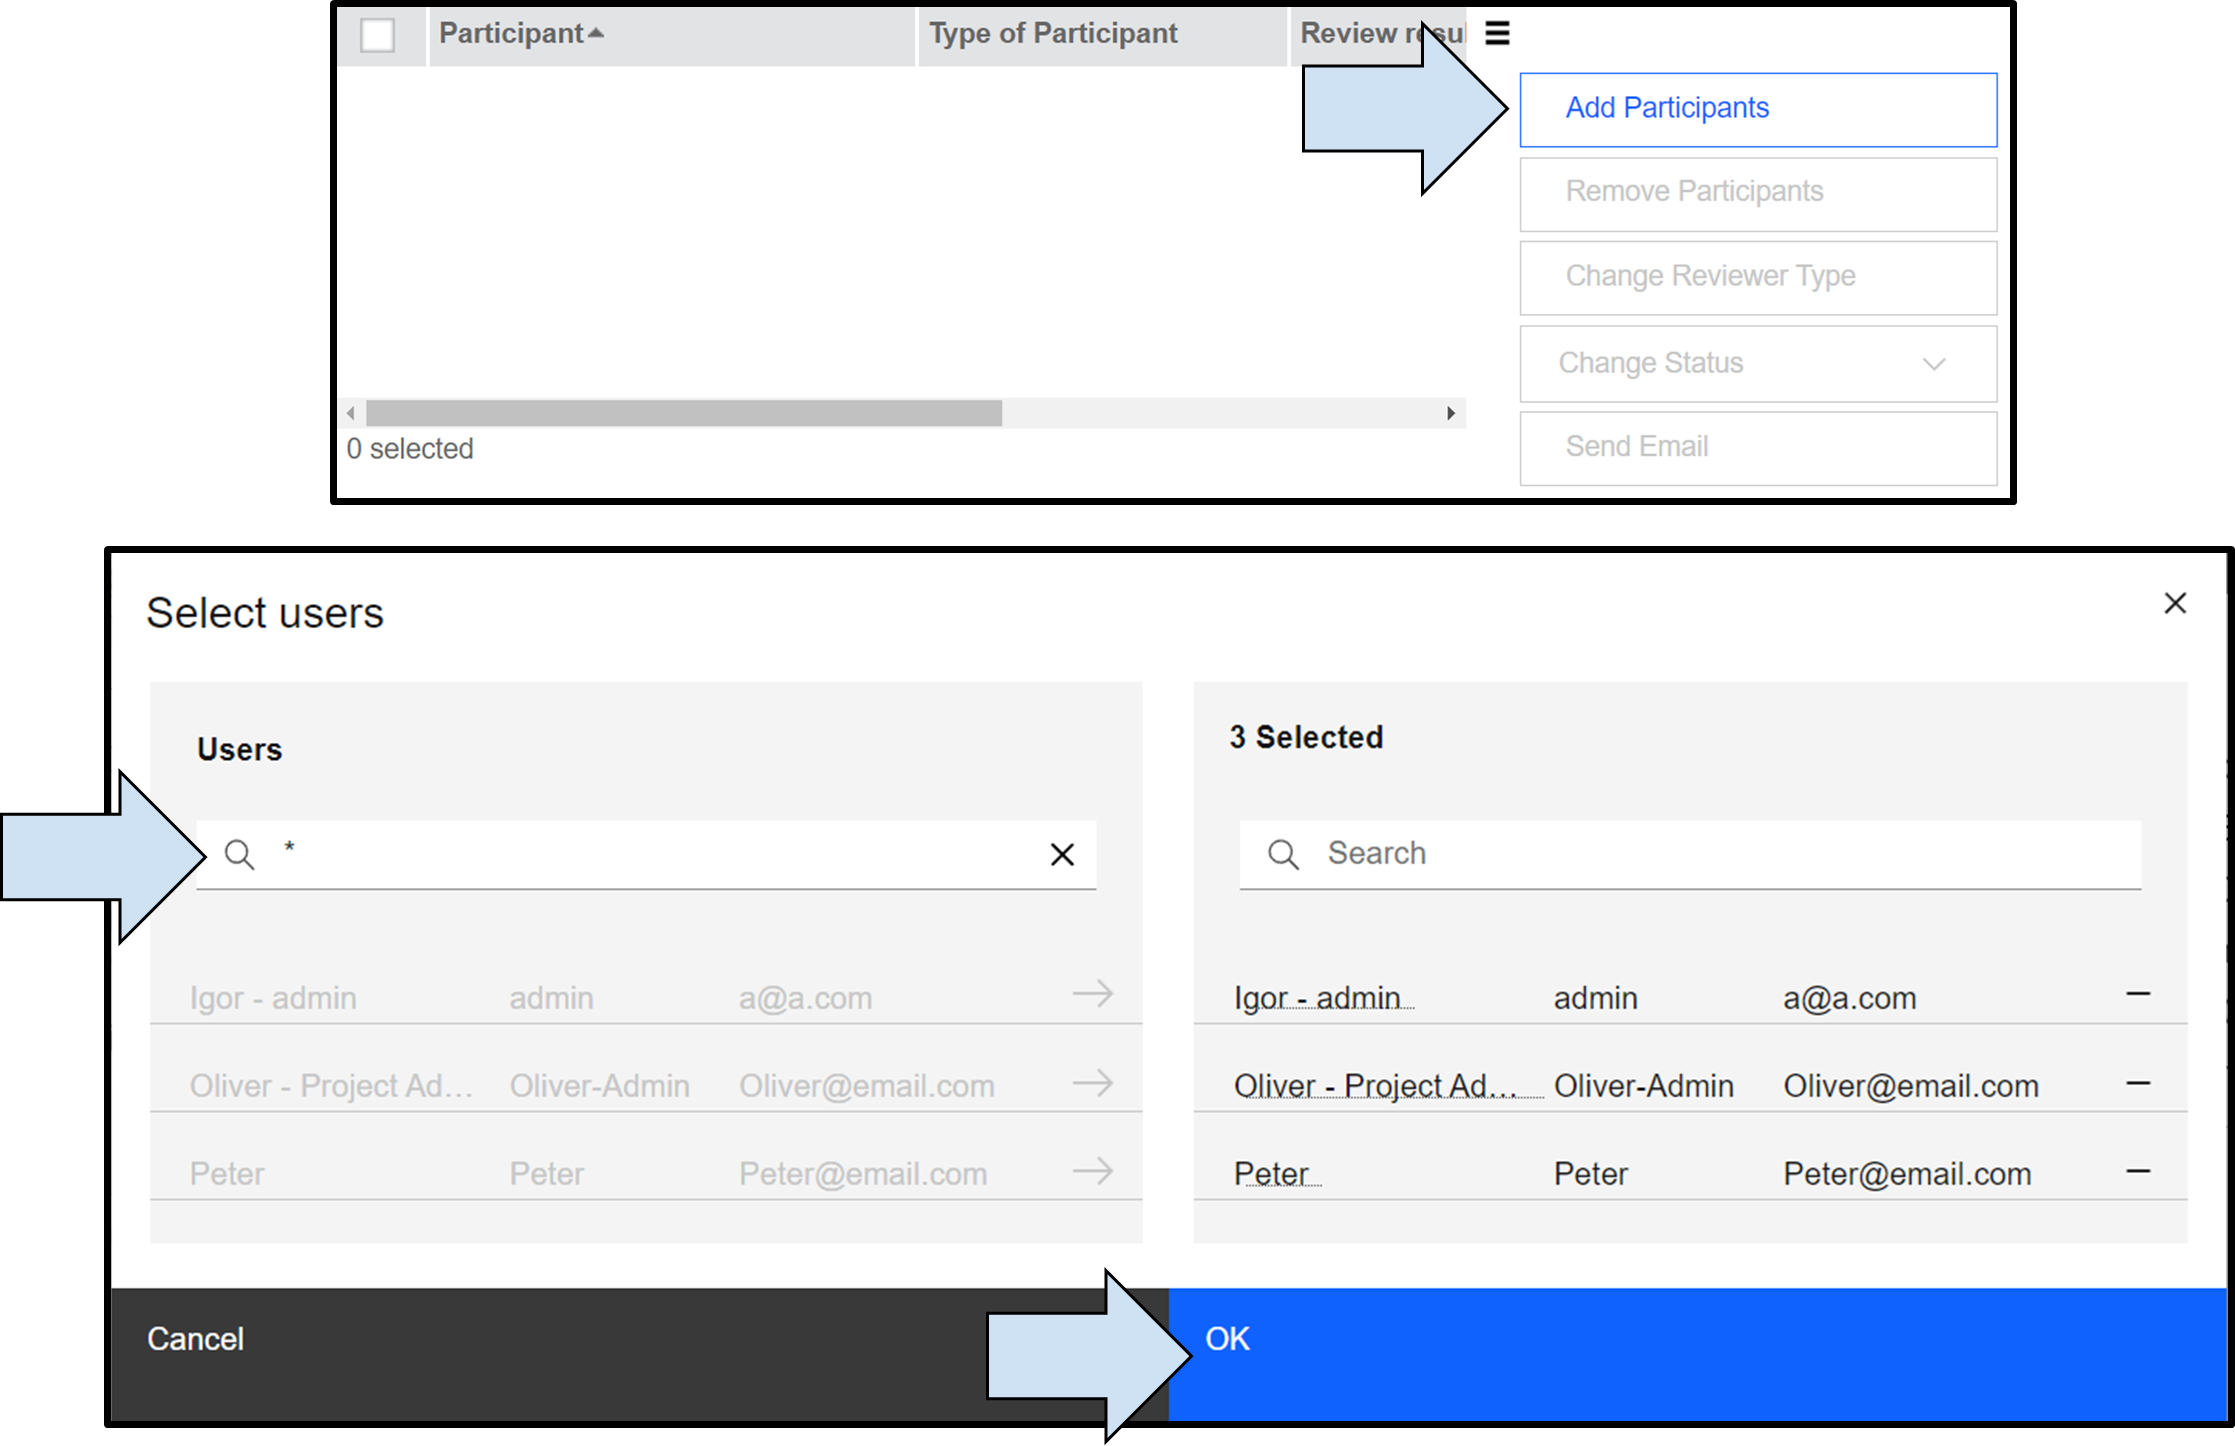
8.) Add Participants to the Review
- Change participant type. To Igor - admin we will assign Approver role and to Pete we will assign Optional Reviewer role.
- Click on the participant you want to assign different role
- Click on Change Reviewer Type
- Select appropriate role
- Click on the OK
- Optional - you can send emails to the participants informing them about review, their role, obligations etc.
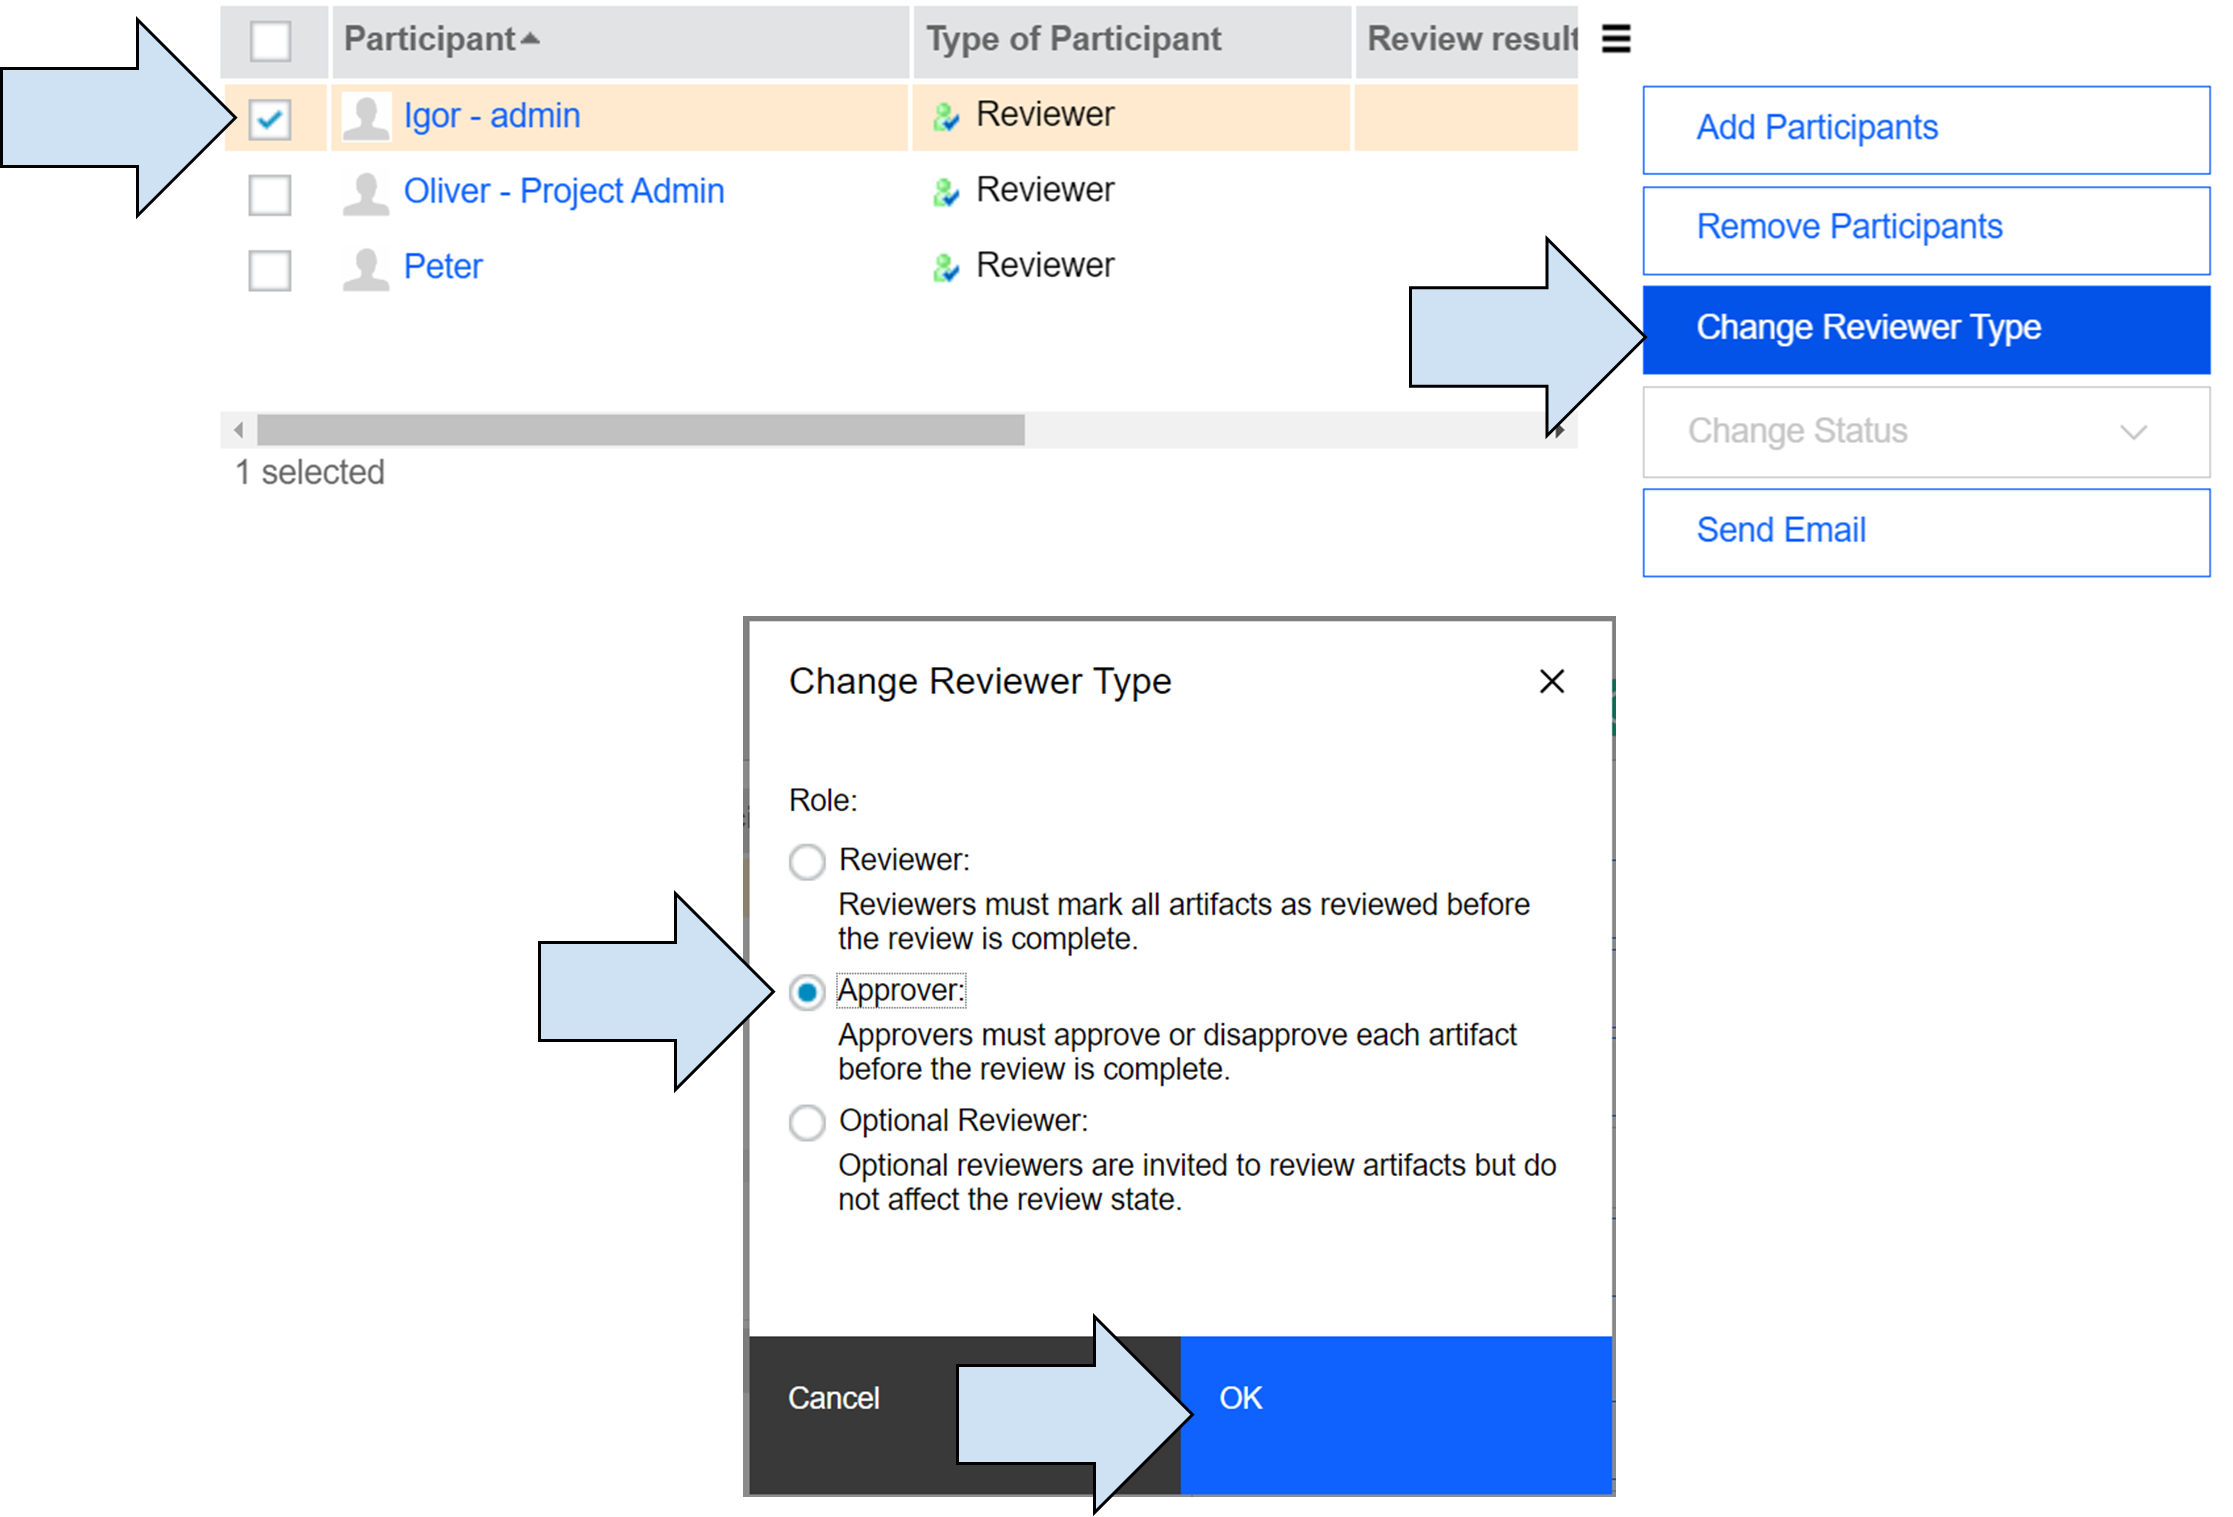
9.) Change Participant Type
- Add Artifacts to review
At this step you can add artifacts to review. Depending on the option you chose at first step “Creating review” you already may have module artifact “AMR System Requirements specification” in your review. If not follow the next steps:- Navigate to the right and select “Add artifacts”
- Find and select AMR System Requirements specification module
- Click on “Add and Close”
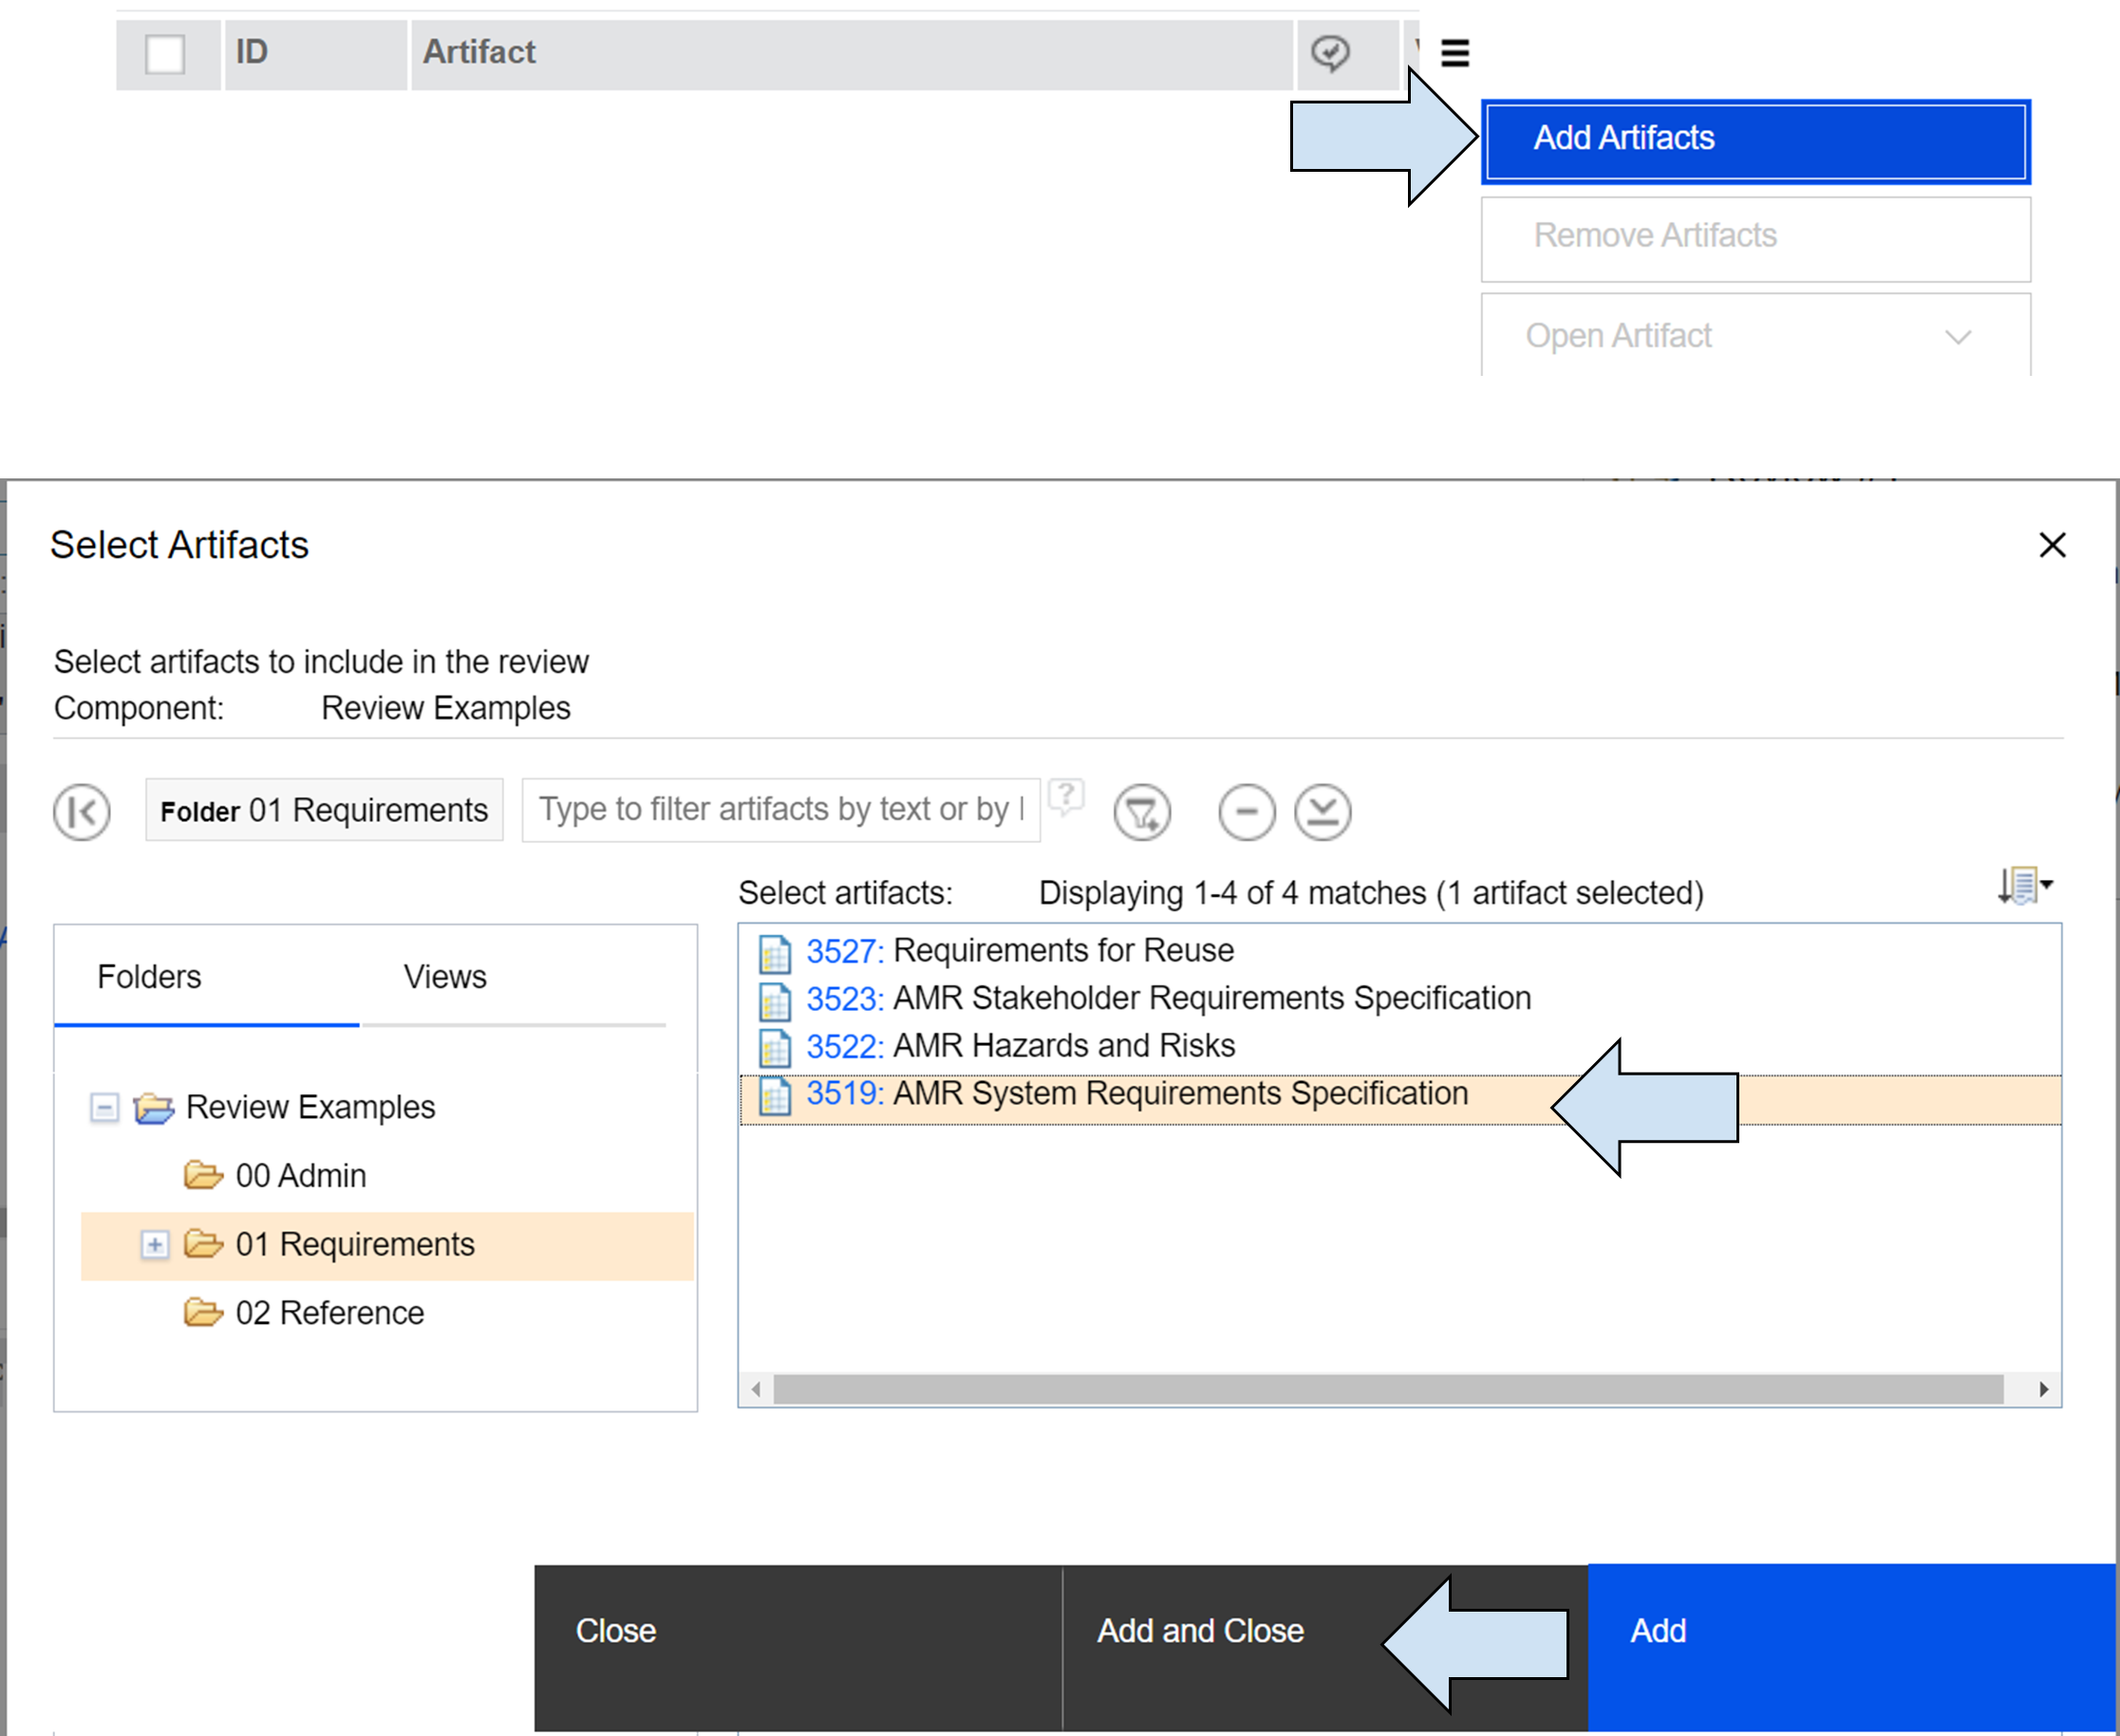
10.) Add Artifacts to the Review
- Save the review and start the review
- Save the review
- Start the review and observe, that in will transition to “In progress state”

11.) Save and start the Review
Note: While review is in progress, it is not possible to change participants, their role, or change artifacts. To do this, you need to “Pause review”. Note that when review is paused, review participants are not able to mark artifacts as reviewed or add comments.
Review the Module
To review the module click on the module name, and you will transition to reviewing the module.
Observe the review state (In progress) and approver review options (Approve, Disapprove, Abstain). You can see different review options if your user is participating as reviewer not approver.
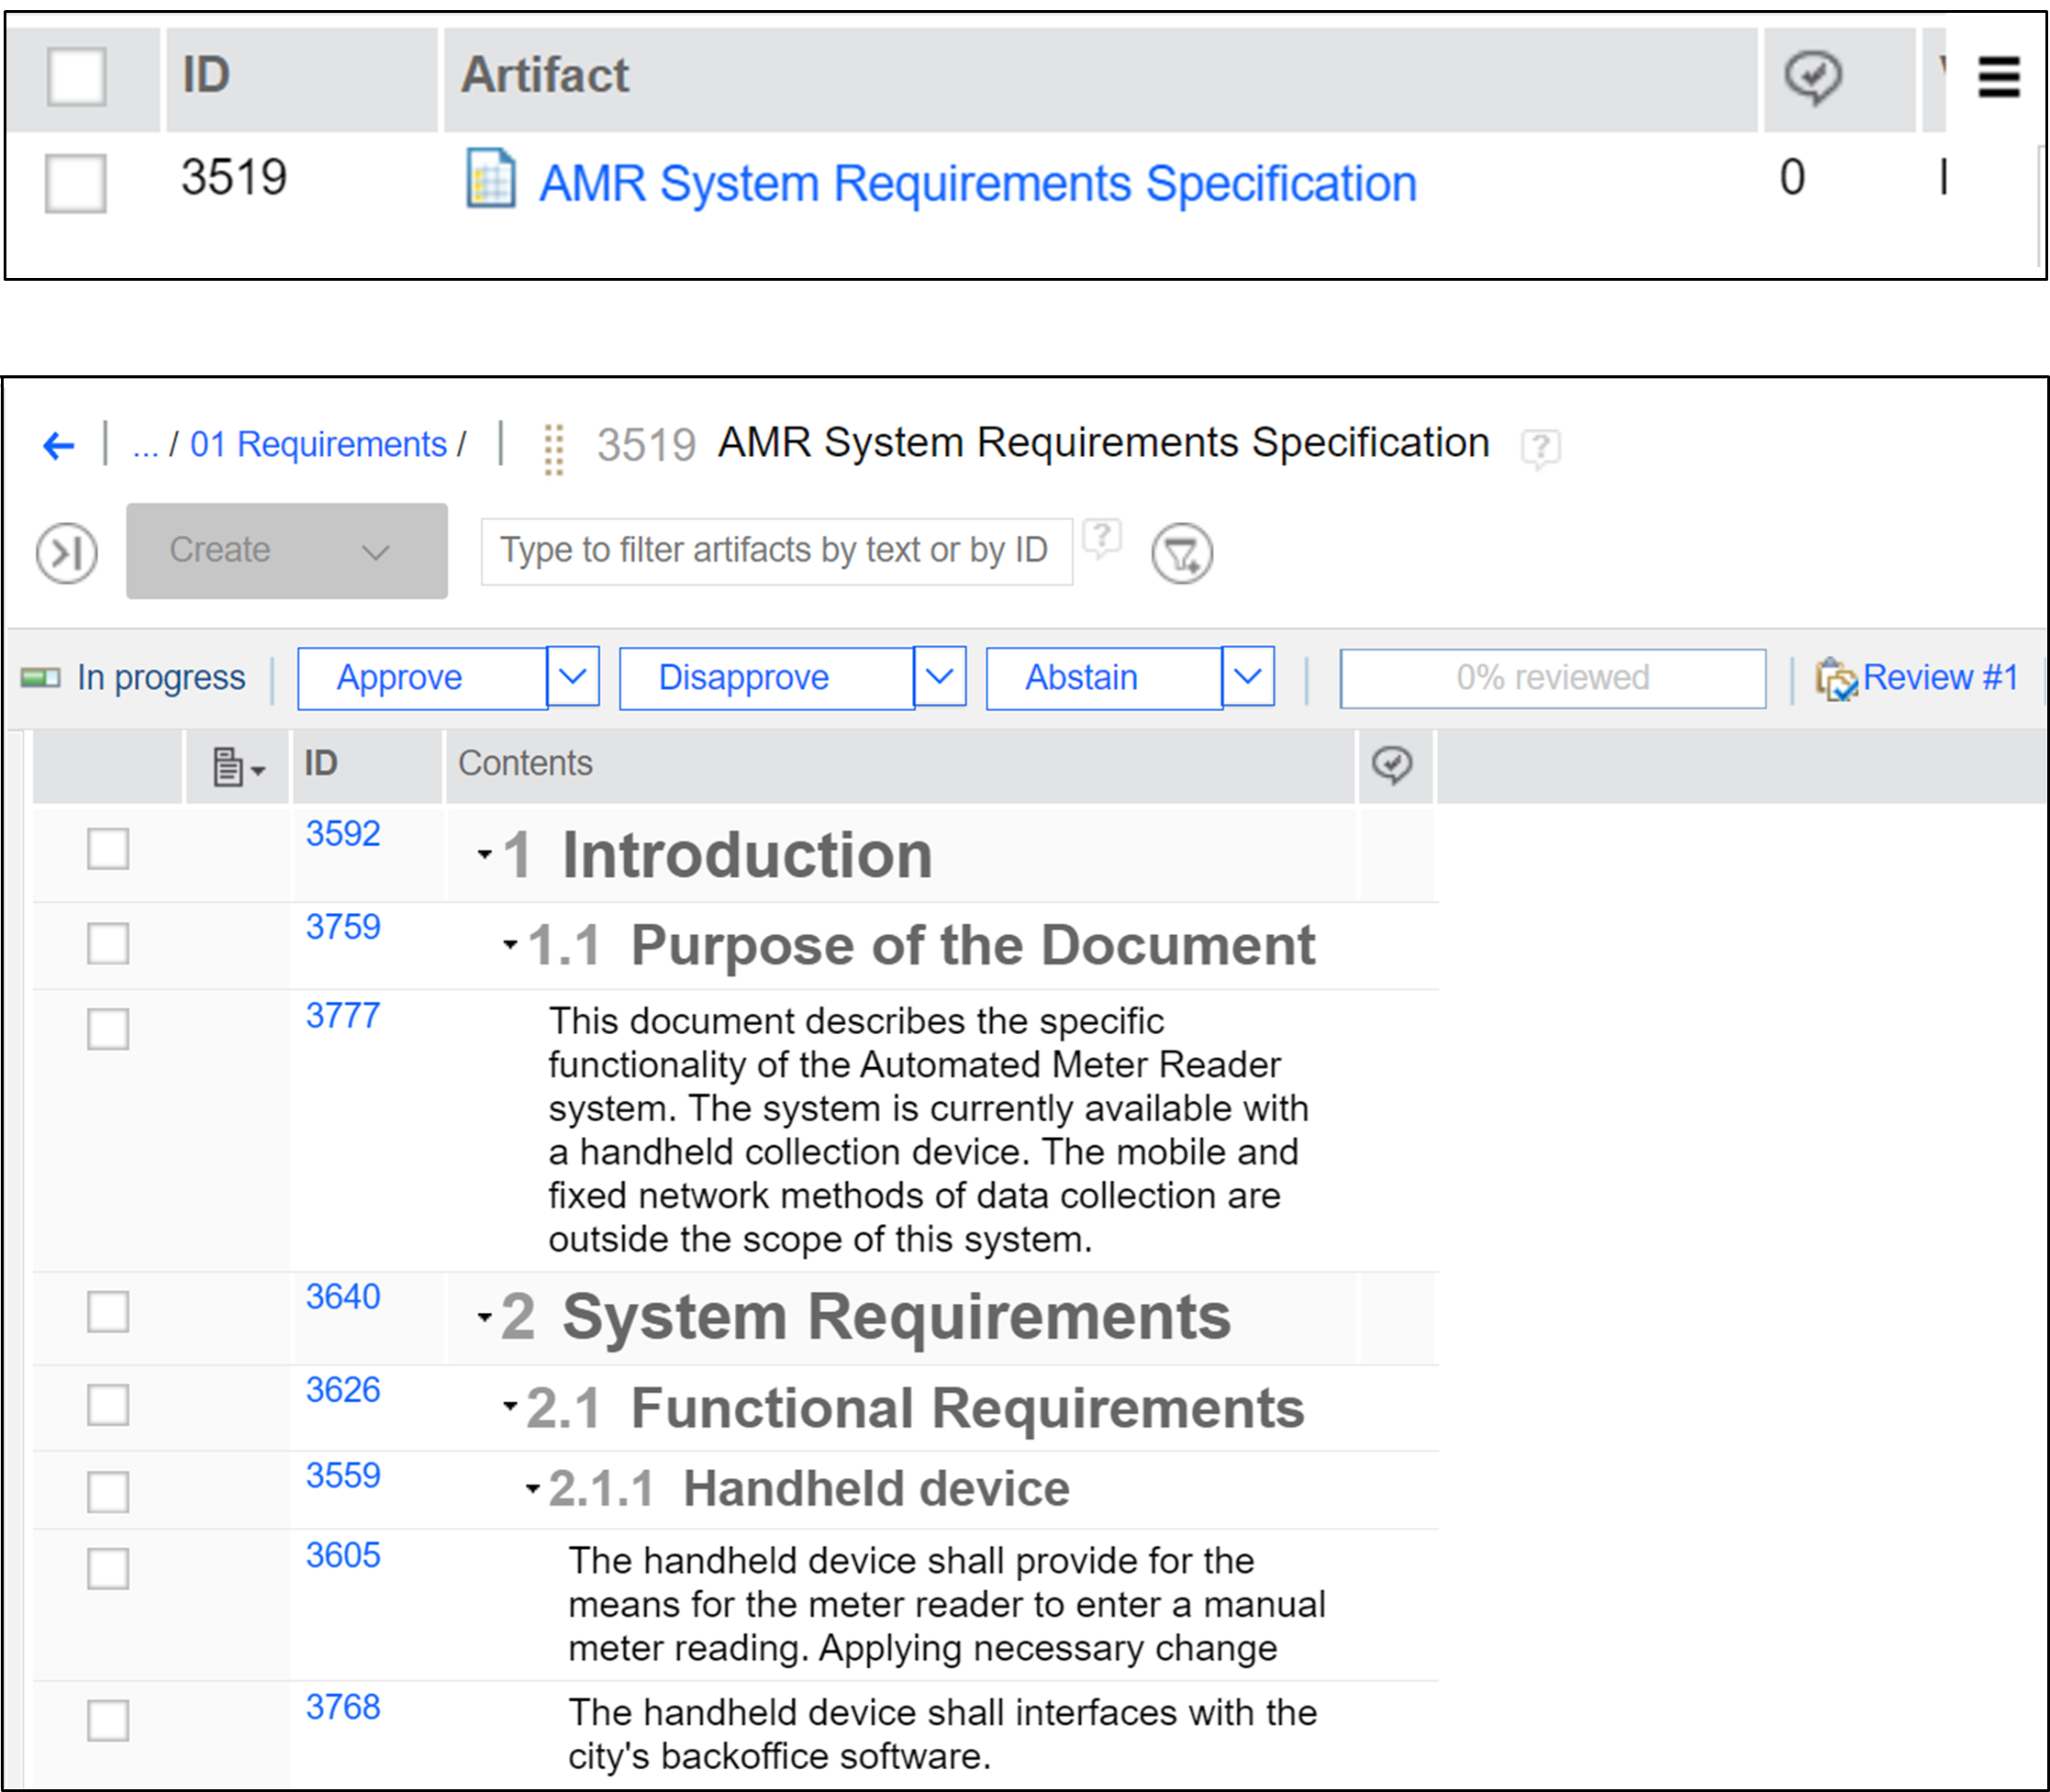
12.) Module Review
Important - You can quickly realize that there is no way to review / abstain from / approve / disapprove individual artifacts. You can only review the whole module. In a complex project with hundreds of artifacts this can be a significant disadvantage. We will cover workaround tips in the DNG reviews 2 - tips and tricks article to demonstrate how simple tricks may help you to focus on individual artifacts during the review. In the following section however, we will cover the basics of the review process and its standard tools.
Review Comments
Review comments are probably the most important tool in the review toolset. Comments in reviews are used in the exact same way as in the module - therefore you can use them to discuss reviewed artifacts, provide feedback, ask questions, share objections, etc. It is possible to create comments for individual artifacts in the module as well as for the entire module itself. Comments may have different priorities and it is possible to direct them to the selected review participant that will be notified by email.
Another useful feature is the ability to resolve a comment or comments thread which is useful to quickly see if questions/objections/reservations were resolved or if there is still an active discussion topic.
Important - Although review comments and standard comments share their capabilities, they are not the same thing. Review comments are visible only in the review context. Commenting the artifact in the review will not be shown outside the review.
Best practice - You should utilize comments as much as you can, instead of using emails or chat applications. This way, there will be a single source of truth with all necessary context, that is visible to all reviewers in the context of the actual tool and review. It may be also useful for any future traceability back to the original questions and their resolution.
Creating Comments
In the following scenario we will demonstrate how comments are created and used in the review process.
To create comment you may:
- Right click on the artifact > comments > Create comment for the artifact
- OR alternatively you may use CTRL+M
- Or simply click on the comment icon next to the artifact
Then fill the comment window, where you may
- Include subject
- Body
- You may direct this comment to selected colleagues. They will be notified about it via email. In our example we directed this comment to Peter
- Choose priority - we changed the priority to High
- Submit by clicking on the OK
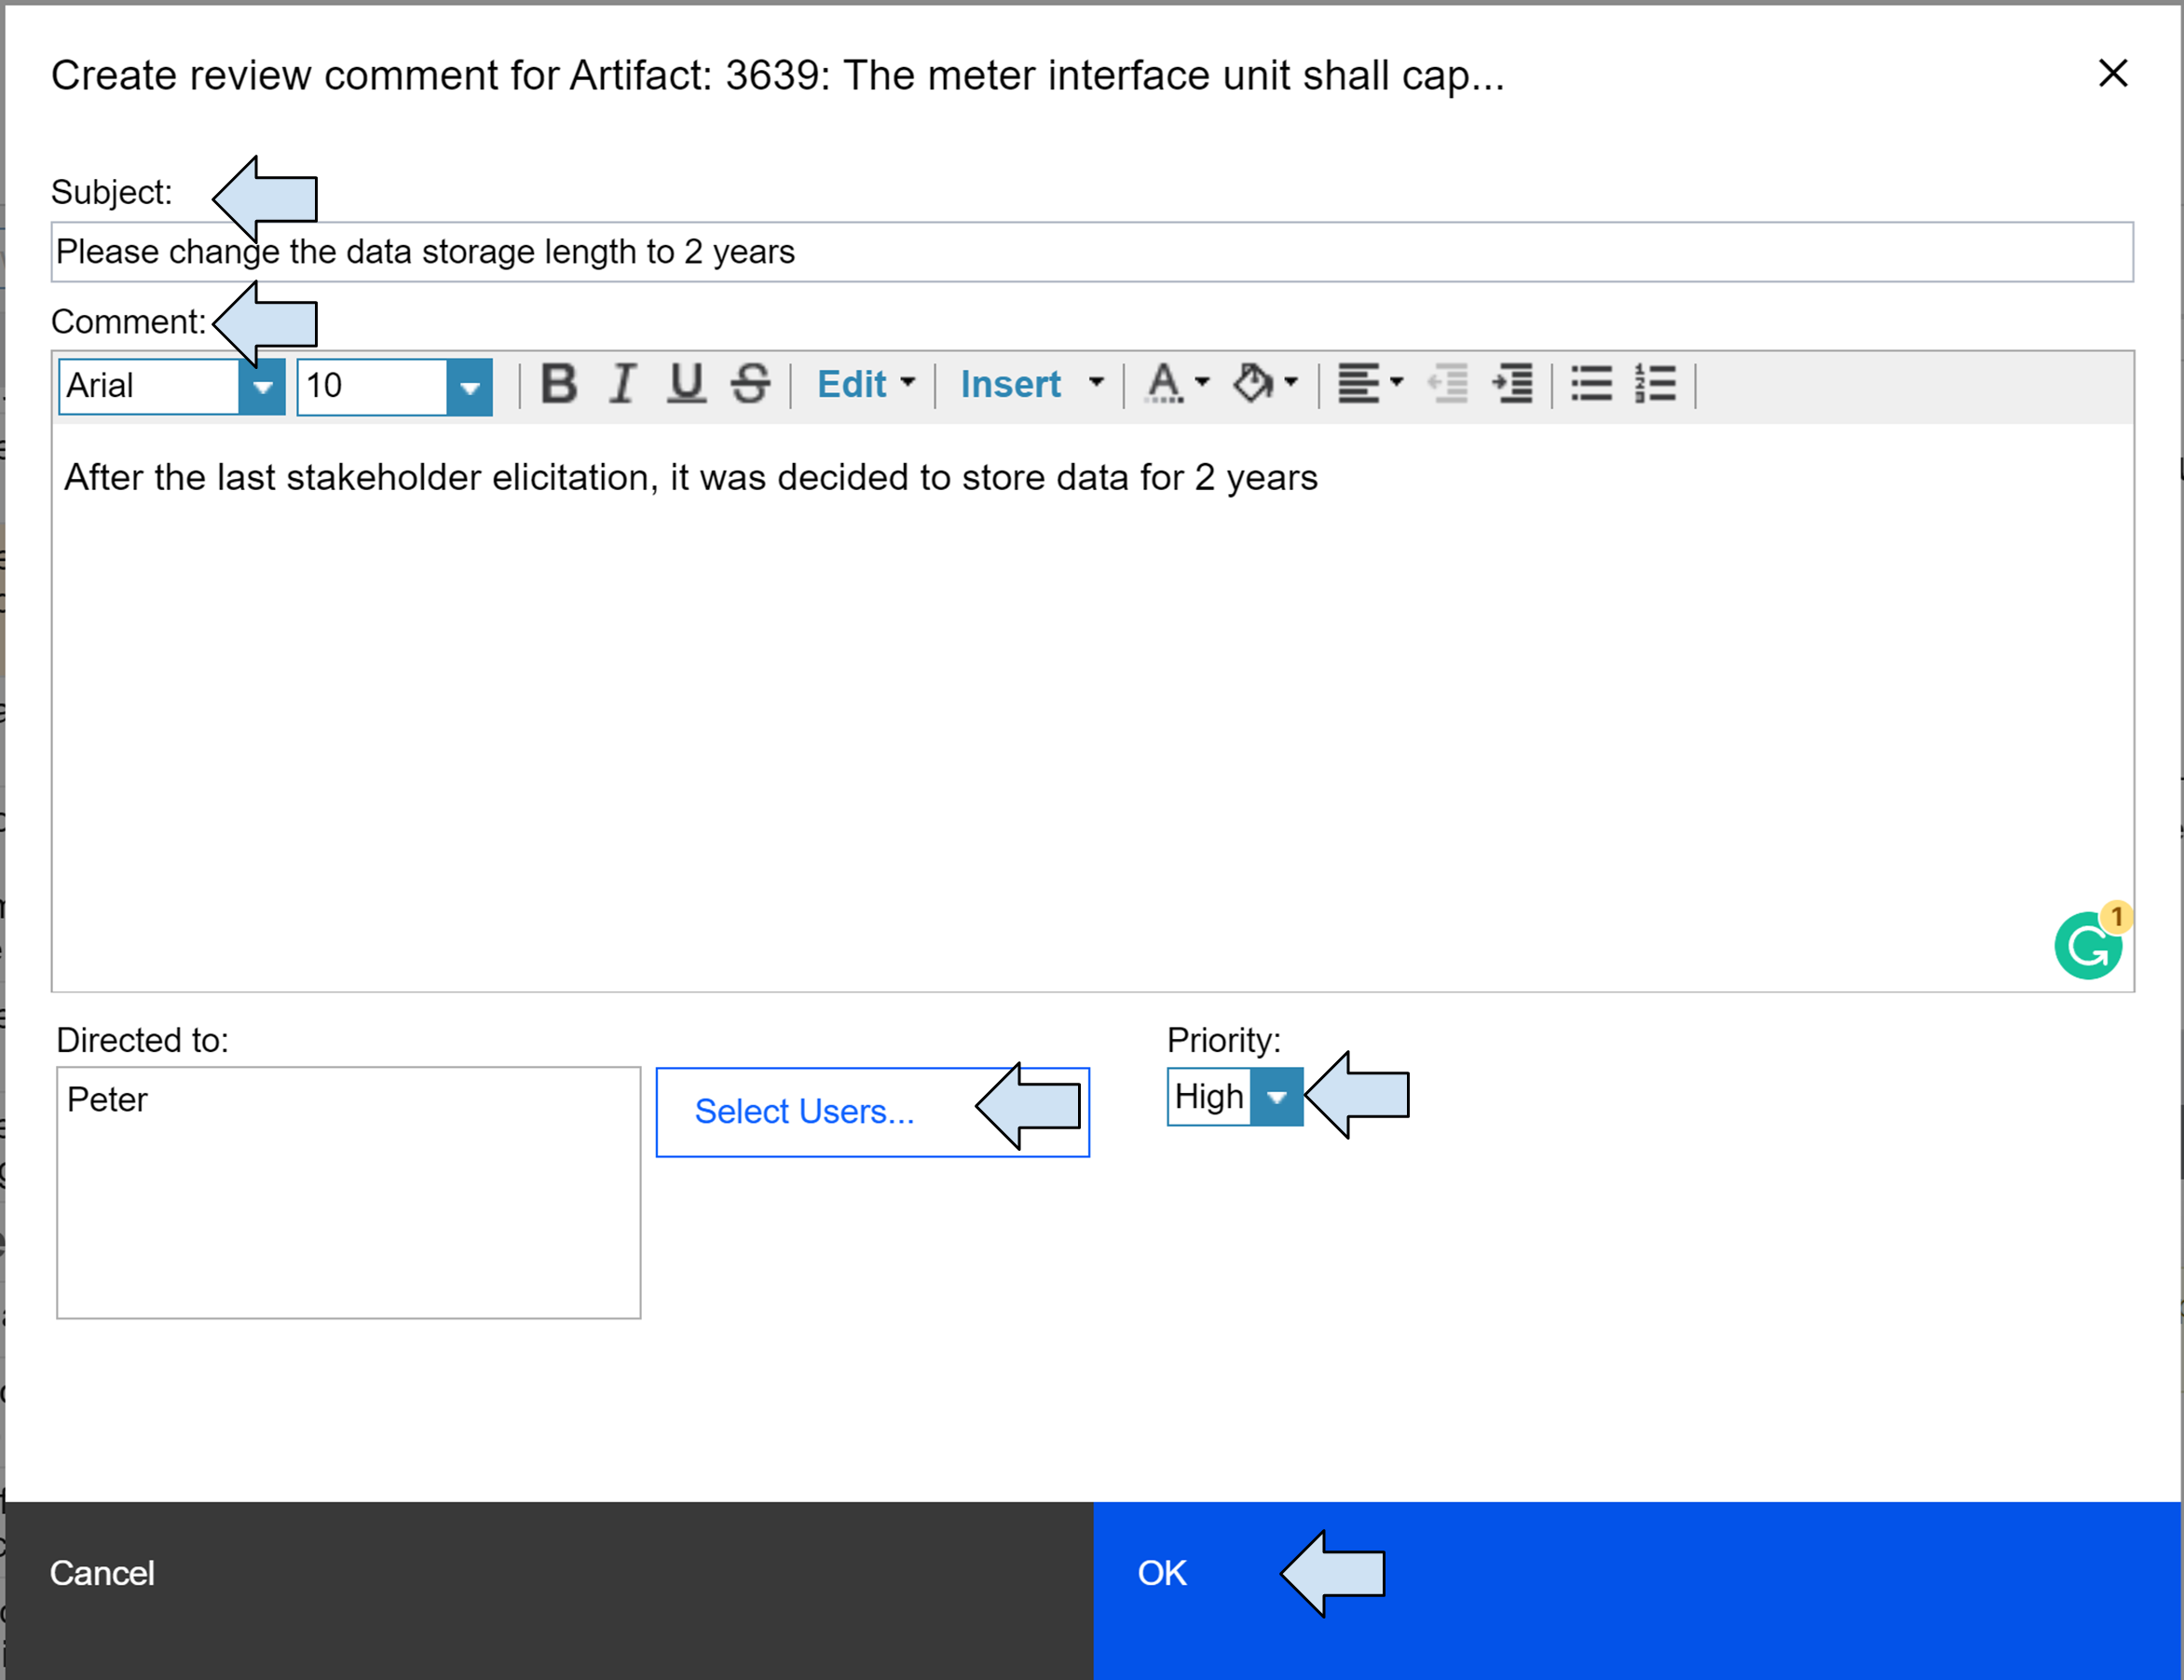
13.) Create Review Comment dialog window
Now you should see a comment icon next to commented artifact, as well as Artifact comment section in the right panel.
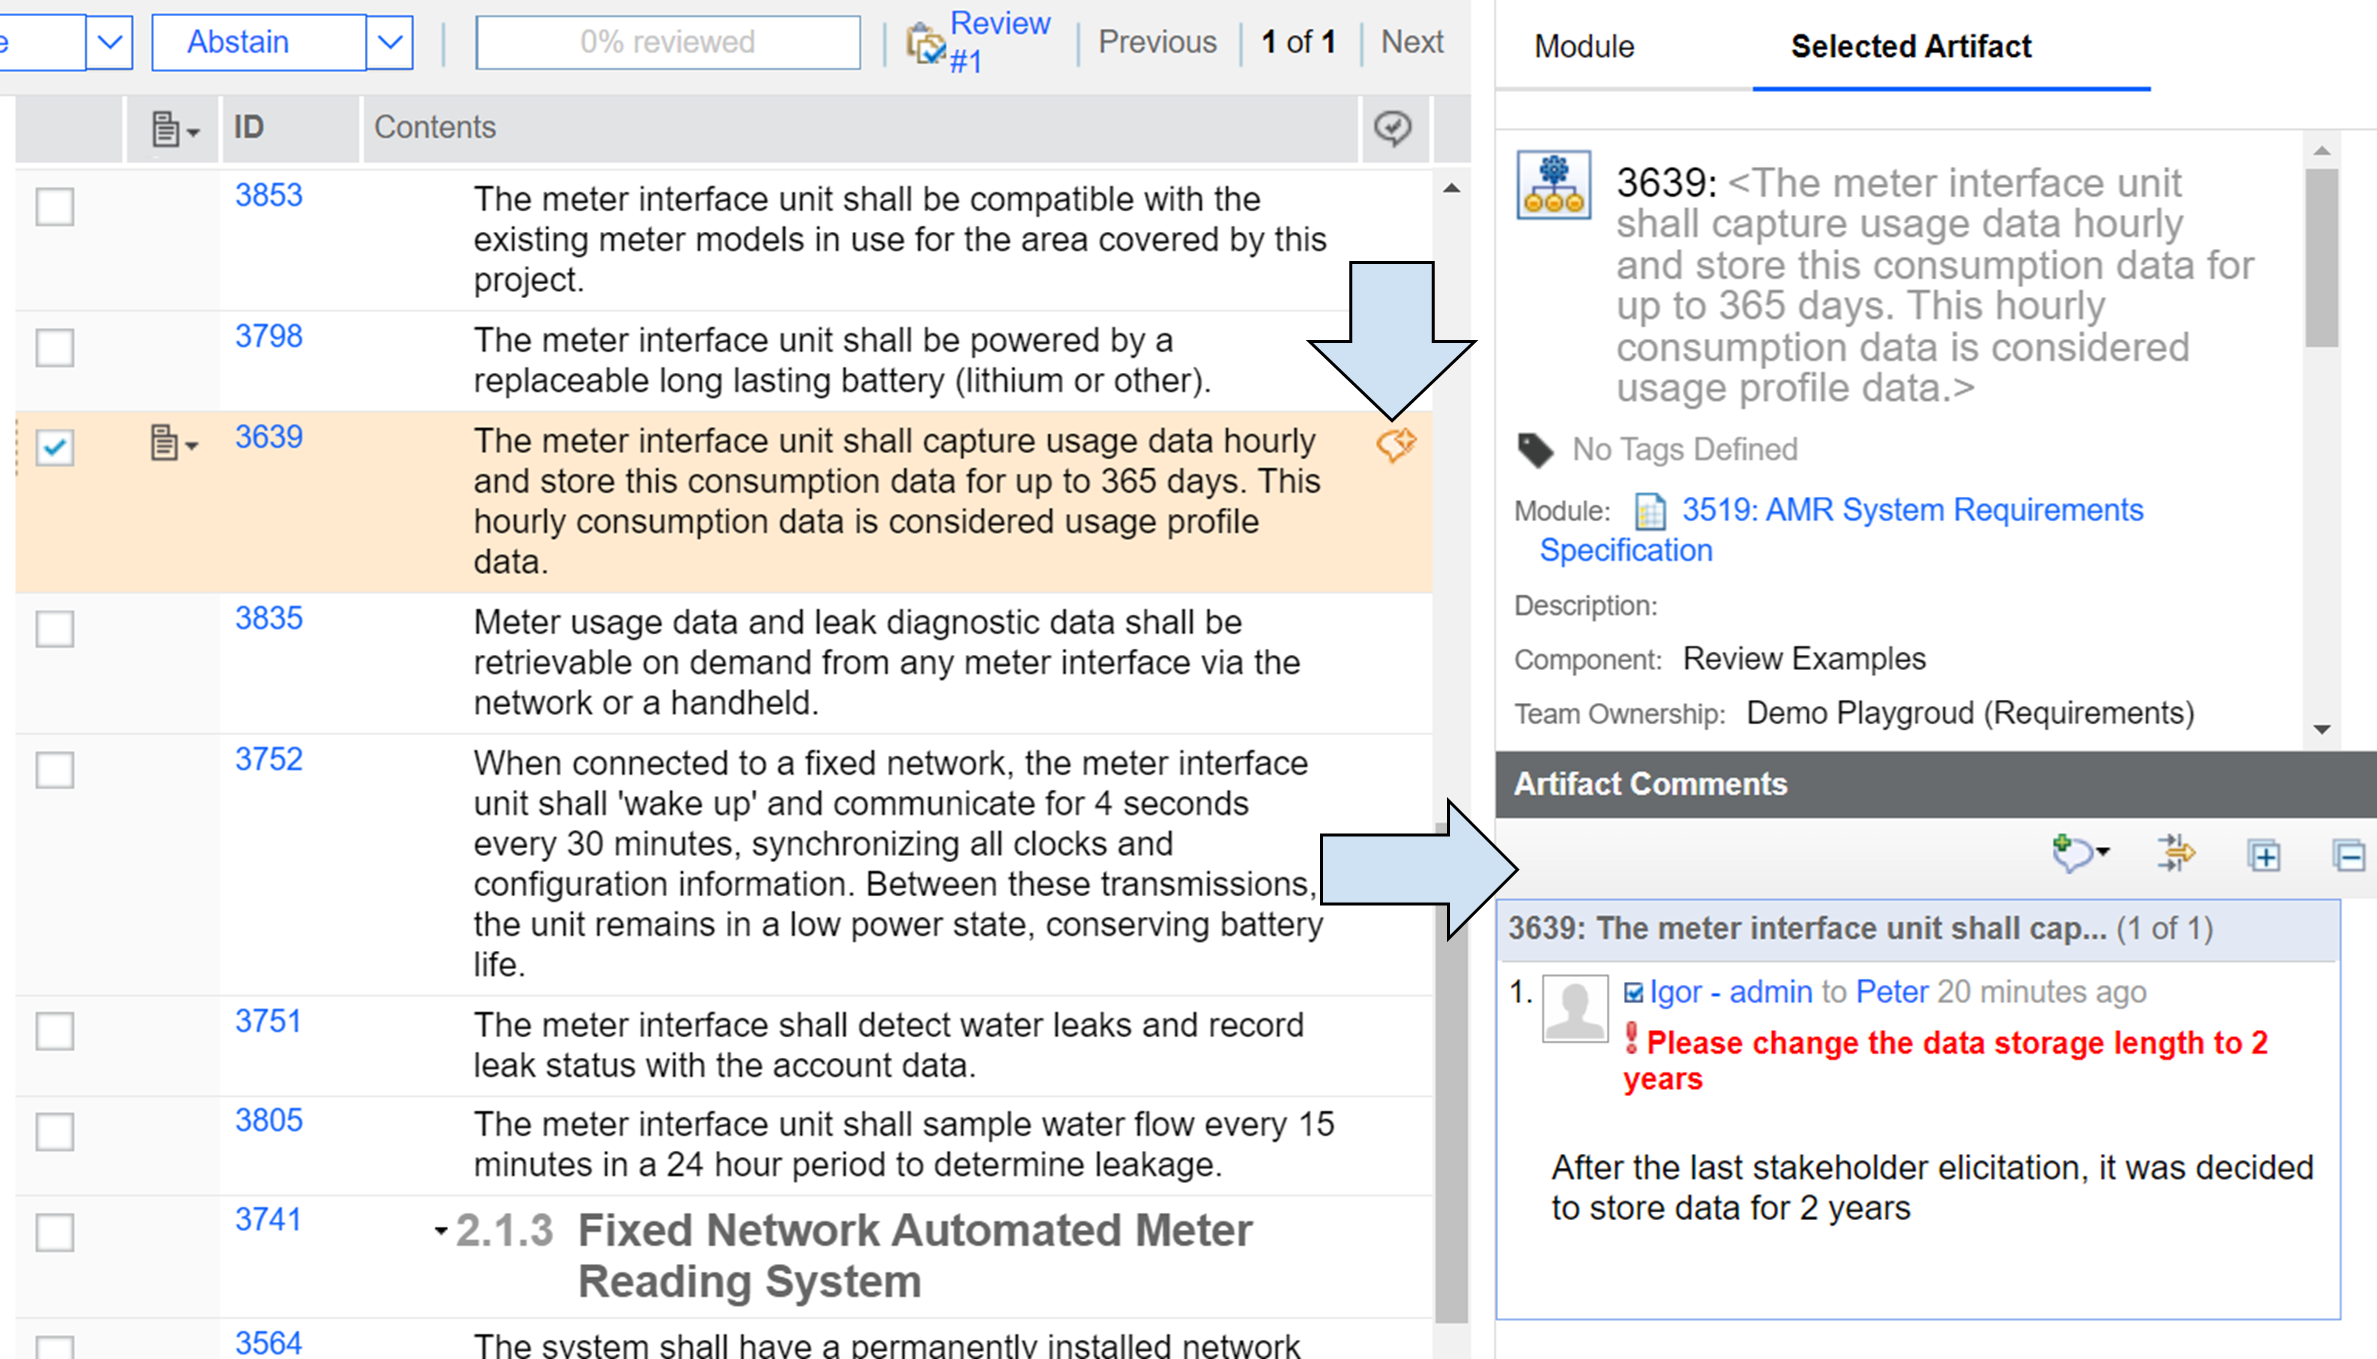
14.) Created Review Comment
Peter received the email notification about high priority comment, he changed the requirement according to Igor's information in the comment and replied back, that it is done. Clicking on the icon indicated by the blue arrow, he will resolve this comment thread to mark it as done. Last but not least - using the built-in comment feature everyone now has information about the change and on what basis was this change done. It may be necessary for any future questions or audits.
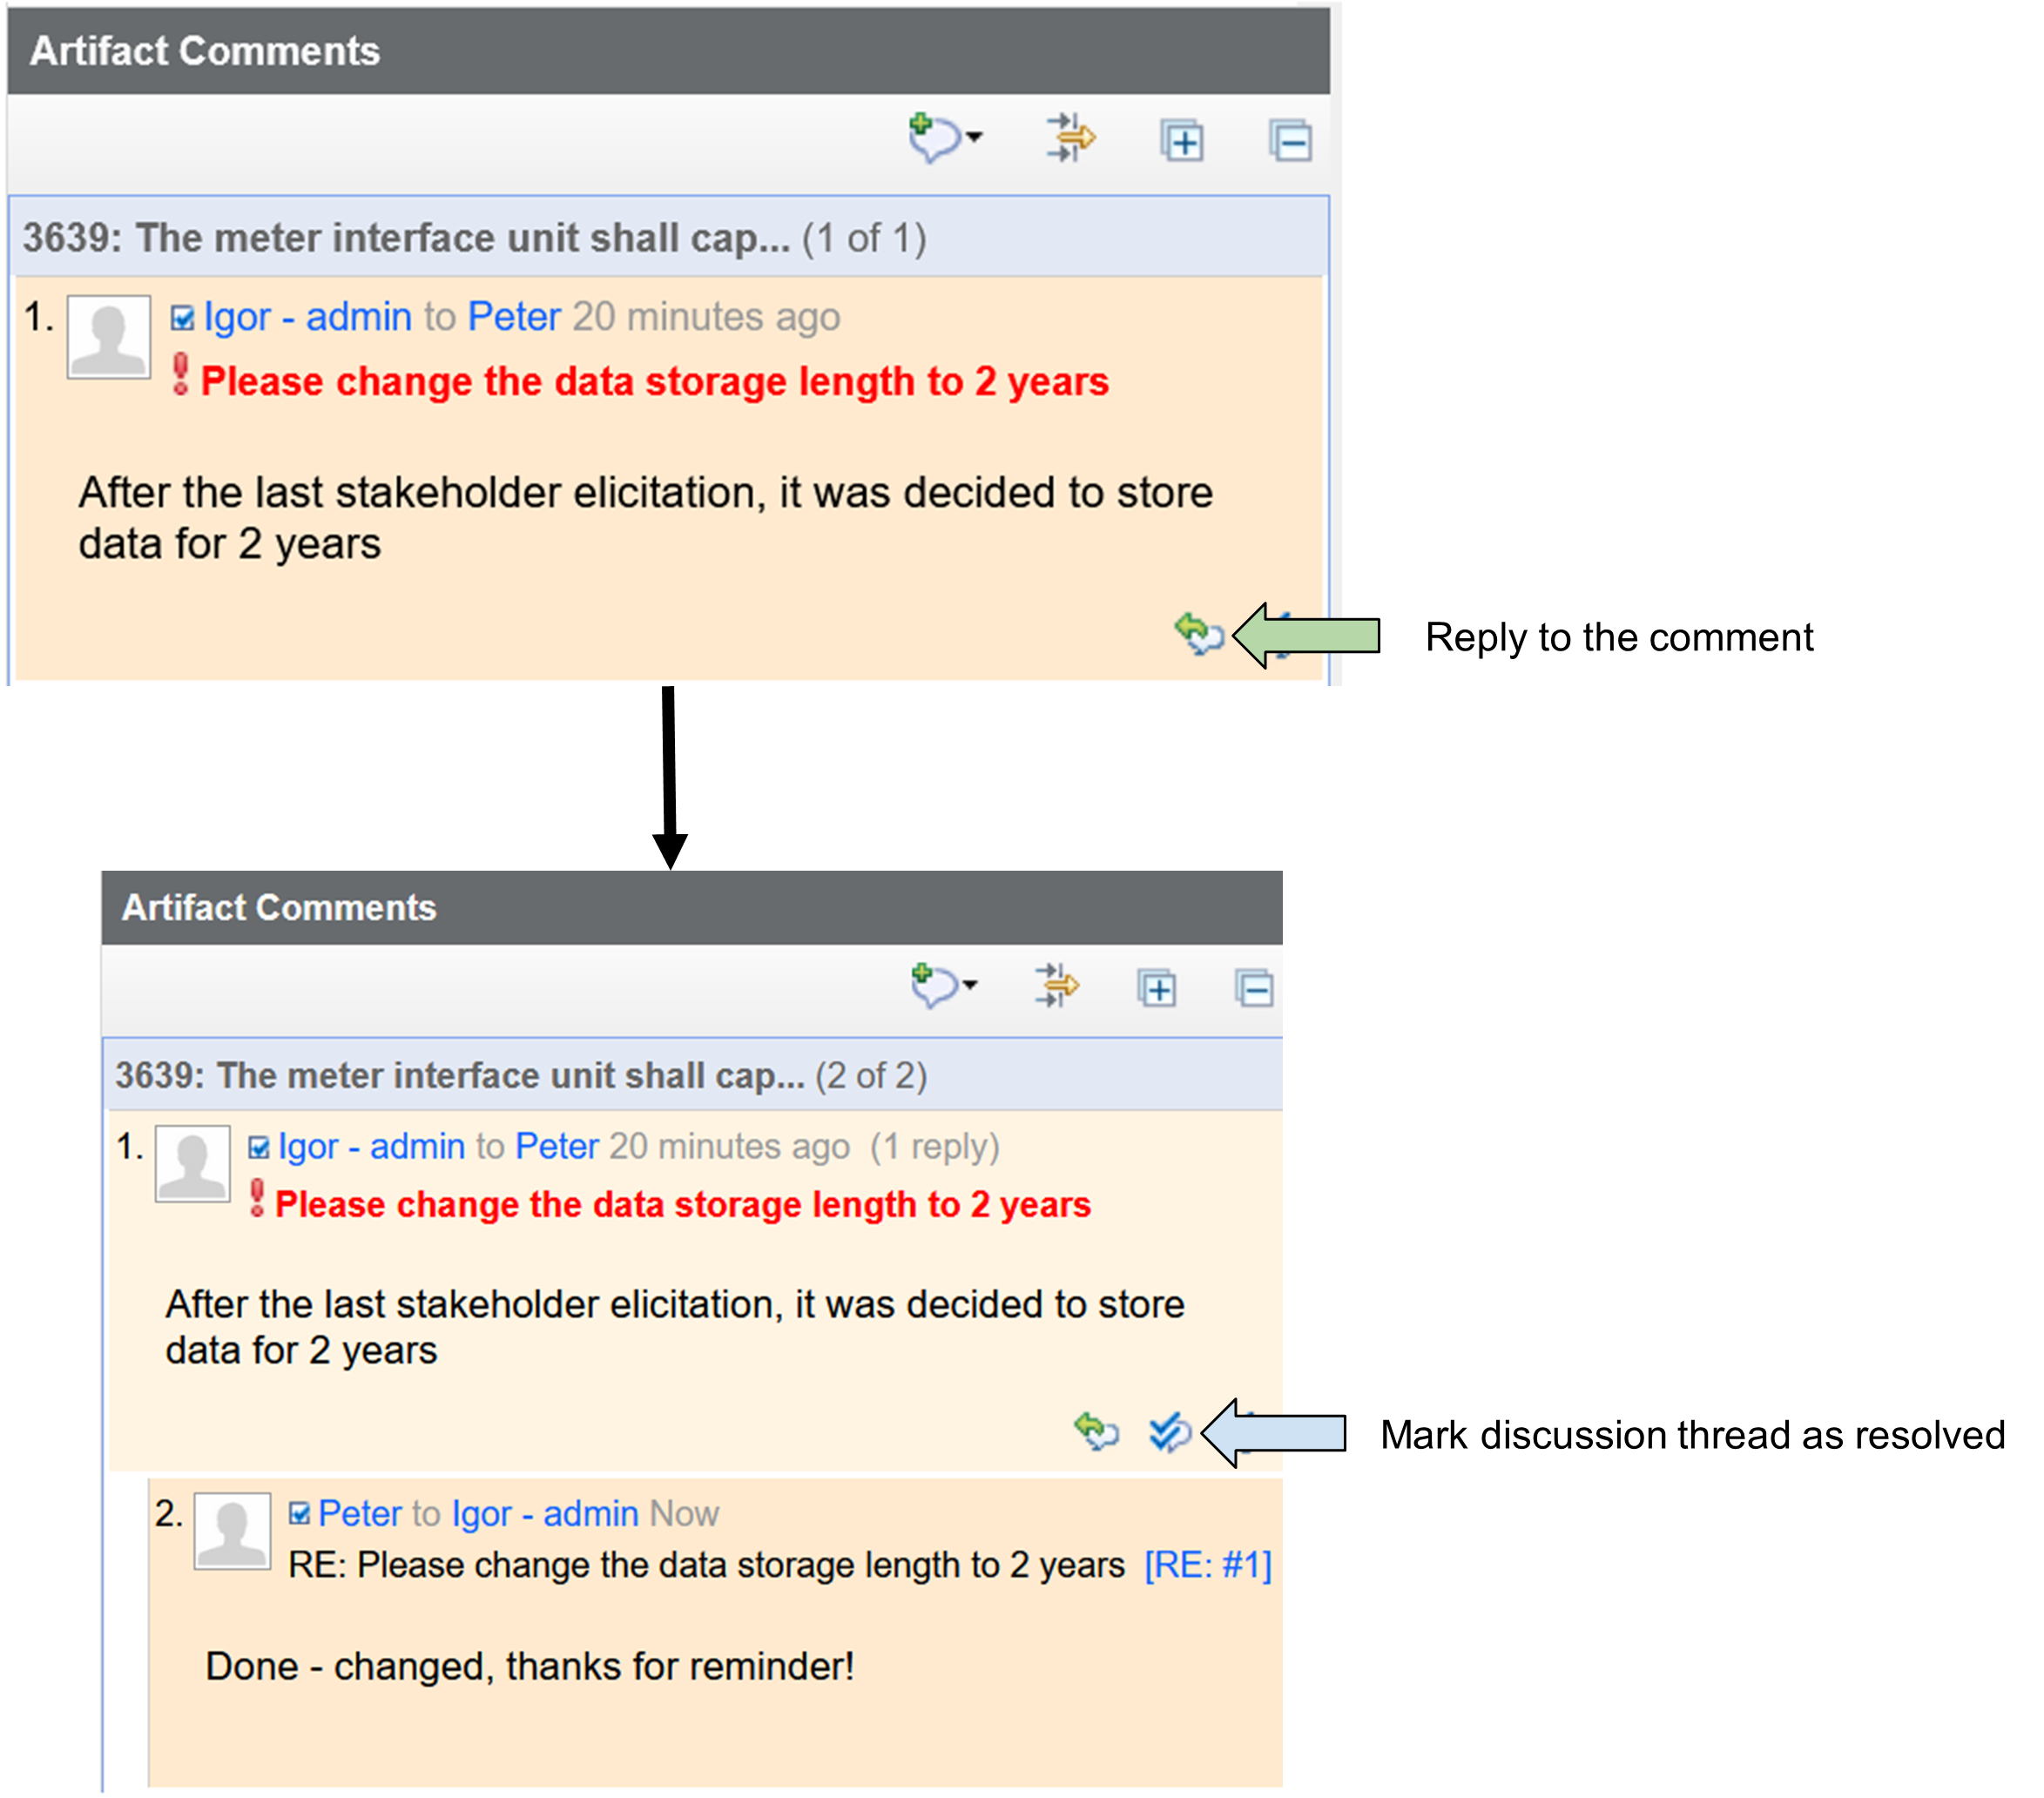
15.) Reply to the Comment or mark comment as resolved
Review Actions
Participants in the review may do the following actions according to their role in the review:
- Approve / Approve with comments
- Disapprove / Disapprove with comments
- Reviewed / Reviewed with comments
- Abstain / Abstain with comments
Approving, disapproving, reviewing or abstaining is done by the simple click of the button to the option in your review. If you would like to include the comment with your action, select the arrow to show that option. The actions displayed in the image below belong to the reviewer/optional reviewer role.
16.) Review in progress
After the reviewer clicks on the “reviewed” the progress bar will automatically change to 50% and status will change to “Reviewed”. Although we have 3 participants in the review, actions of the optional reviewer are not mandatory and they do not impact the review progress.
17.) Review in reviewed state from a participant
Now the reviewer can mark their review as “Done”.

18.) Completed Review
To finalize the review, all other participants (Approvers and reviewers) need to do their actions and mark their reviews as done. After that, we can finish the review by clicking on the finalize review button which will save the review and it will not be possible to modify it.
Final notes on the roles and review actions:
- Every review participant (reviewer, approver, or optional reviewer) with required privileges can finalize the review.

19.) Finalized Review
- Irrespective of the role or permissions, every participant (except optional reviewers) has to review/abstain/approve/disapprove all reviewed artifacts and mark their progress as done before the review can be finalized.
- Approver role is not mandatory in the review - the reviewers may review the artifacts and finalize the review, however, the review status will be reviewed and can not be set to approve or disapproved by reviewers.
Reviews of Individual Artifacts and Collections
In addition to creating reviews of modules, we can create a review of individual artifacts or collection of artifacts. This section will try to explain why module reviews are by far the most used option but also, when using collections and individual base artifacts may be preferred.
As already mentioned, most of the time we work with artifacts solely in the module context. The problem is that individual artifacts selected to be part of the review or collection are the base artifacts.
Base and model artifacts share almost all of their content such as attributes, titles, and text. Any time change is made to one of the artifacts, this change is automatically propagated to the second artifact. The only three exceptions are links, comments, and tags that are not propagated from the module artifact to the base artifact. You can find out more about this topic in our article - Module vs base artifacts.
Using collections or individual base artifacts in the review has therefore major 2 downsides - Losing context in which is this artifact used, but most importantly - losing information about the links. As verification of traceability between the artifacts is an integral part of the review process not having link information is a dealbreaker.
There are however situations when reviewing base artifacts may be an advantage. Those instances include artifacts that are not so far in the module, do not need wider context, and do not use links. These artifacts may include:
- Images and drawings
- Diagrams, Use-cases, workflows
- Documents such as presentations, pdfs,...
Adding these artifacts into a collection or directly to the review does not have is not limited or affected by described shortcomings.
Few final notes about using collections and individual artifacts:
- To add artifacts to the review, enter the review, click on add artifacts and select artifacts for the review.
- Note 1 - The biggest benefit of using individual artifacts is that reviewers must do review action for every individual artifact (Approve/disapprove/review/abstain from).
- Note 2 - It is not possible to add a collection here in the review editor.

20.) Add Artifacts to the Review
- To add the collection, you must create new review containing that collection. Navigate to the collections menu, click on the option icon next to the collection and select “Create review from collection”. After that continue with the review creation process from the beginning of the article.
- Please note that collection already contains artifacts.
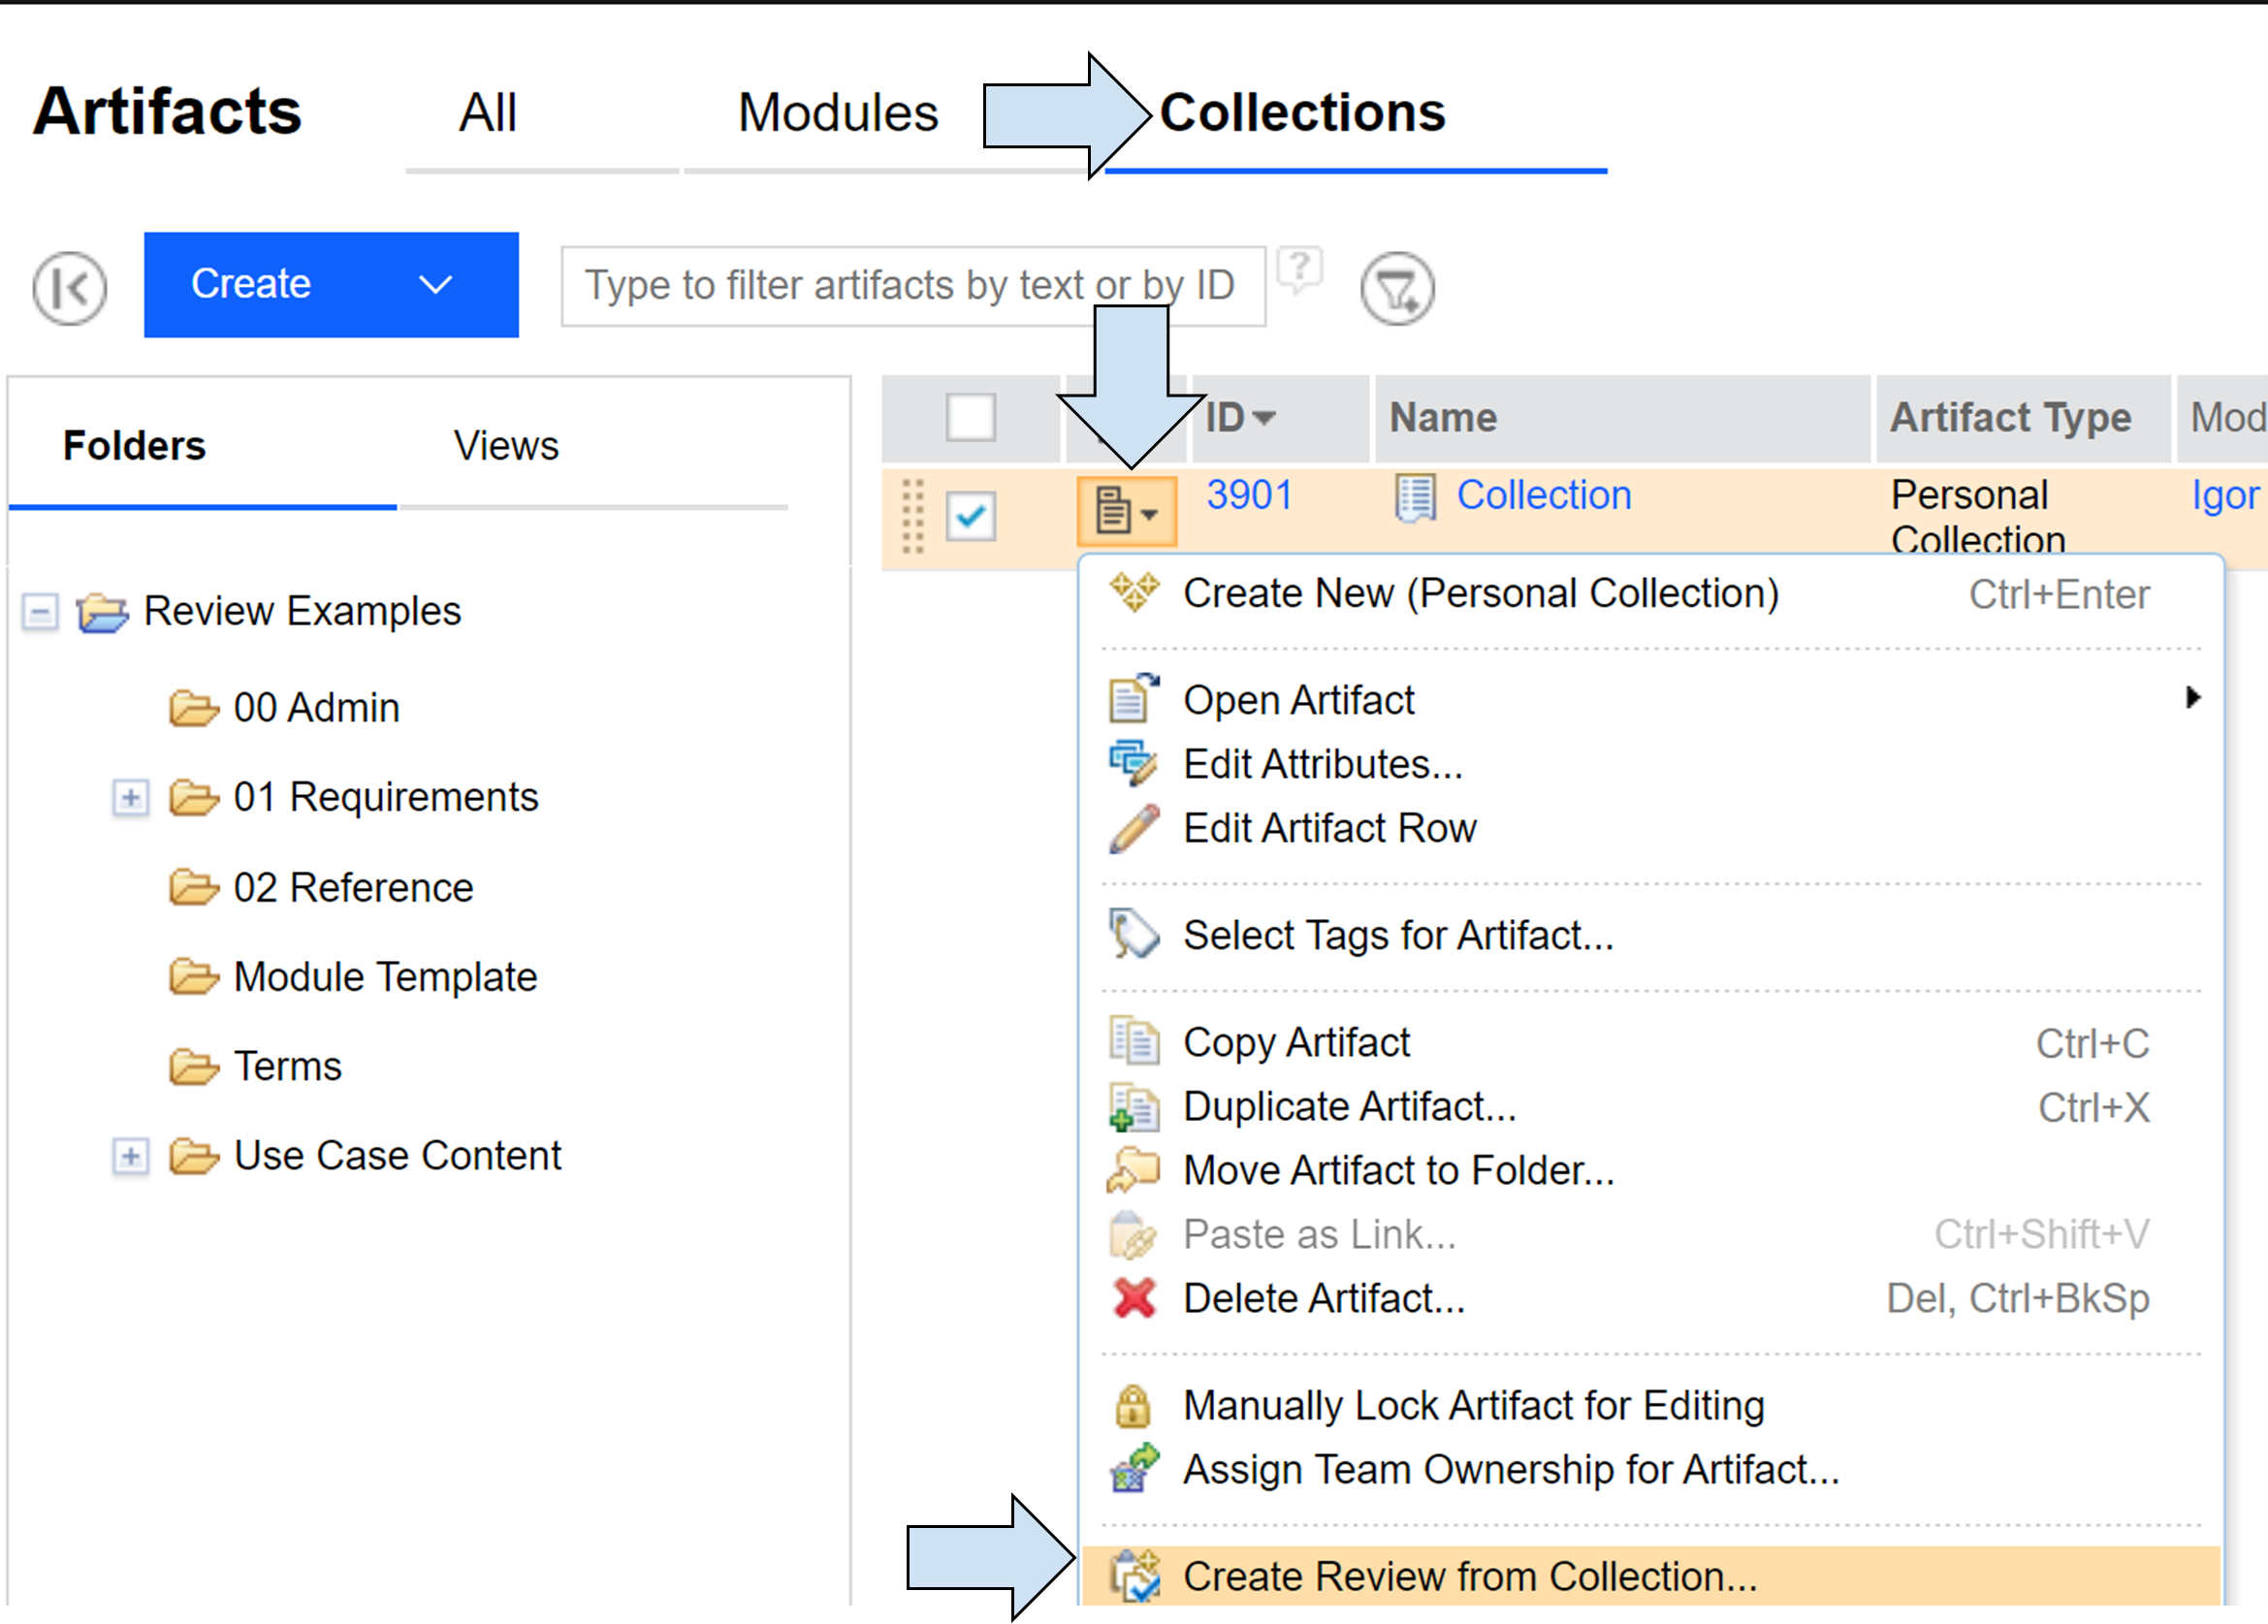
21.) Create Review from a Collection
If you would like to dive deeper into the review topic and discover tips, tricks and workaround please read our second article - DNG reviews tips and tricks.
Summary
This is the end of the first article from multi-article series where we explore Reviews functionality in DOORS Next. In the second article, we will continue our explanation and scenarios to cover more advanced topics and share workarounds to limitations as well as tips and tricks.
Softacus Services
We, in Softacus, are experts when it comes to consulting and service delivery of IBM software products and solutions in your business. We help our clients to improve visibility and transparency when licensing and managing commercial software, providing measurable value while increasing efficiency and accountability and we are providing services in different areas (see Softacus Services).
IBM ELM extensions developed by Softacus are free of charge for the customers who ordered IBM ELM licenses via Softacus or for the customers who ordered any of our services. If you are interested in any of our IBM ELM extensions, you found a bug or you have any enhancement request, please let us know at info@softacus.com.
Related and Referenced Topics
Blog Articles:
Advanced Concepts of DOORS Next Reviews - learn how to manage changes in your DOORS Next project, increase reusability and deliver changes quickly while adhering to proper change control practices.
DOORS Next Reviews - Tips and Tricks - learn more about advanced topics, workarounds to limitations, tips, and tricks for reviewing requirements in a module.