Introduction
In this article, part two of a series on requirements reviews, you'll learn more about advanced topics, workarounds to limitations, tips, and tricks for reviewing requirements in a module. You'll discover how to use workflow status, custom attributes and views to filter and focus on only the requirements you need to review. These methods are simple to use and can save you time by eliminating the complexity.
This article is part two of the multi-article series about the reviews and review process. Please read the first article Basics of DOORS Next Reviews to learn more about the basics. In this article, we will continue our explanation and scenarios to cover more advanced topics and share workarounds to limitations as well as tips and tricks.
Module Review Limitation 1
To dive deeper into the review topic, we will start with the first limitation of a review process - not being able to pick and choose module artifacts that should be reviewed. Since modules may have thousands of artifacts, we need the ability to use a more granular selection for the review. This can be done using simple workarounds described in the next sections.
Workaround Tip 1 - Using Workflow Status and Views
You are probably familiar with a requirements workflow. It is a built-in state transition model in which you define the state that artifacts of a specified type can be in and the actions that users can select to move these artifacts from one state to another. If you are using this workflow, you can quickly create view for all artifacts that were submitted for review. Later you can use this filter in the review process to focus only on this set of artifacts, instead of going through the whole module, that can potentially have thousands of artifacts. To create this filter and use it in the review, please follow next steps.
Step 1 - Add view section to the module
Navigate to the AMR System Requirements Specification module and:
- Click on “Configure page settings” icon
- Click on “More”
- Find “State” - The “Default” is the name of the workflow. If you are using custom workflow you may see multiple options with different names in parentheses
- Click on Add
- Select OK
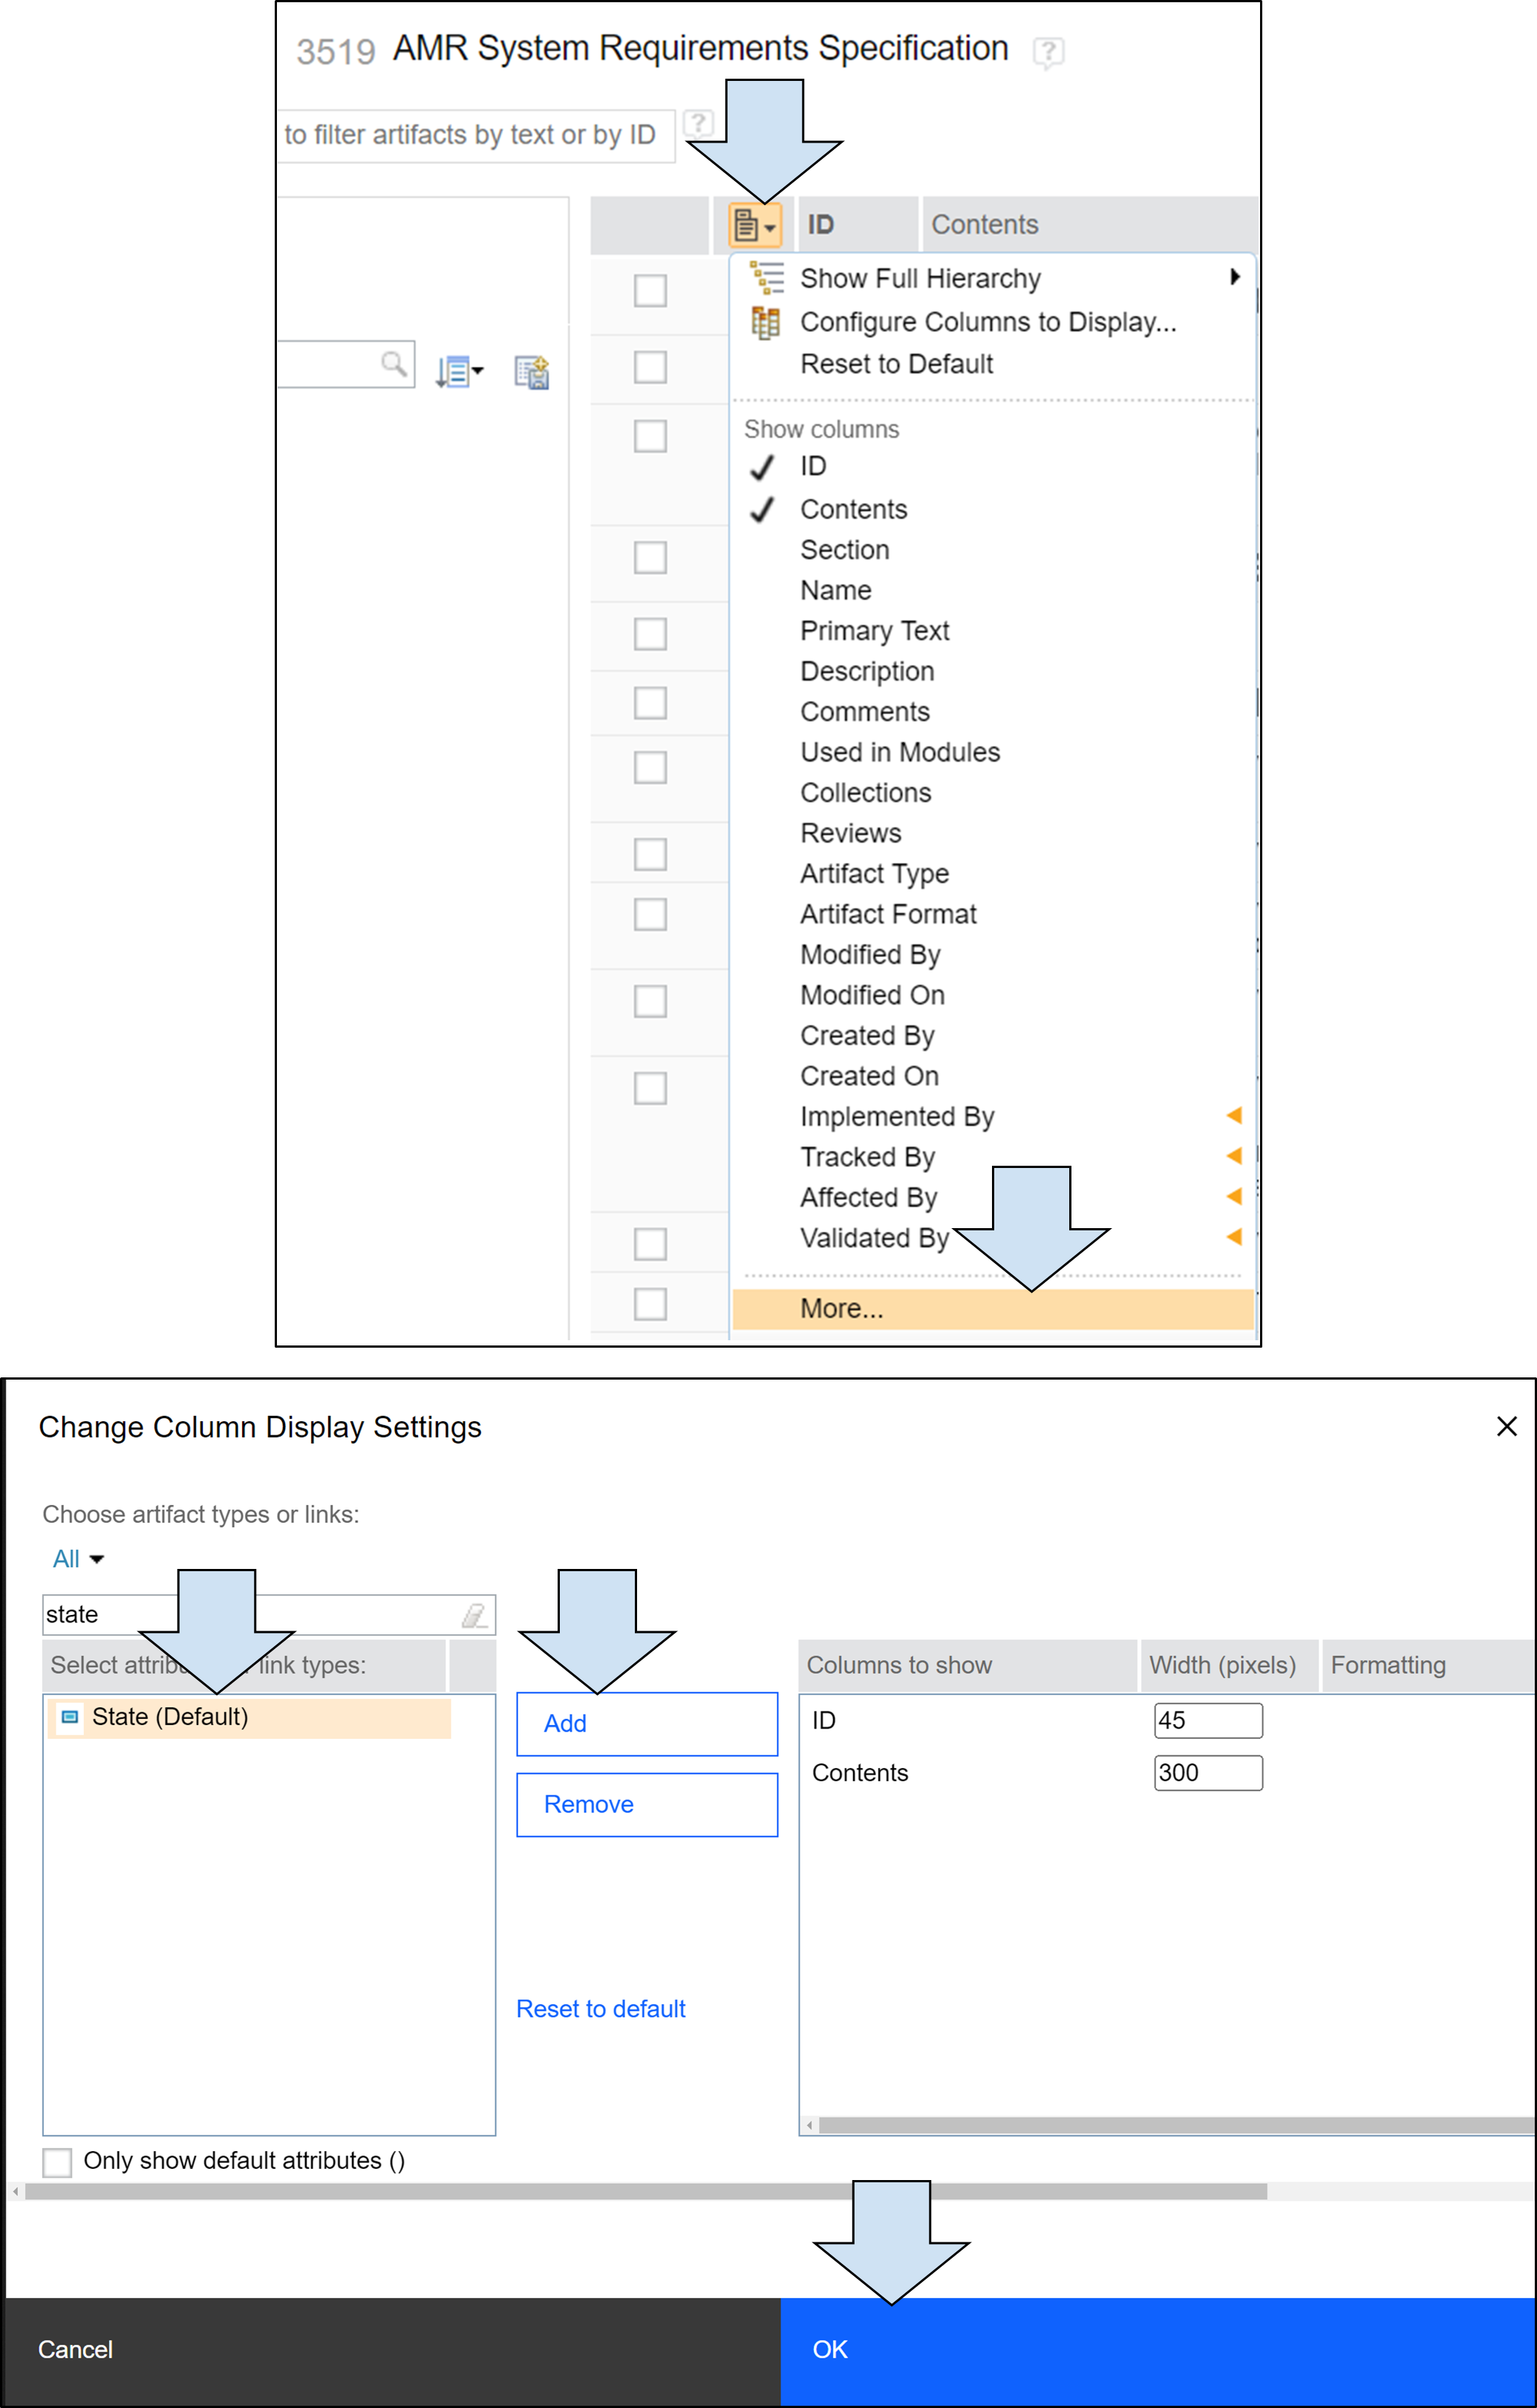
1.) Add State attribute to the view
Now you should see workflow state in your module.
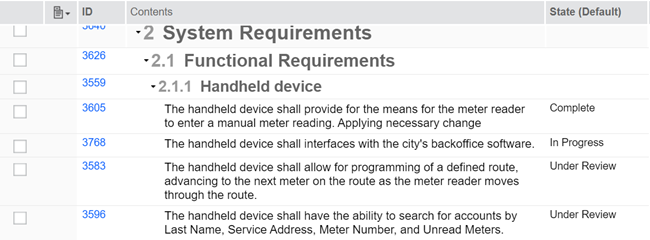
2.) State attribute added to the view
Step 2 - Creating filter and save the view
To quickly see only artifacts that are ready to be reviewed (represented by the “Under review” workflow state) you can create a filter using following steps:
- Click on add Filter icon
- Search for state and select workflow you are using
- Leave default “is any of” the selected states
- Choose Under review state
- Click add and close
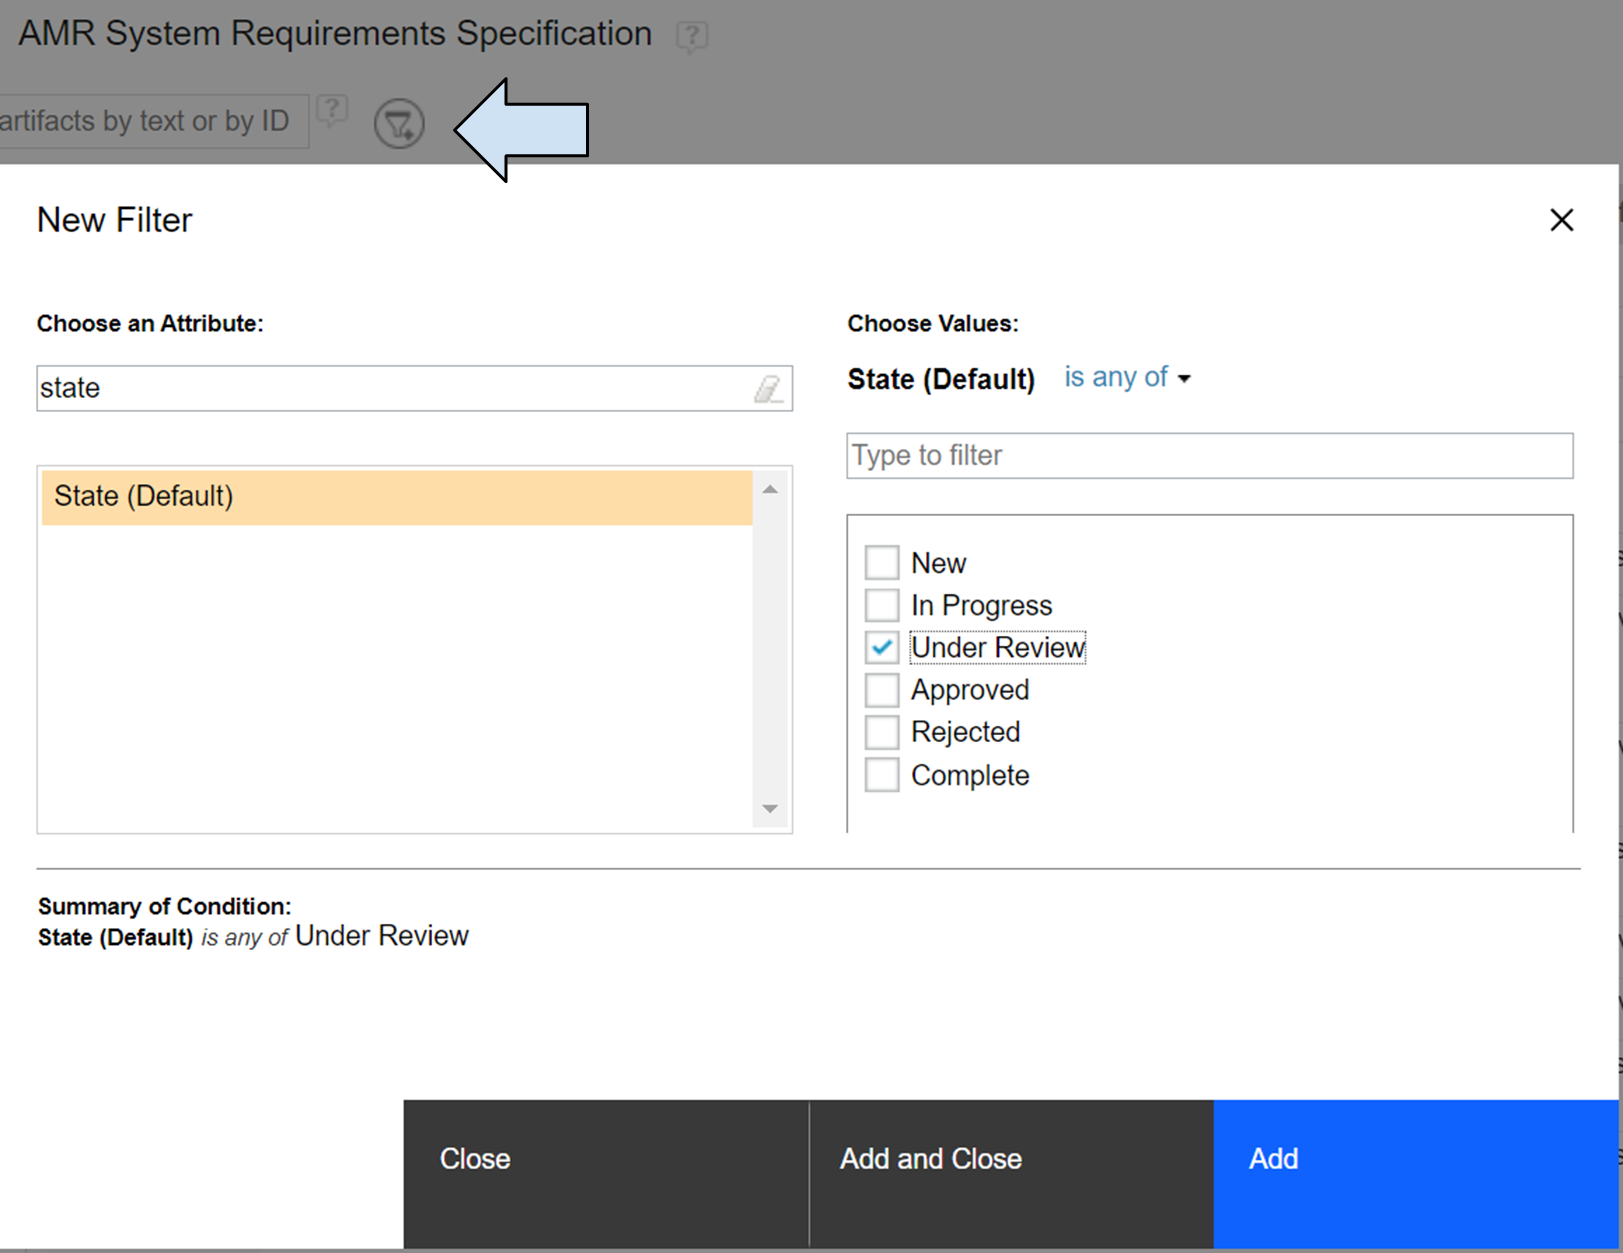
3.) Filtering based on State attribute
Now you should be able to see only artifacts, that are under review state. If so, you are half-way done, because to be able to use this filter in the review we need to save it.
- Click on the “save as new view” icon
- Name the review - You can use any name you prefer, to associate this view with the review, so it is easy to find and easy to use. For example - Sprint 4 Review, or March Review or anything that is easily recognizable by your colleagues and review participants.
- Select shared. As this view is not just for your personal purposes but also as a tool for review participant, select shared option to share this view with you colleagues
- Alternatively, you can select who exactly can see the view and you can select just review participants
- Click OK
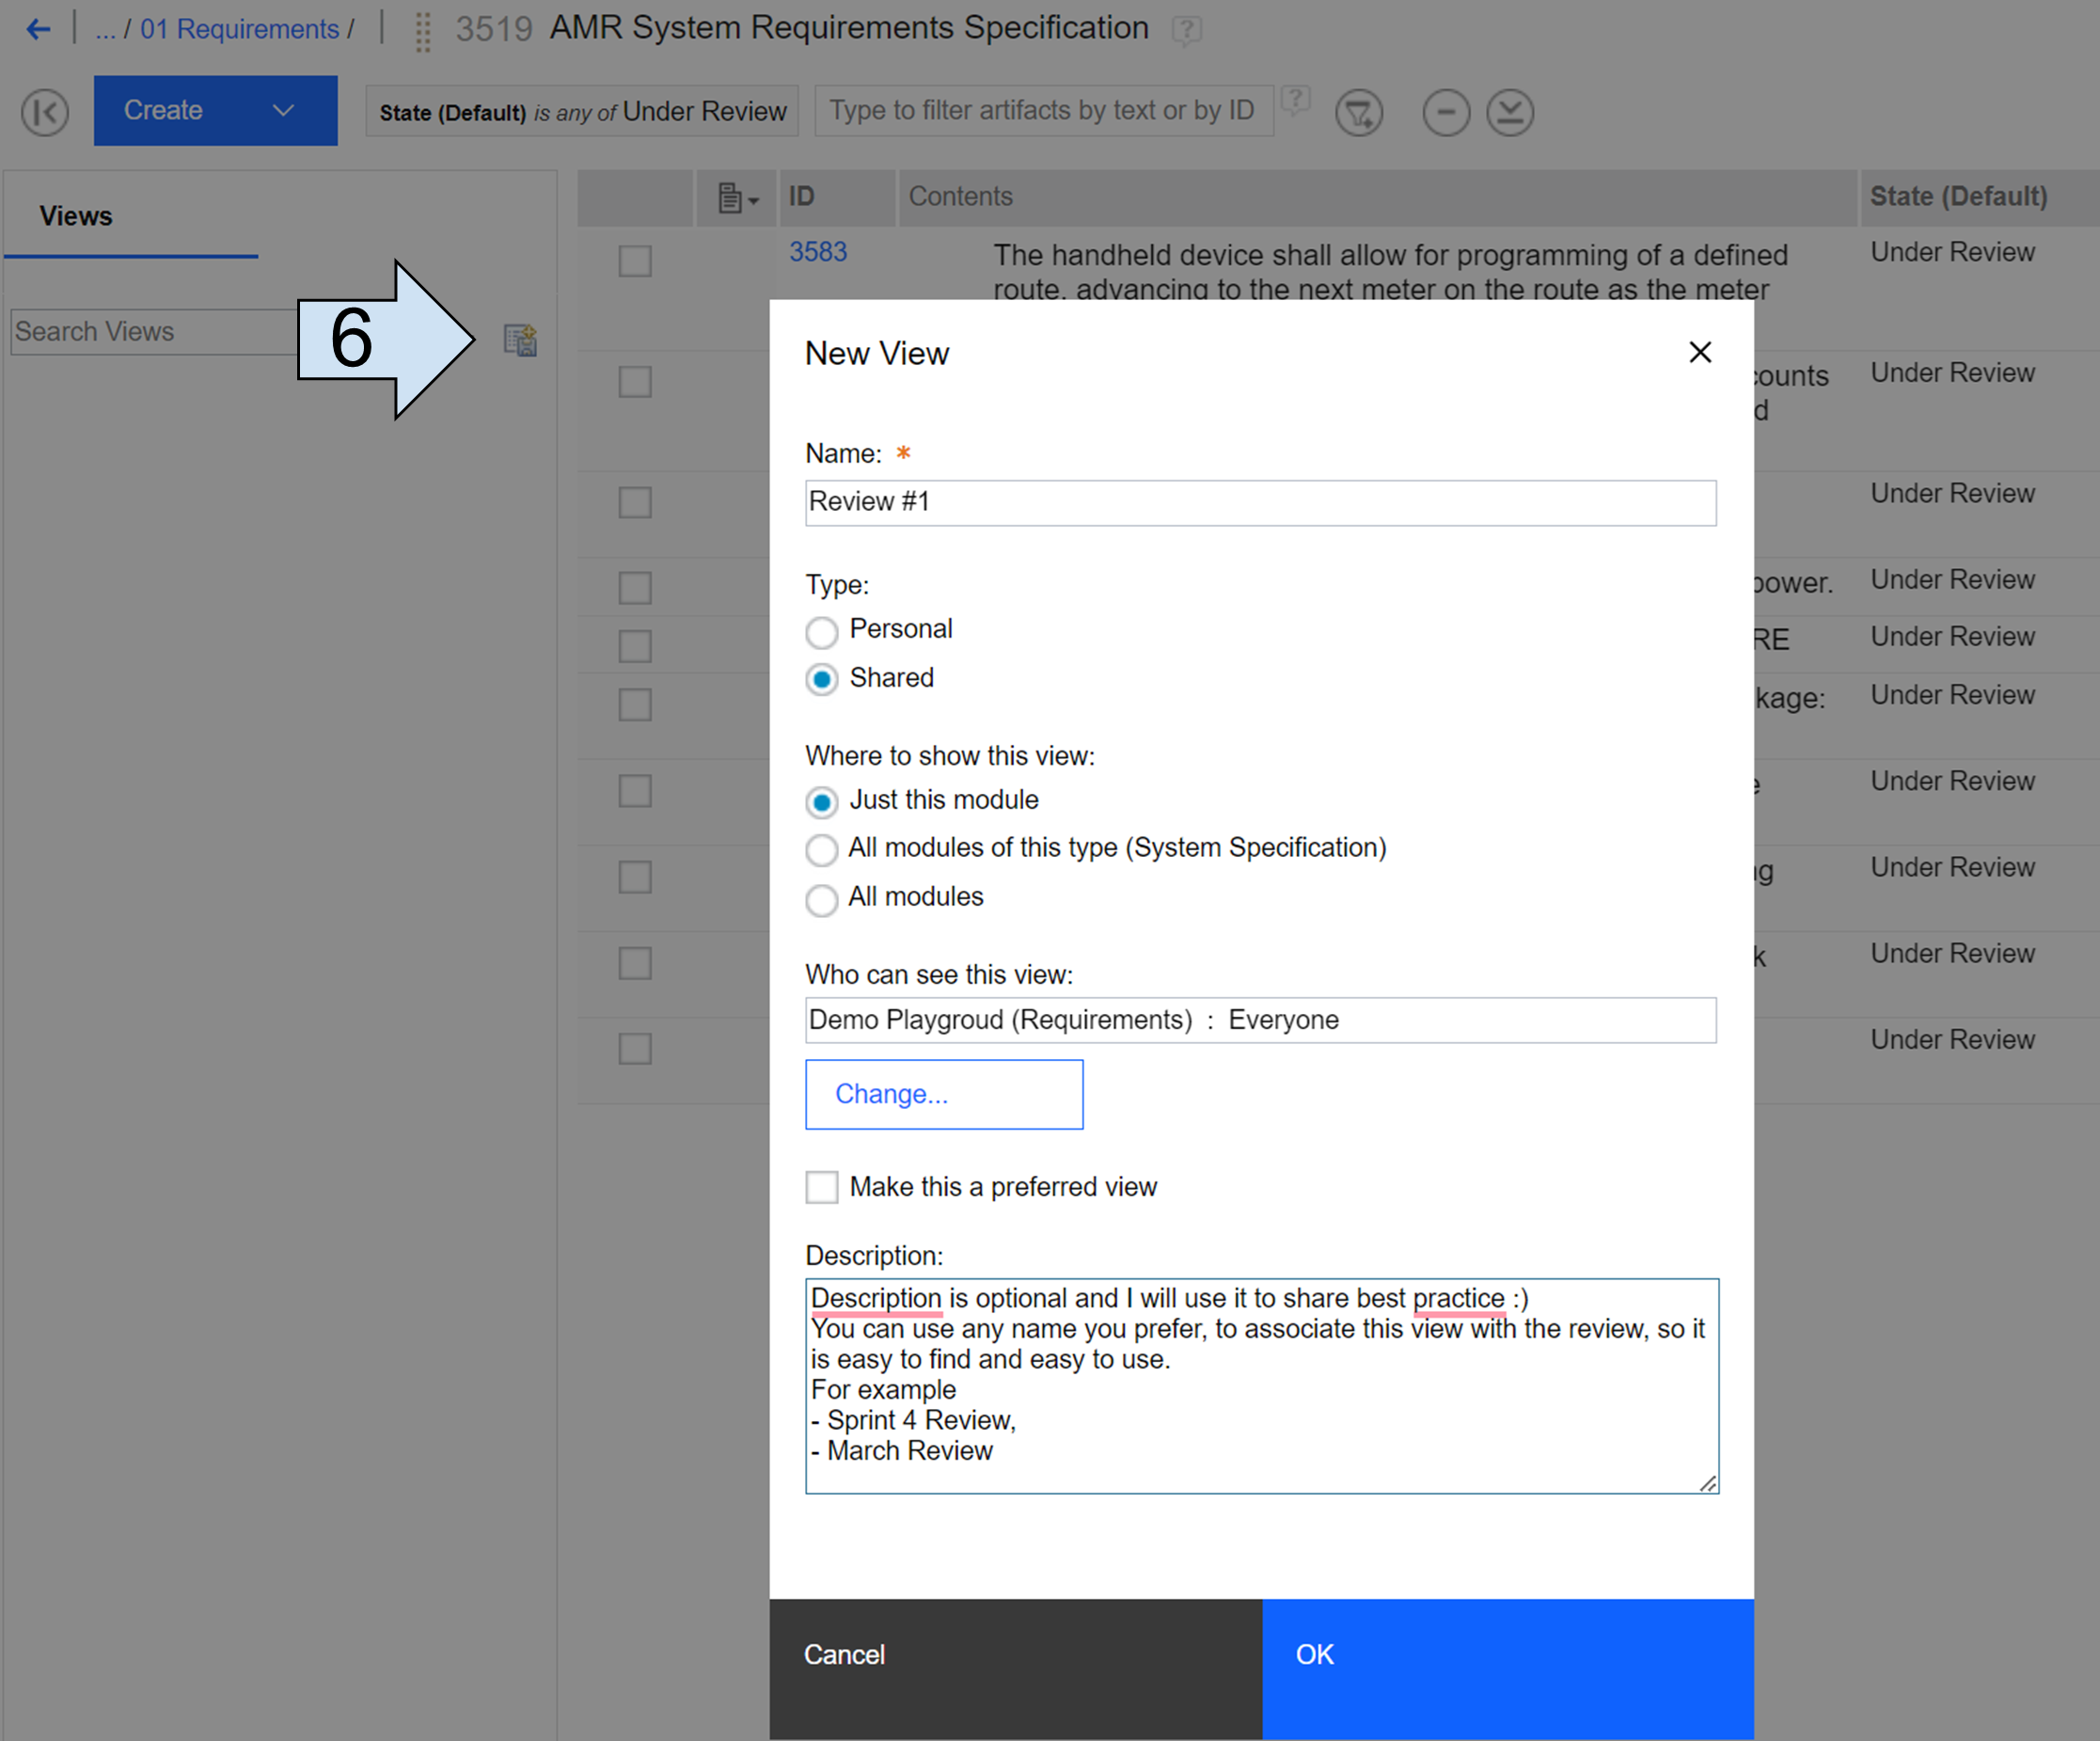
4.) Create a view with filter
Step 3 - Use this view in the review
In the review simply click on the view and you can focus only on the selected artifacts.
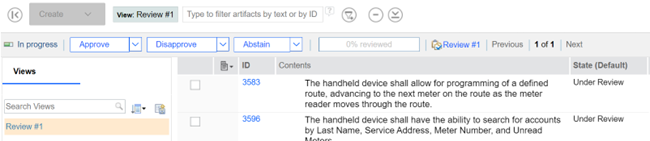
5.) Review grid view
There is one more section you may want to add - using view created in the module will remove Review comments section. This section can not be added in the module context, it can be added only in review. To add review section simply follow the step 1 and search for “review comments”.
You may also save this view - it helps reviewers and at the same time it does not have any impact on the view in the module. Note - if you are conducting review from the baseline, you will not be able to save the view.
Workaround Tip 2 - Using Custom Attribute and Views (Option 1)
There may be a reason why using workflow state does not solve your problems - you may not actively use it or it may not be granular enough. In this subsection, we will demonstrate how you can create custom attributes and use them in filters. We will create two different attributes just to show you multiple ways how you can approach filtering the artifacts for review. In the first option, we will create custom attribute “For review”, with boolean data type. Changing this attribute to true will be used to identify artifacts that should be reviewed in the next review process. To create this custom attribute and corresponding filter, follow the next steps:
Step 1 - Creating custom attributes
Creating custom attributes is very simple.
- Navigate to the “Administration options” at the upper right corner
- Select “Manage component properties”
- Find and select “Artifact Attributes”
- Select “New Attribute”
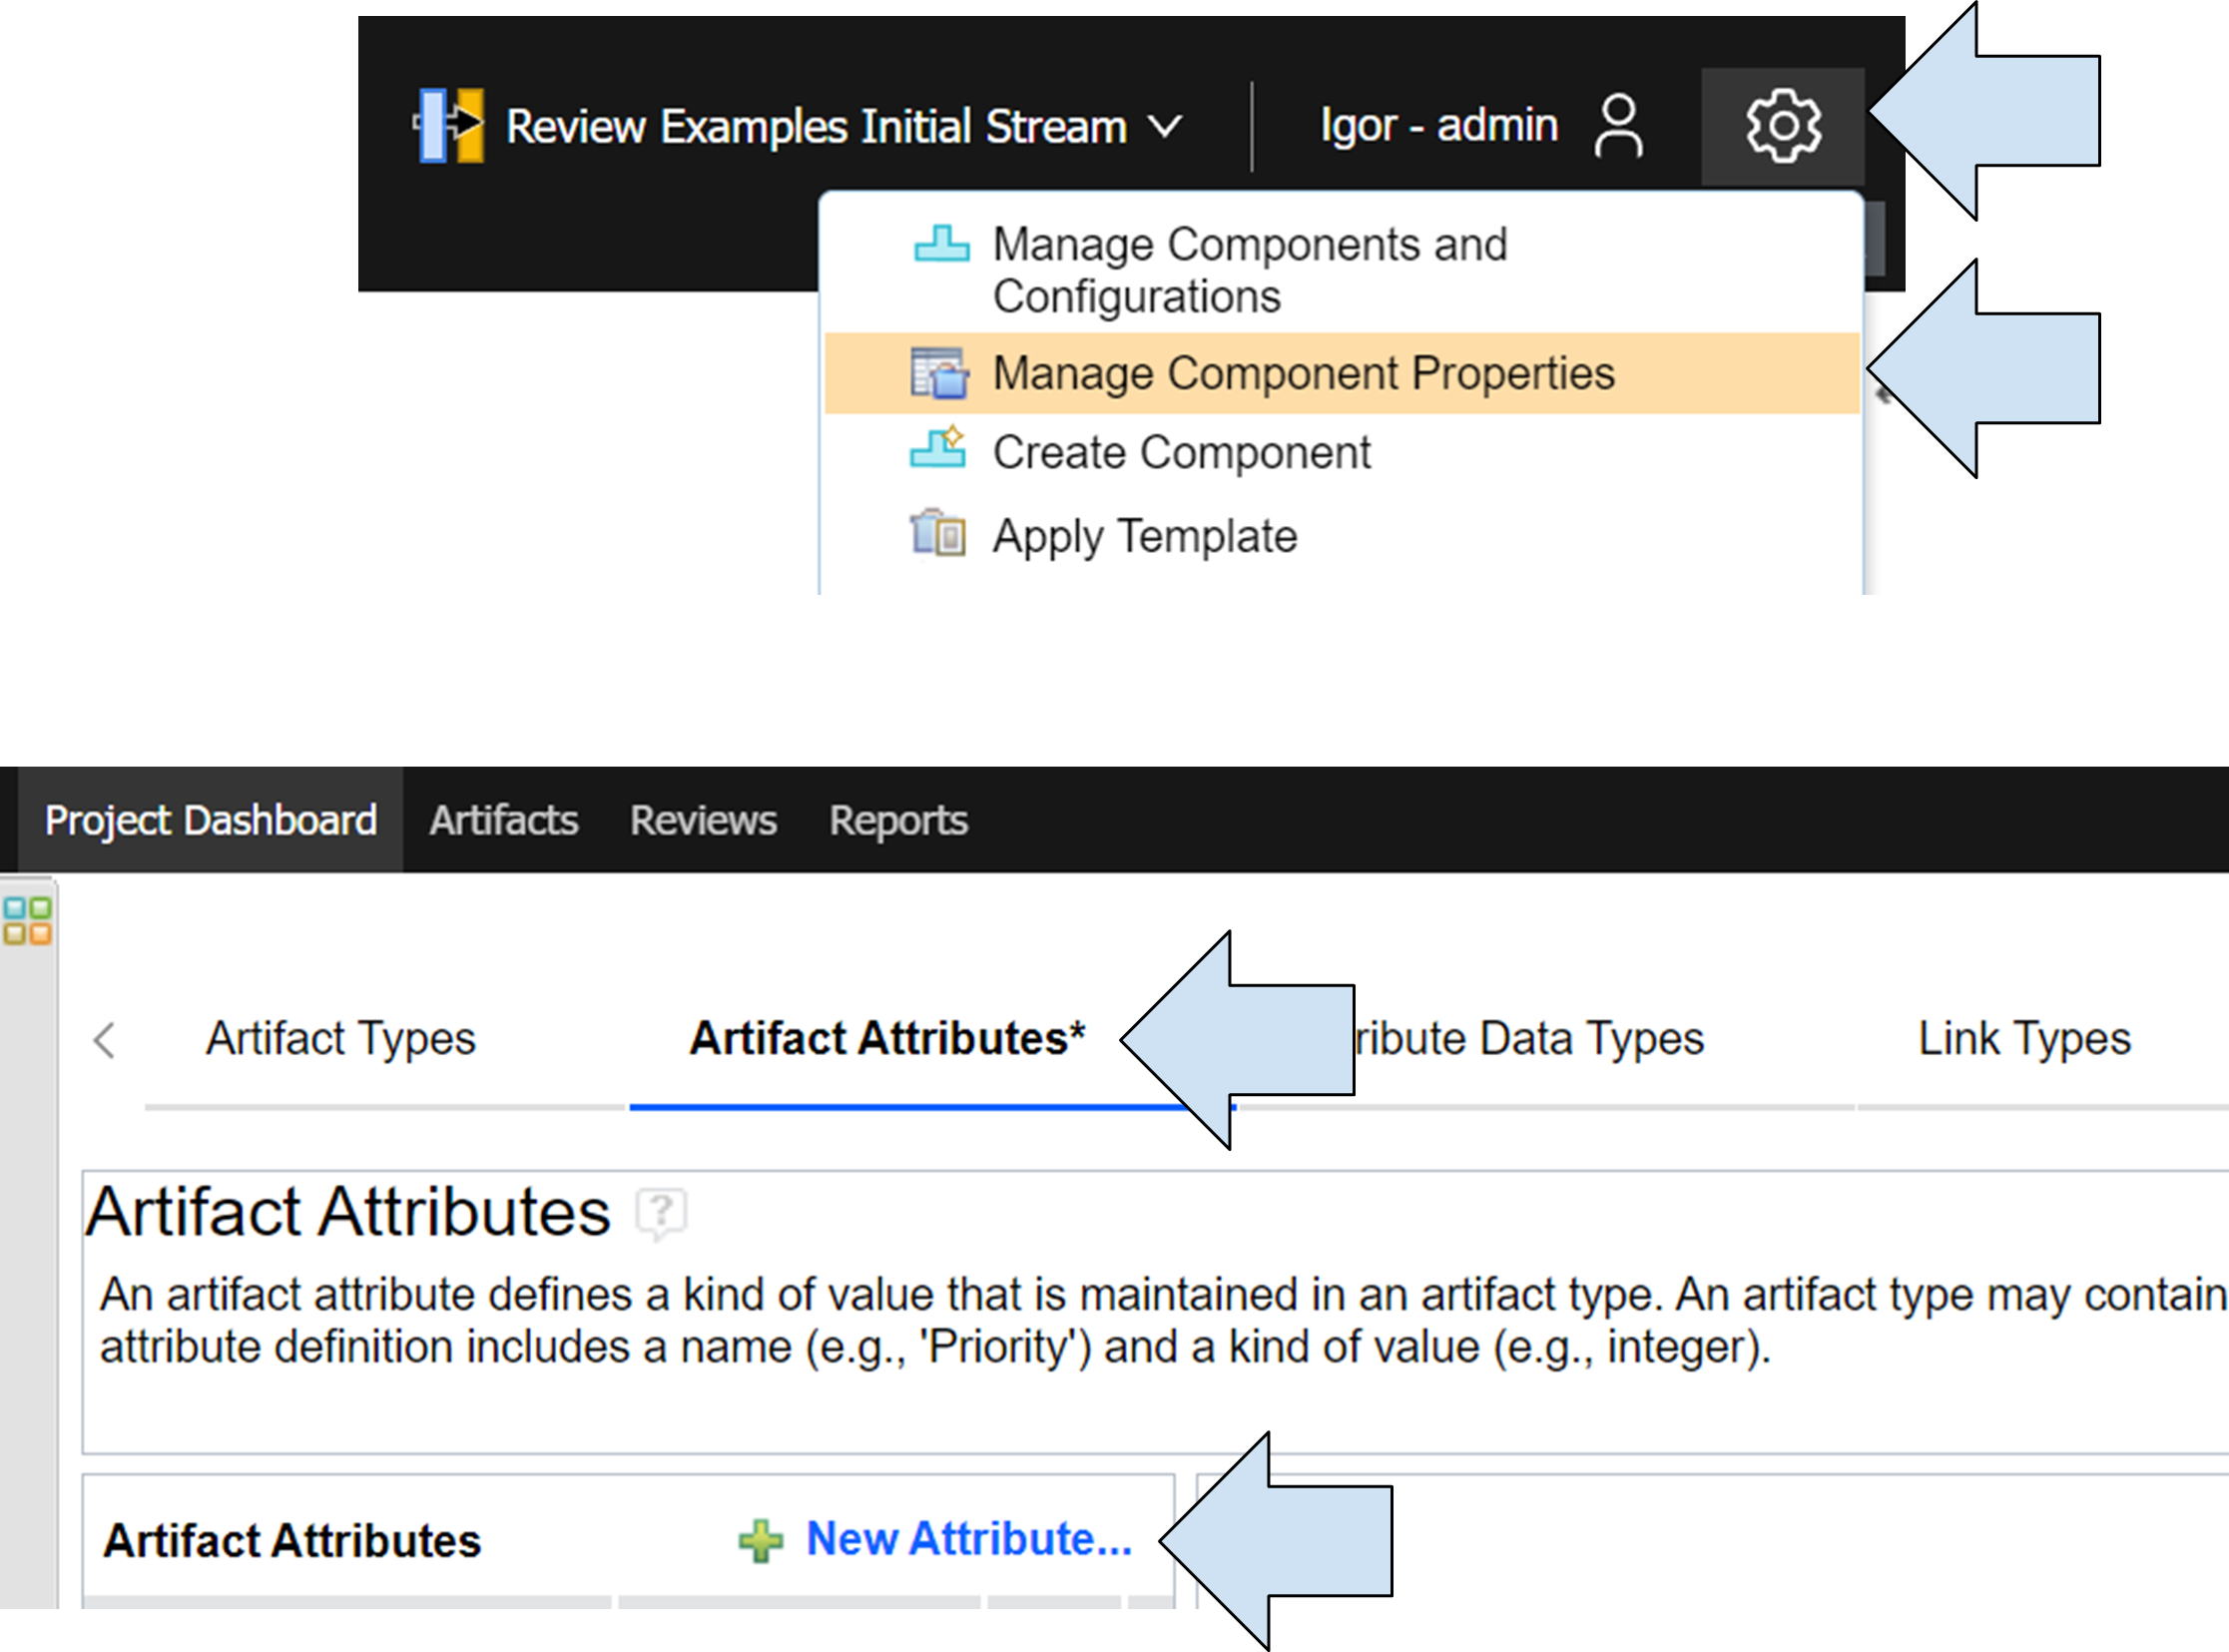
6.) Create new attribute
- Create the attribute
The custom attribute we create in this first option is a simple boolean attribute we will name “For review”. Assigning true value to artifacts with this attribute will signal us, that those artifacts should be subject to the review. To create this attribute
- Input attribute name
- Find and choose Boolean data type
- Alternatively, you can choose initial value (for example no value, or false)
- Save this artifact
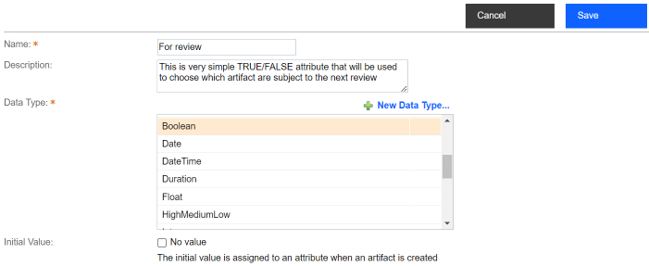
7.) Save "For Review" attribute
Now the artifact is created but we are not done yet. To use this attribute, we need to associate this attribute with artifact types we are using. To do that:
- Click on “Artifact Types”
- Navigate to the artifact types you would like to see in review. Eg. Headings, system requirement, information, etc. (please repeat following process for all of those requirements)
- Click on “Add attribute”
- Select our newly created attribute - “For review”
- Click on OK
- Save the artifact type
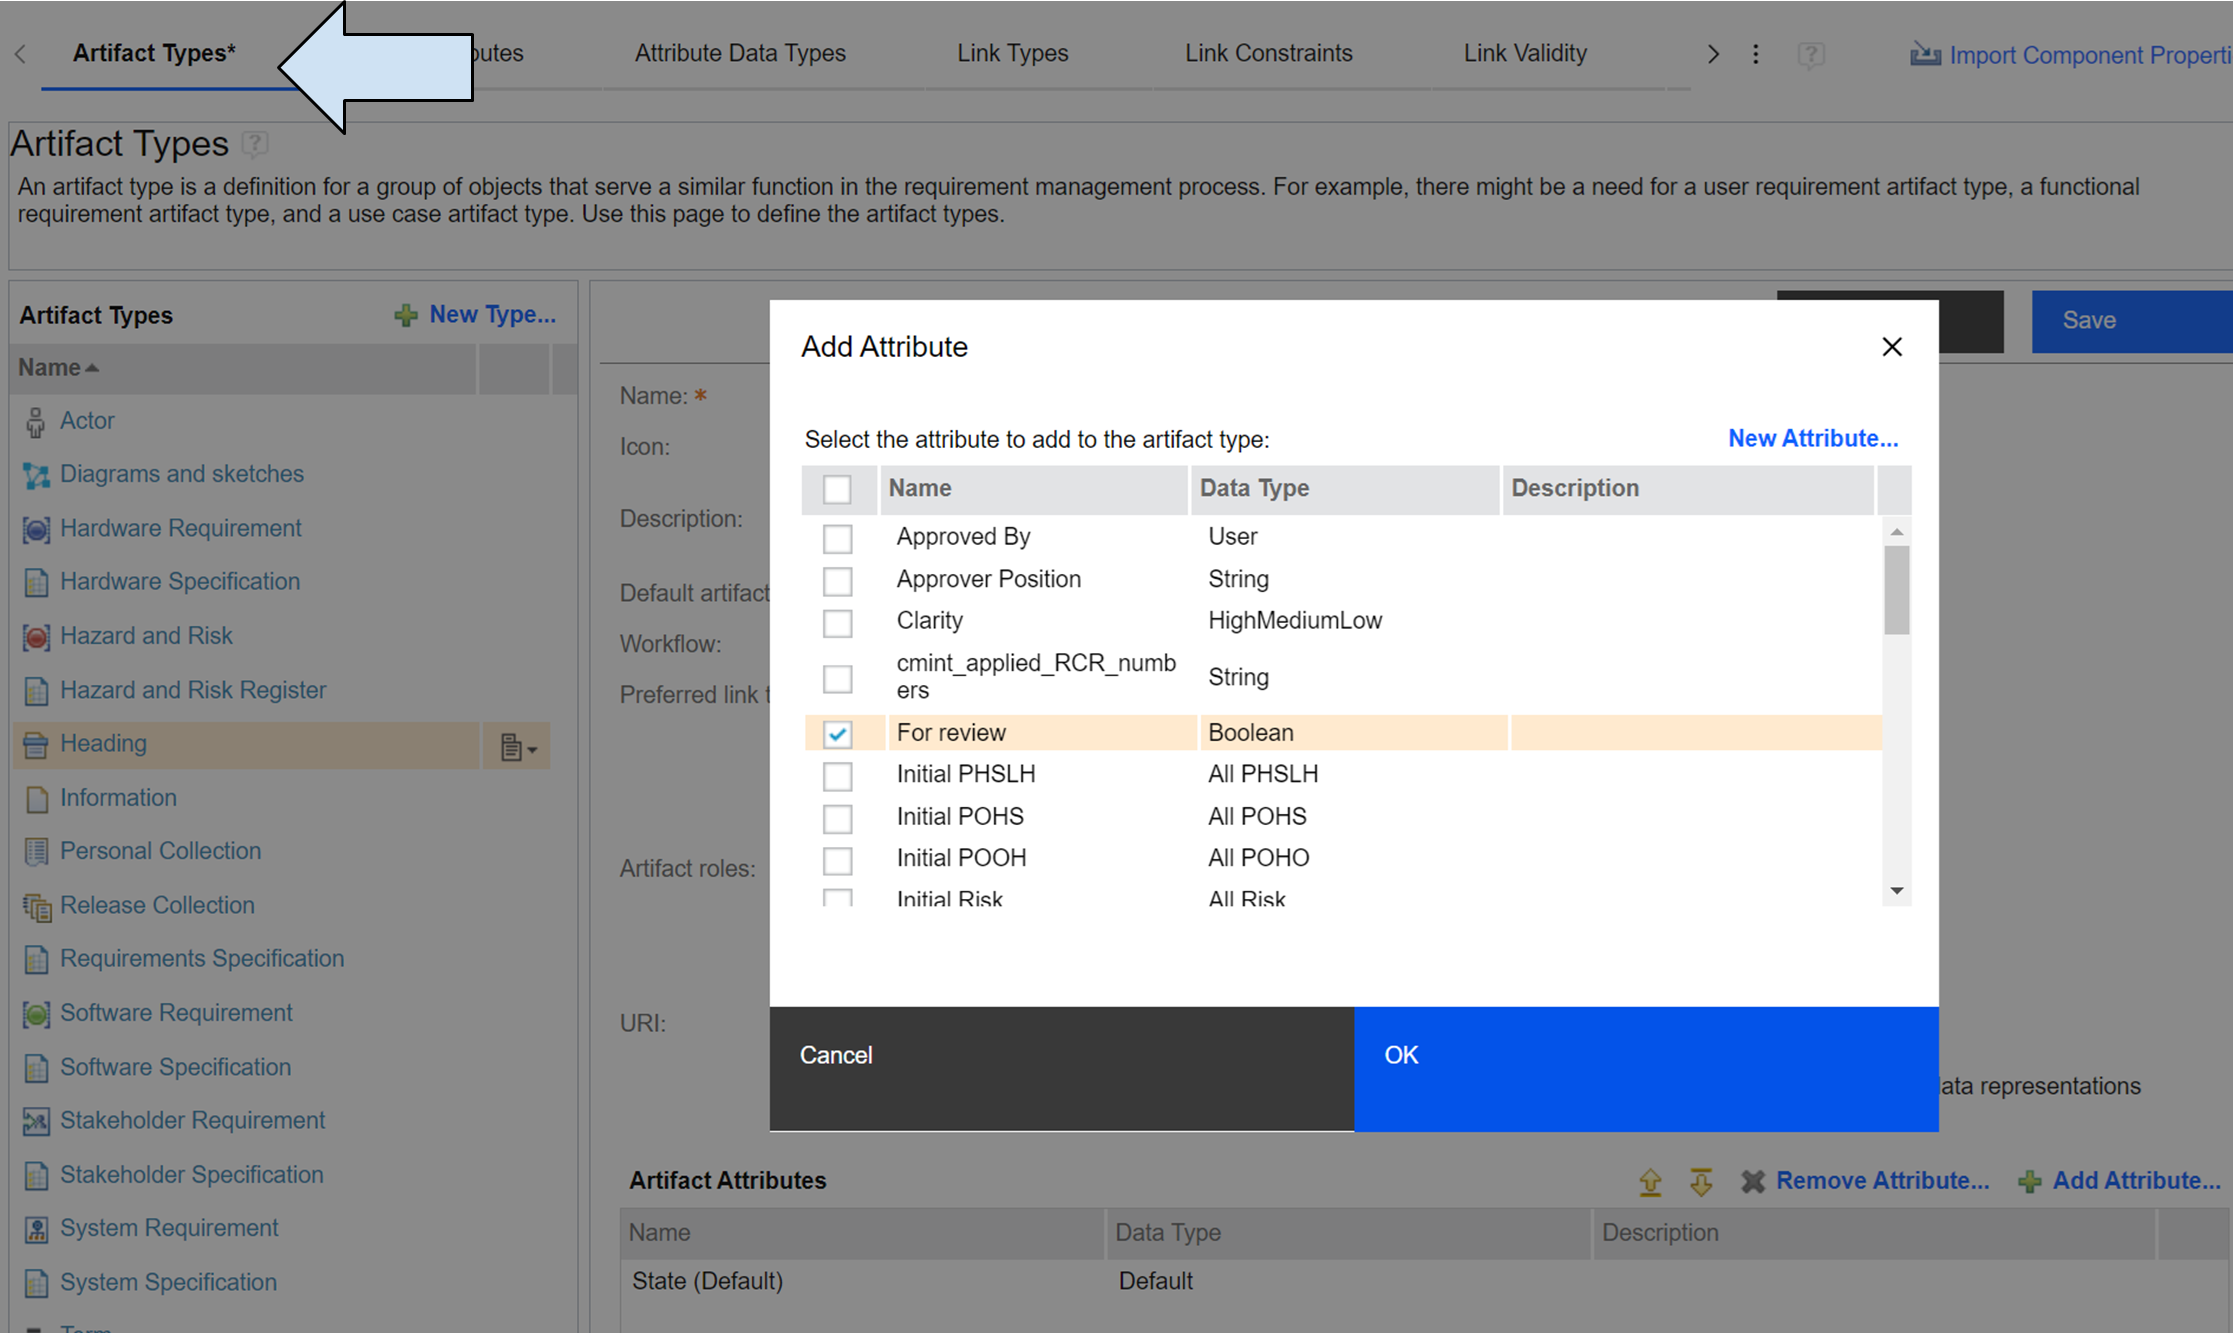
8.) Assign "For Review" attribute to the artifact type
Step 2 - Adjust view and filter
To change the view please use Step 1 from Workaround tip 1 to add view section to the module. Select “For review”
9.) Adjust view
Step 3 - Pick and choose artifact for review
You can pick and choose artifacts one by one by selecting individual artifact (in our example #3595), clicking on pencil icon and choosing the right value.
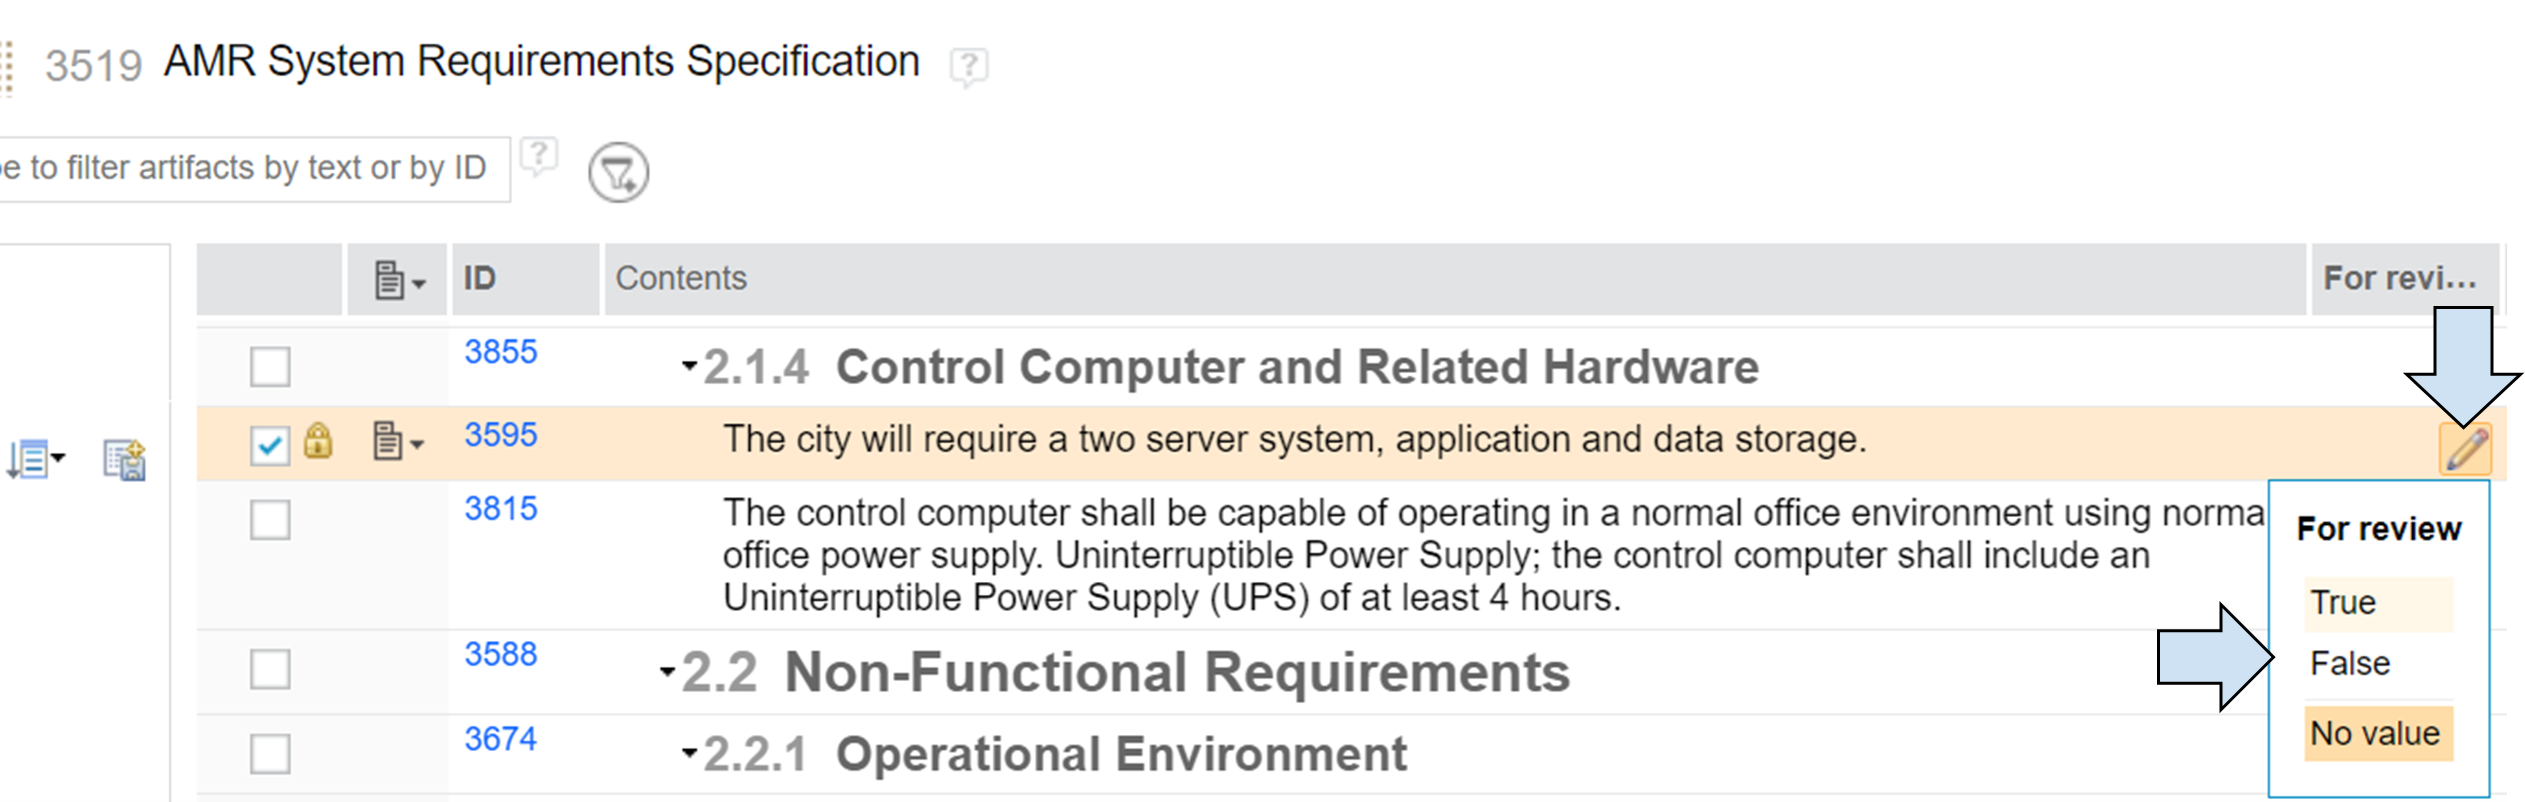
10.) Choose value for "For Review" attribute
It is also possible to change value for multiple artifacts at once. This way you can easily select entire sections, chapters as well as multiple individual artifacts. As an example, for the next review, we have chosen entire subchapter 2.1.3 and single artifact 3639 from chapter 2.1.2. After selecting the artifacts
- Click on options button next to any of the selected artifacts
- Select “Edit the attributes for 6 (X) Artifacts”
- Find the attribute/s you would like to bulk change (In our example it is “For review”)
- Click on the checkbox until the value is true
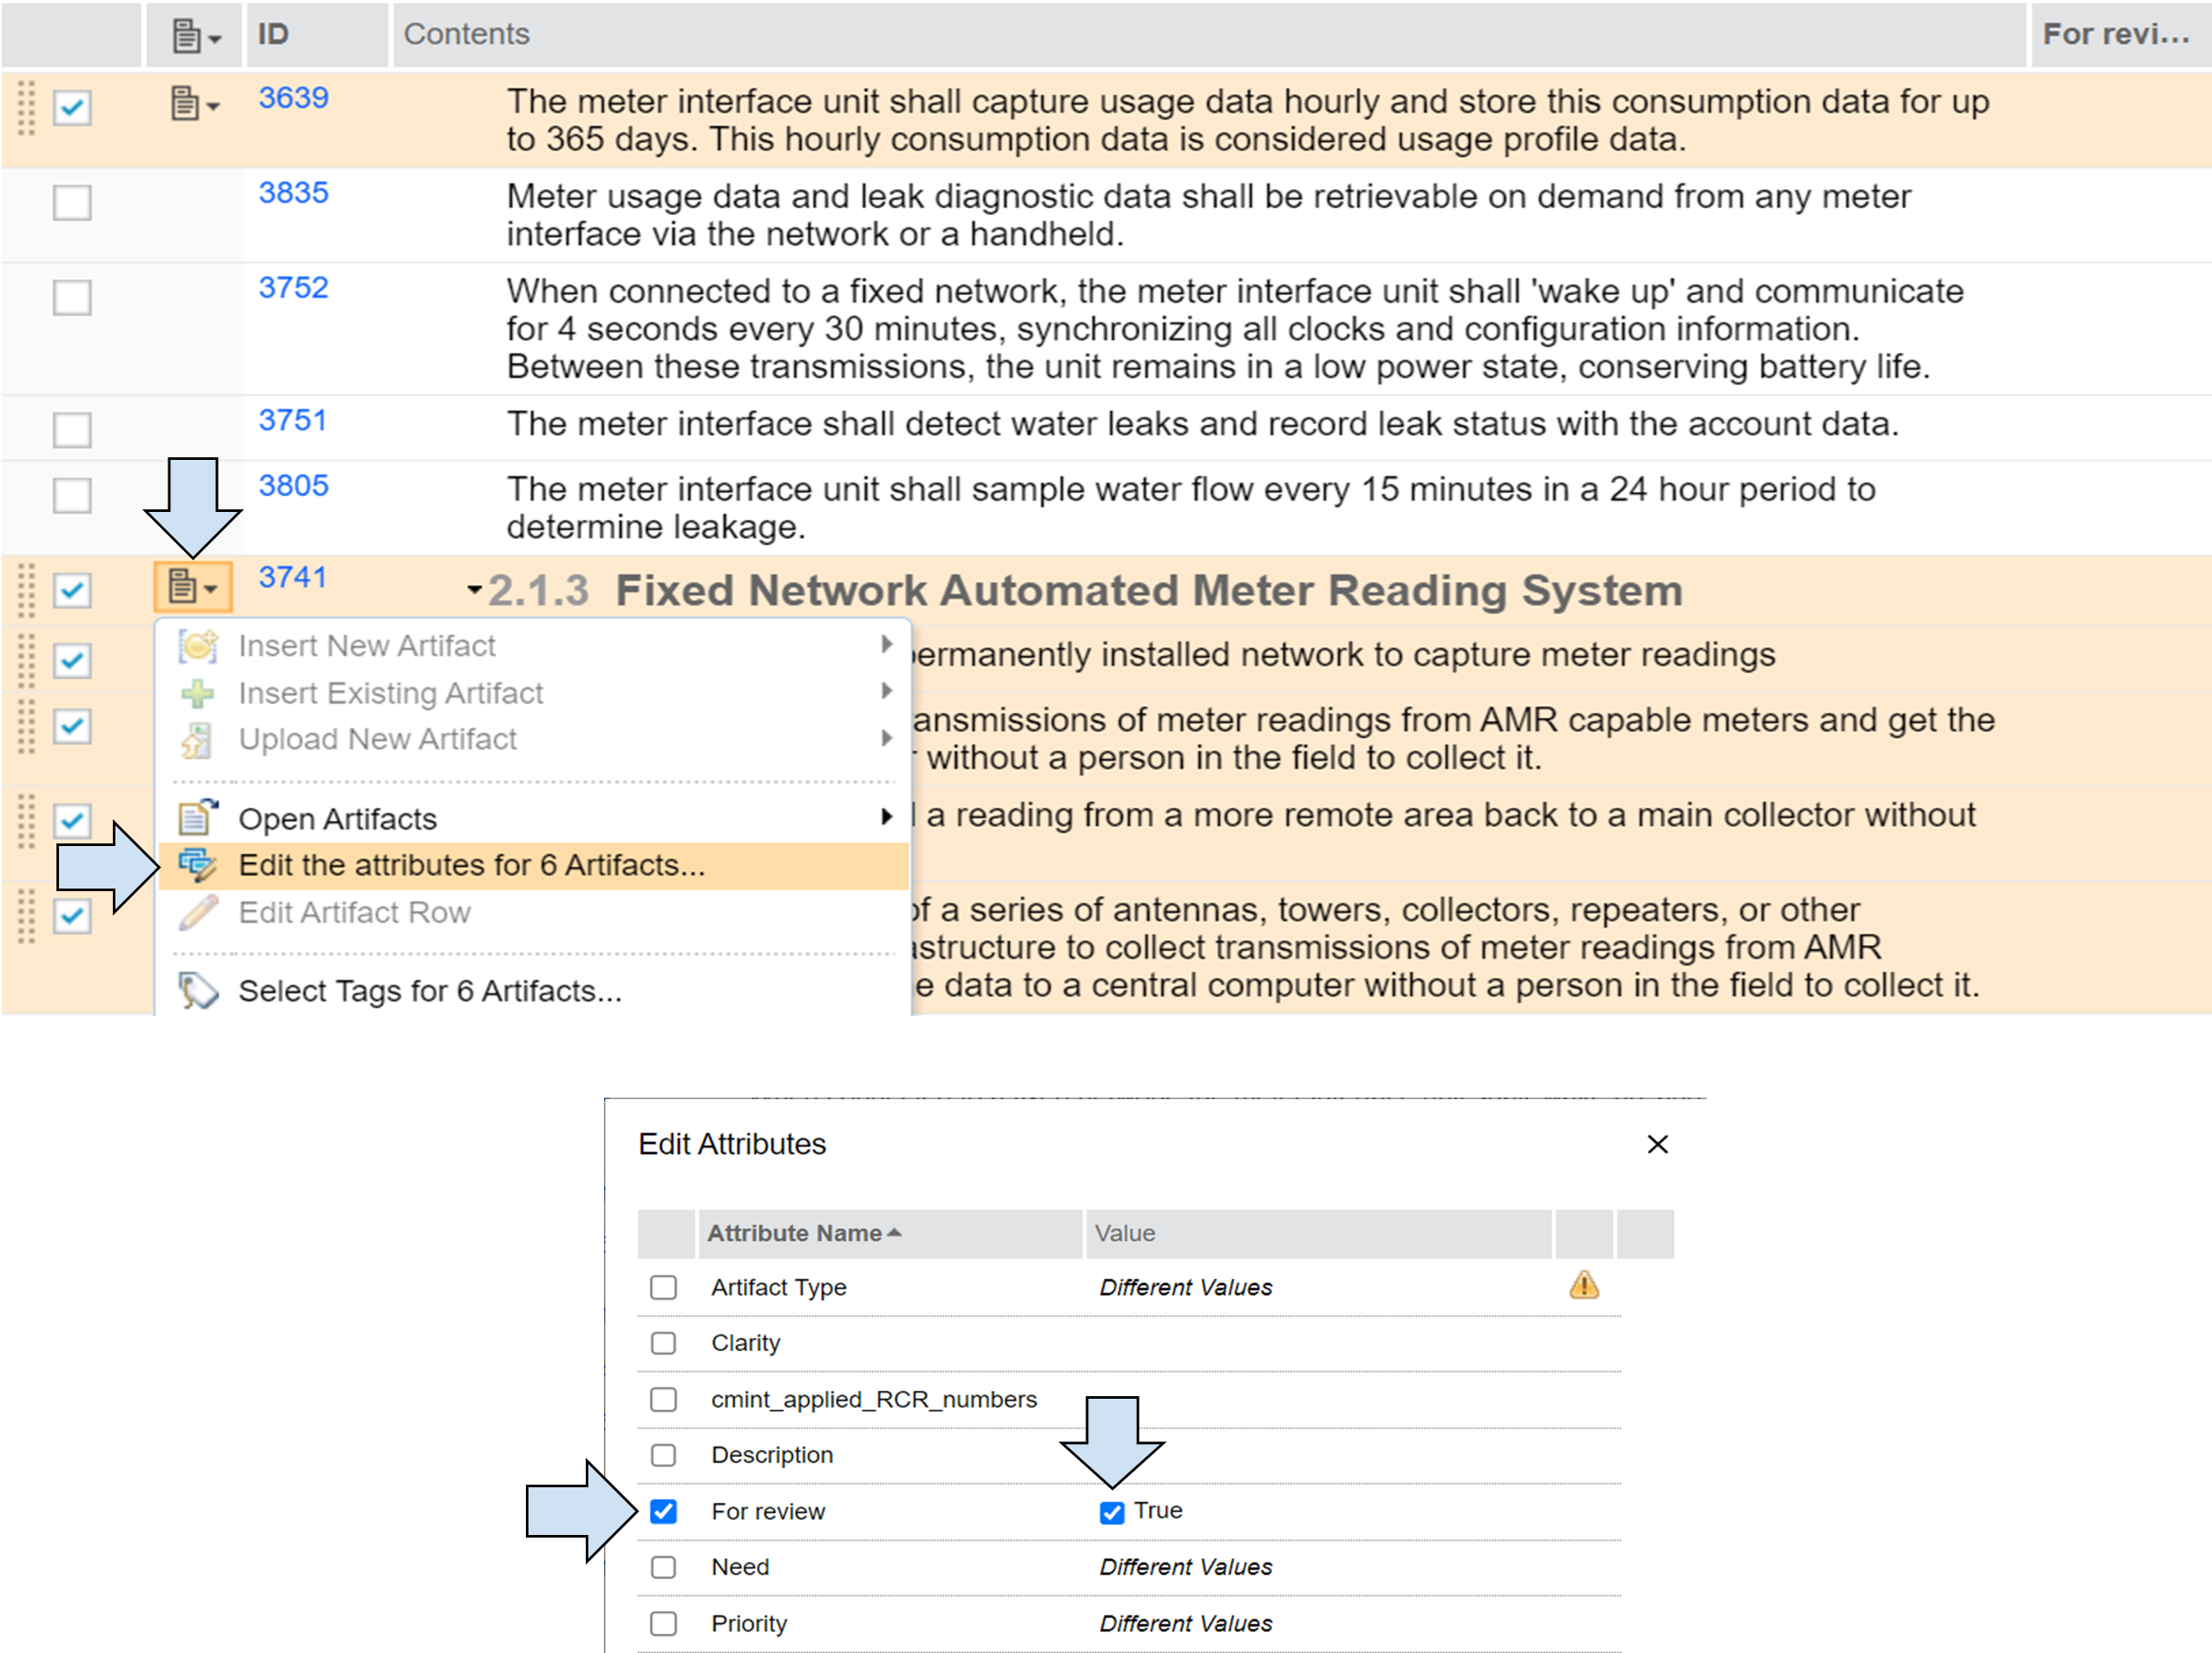
11.) Bulk edit of "For Review" attribute
Step 4 - Create filter for the next review
Now that we selected artifacts for the next review, the last step is to prepare and save filter, so our reviewers can focus only on selected artifacts. To create filter please use “Workaround tip 1 - Step 2 - Creating filter and save the view”.
- Click on add Filter icon
- Search for “For review” and use “is” “True”
- Click add and close
- Save as shared view - We used name “For next review”
Now you have everything prepared for your next review.
Workaround Tip 2 - Using Custom Attribute and Views (Option 2)
There may be a situation where boolean (True/False) option may not be enough. For example during the lifecycle you may be working on requirements that are supposed to be reviewed in different iterations, therefore you would like to have the option to not only choose whether requirement is considered ready for review but also review iteration.
To do this we will show you second option for custom attributes, where the user can choose an iteration an from an enumerated list of values. To do this please follow the Step 1 - Creating custom attributes:
- Navigate to the “Administration options” at the upper right corner
- Select “Manage component properties”
- Find and select “Artifact Attributes”
- Select “New Attribute”
After that,
- Add a name for the new attribute (We used “Iteration”)
- Click on + New Data Type - Here you will create new data type with enumerated list of values representing different iterations
- Input name for new Data type (We used Iterations List)
- Select option “Enumerated list of values”
- Add values one by one or add multiple values at once
- You can use different names. The more self-explanatory and easier to understood, the better. For Example Sprint 1,2... or Iteration 1 CW 1-4, Iteration 2 CW 4-8, etc..
- You can
- Select OK and Save.
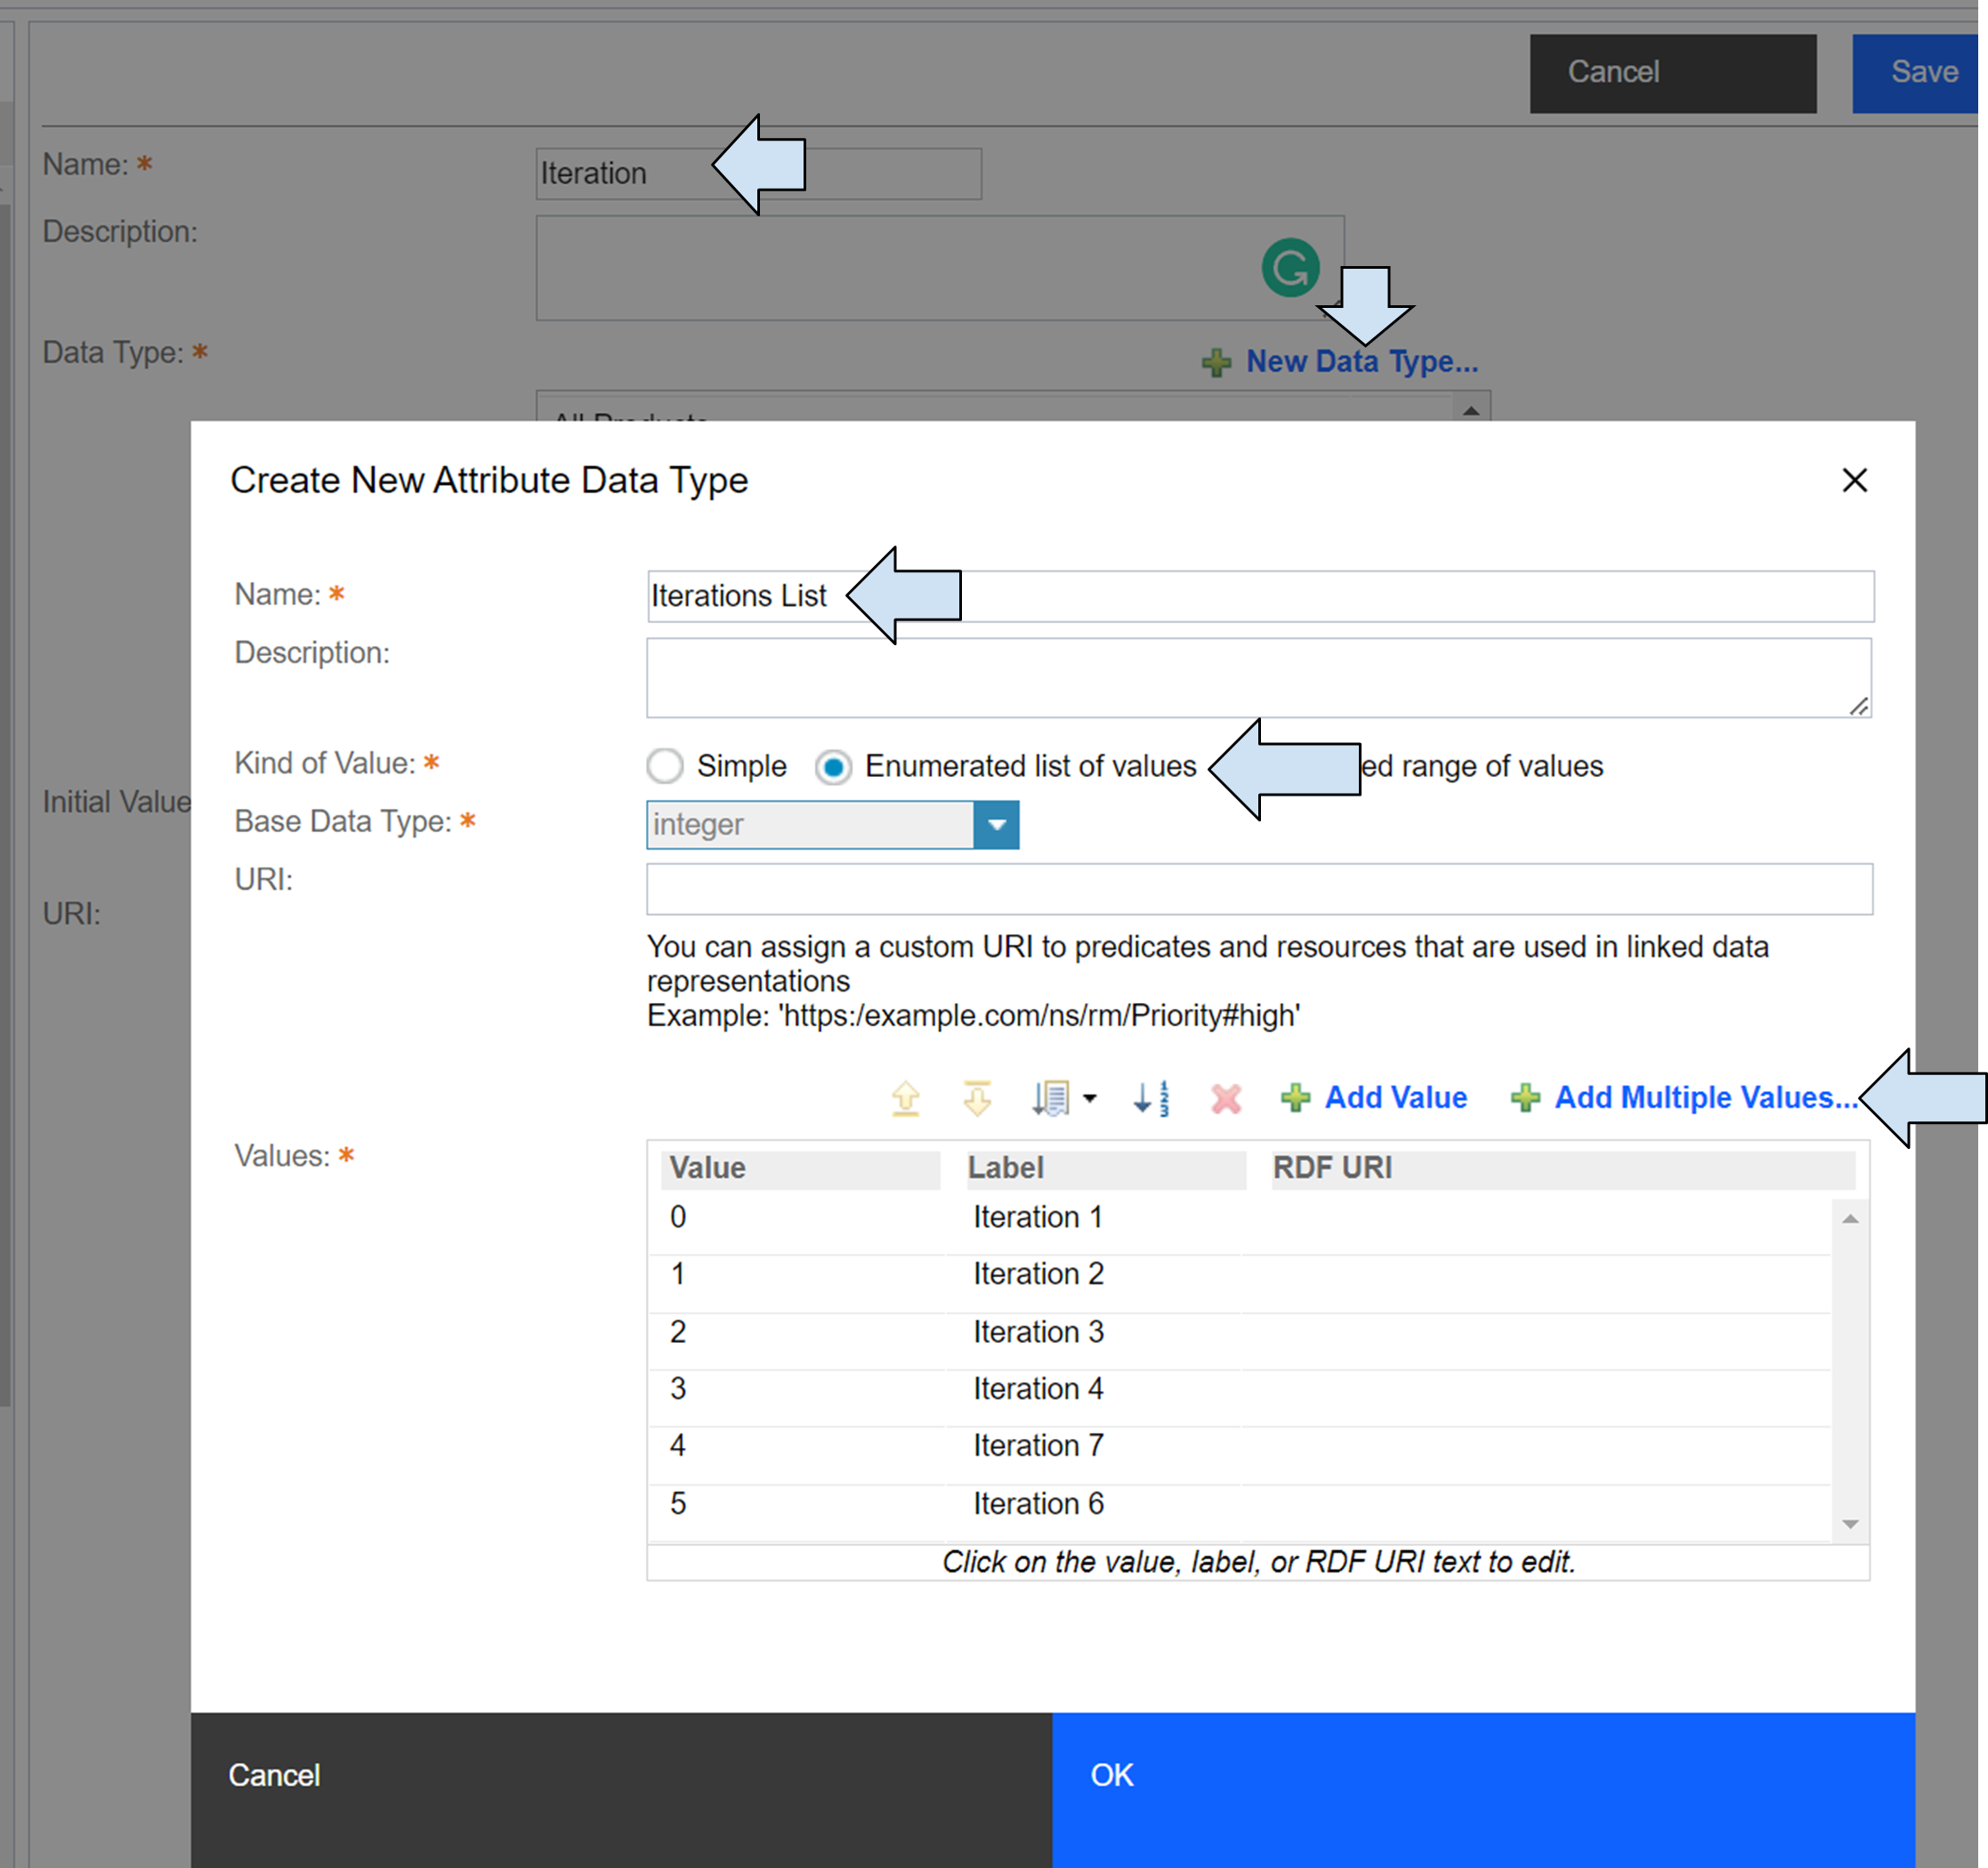
12.) Create "Iteration" attribute and data type
Next - please use previous section as a guide and:
- Associate this new attribute with the artifact types, as we did in previous scenario.
- Adjust view by adding “Iteration” column
- Pick and choose artifact for review in different iterations - for example we have chosen Section 2.1.3 to be reviewed in Iteration 3 and Section 2.1.4 to be reviewed in iteration 4
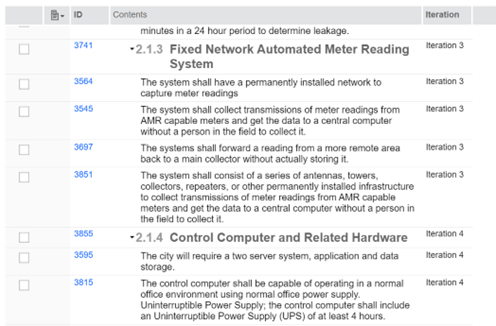
13.) Add "Iteration" to the view
- Create 2 shared filters
- “Iteration 3 Review” where you filter only artifacts with iteration 3 value
- “Iteration 4 Review” where you filter only artifacts with iteration 4 value
This way you can work on multiple future iterations at the same time and have filters prepared that can be used in those iterations.
Review preparation - preparing better more specific filters
The last important note or consideration for module reviews is to prepare better, and more specific filters, that contain every attribute needed or checked in the review. For example, in the review we created in this document, we included this instruction to reviewers:
Please review, if all requirements are unambiguous, clear, unique, consistent, and standalone. Use the "Review iteration 3 filters" and check if every requirement is:
- verifiable and has a verification method assigned
- necessary and linked to stakeholder requirement (“satisfies link”)
- has priority value assigned
- had need value assigned
- has requirement type assigned
If we know the scope of the review and it process beforehand, it makes sense to prepare filter before review, so we can be sure that all reviewers are working with the same set of requirements and their attributes. You should be able to create and save this filter already, example below will serve just as hint and illustration.
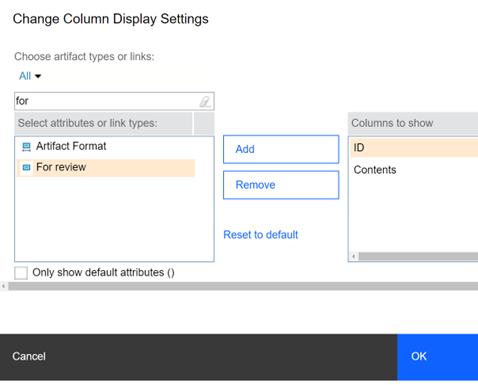
In first step we choosed all necessary columns to display in view.
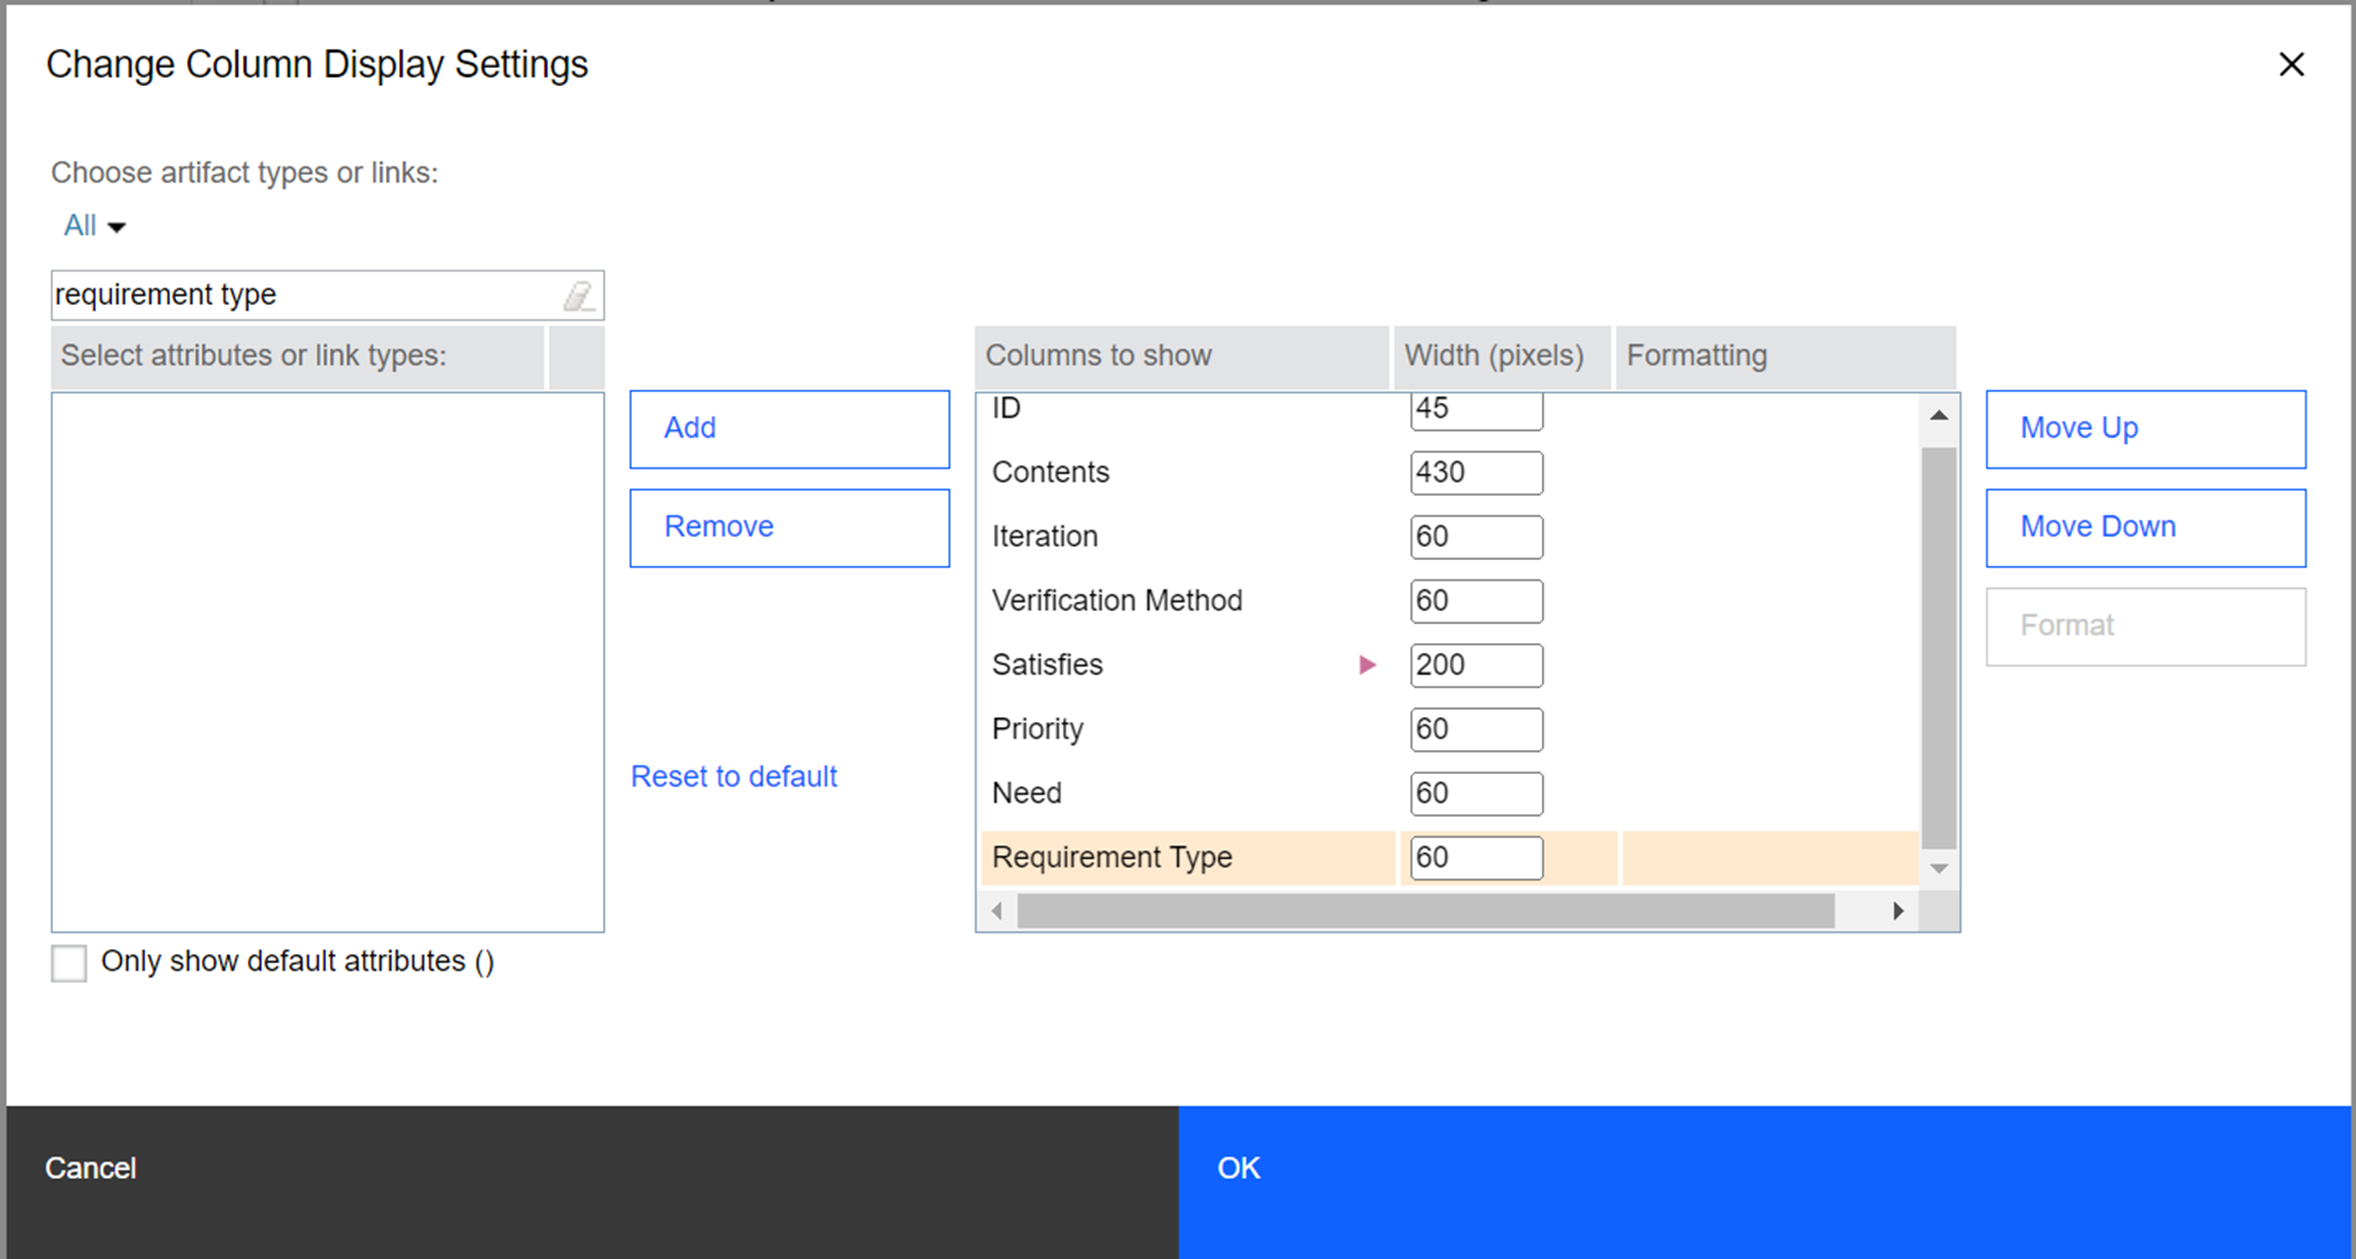
14.) Adjust columns of the grid view
In second step we created and saved filter to include only requirements selected for Iteration 3.
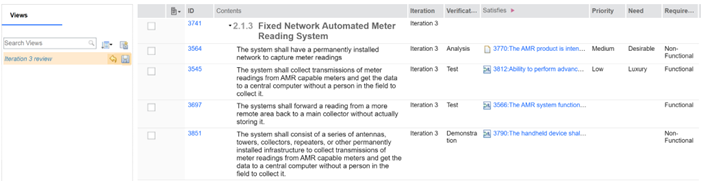
15.) Save the view
Thing to consider when using custom attributes
One of the possible limitations of using attributes to mark the artifacts for the next review is that every change to the attribute will change the artifact modification date. If this is a concern or a problem, there is one potential workaround - using public tags, as the modifying tag will not impact the last modified date of the artifact. You can tag artifacts one by one in order to mark them for review and then create filters based on those tags.
Review Limitation 2
Another limitation of the reviews is that comments about the potential problems with the artifacts stay in the review context. However, you may want to have the ability to propagate information about artifacts that do not conform to your standards and need to be reworked. Sure, you can exit the review, enter the module, add comments or information in some attribute (for example description), but what if you don't want to exit the review context? One possibility is to use links.
Workaround Tip 3
Browsing the review options you will realize, that there are not many things to do. Creating links is one of the few options enabled. To signal, that requirement needs to be reconsidered, reworked or changed in any way we will create links to the special module that we will create. This module may be called Review checklist and there should be described our review guidelines, instructions, standards and rules how we measure and evaluate requirements. Creating this kind of module to instruct and guide in the complex process is a benefit even if it would not be used in linking workaround use-case. As a simple example we created the following module.
*In the example we used a modified review check list that is part of the automotive compliance template.
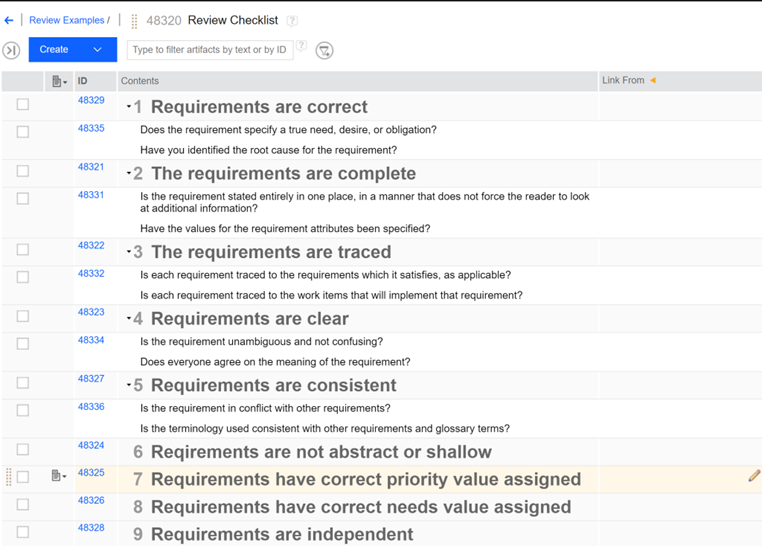
16.) Review checklist module
After the creation of the module, we can simply link incorrect requirements to the sections, that describe where we see the problem. For example:
- Are we missing some links? We can link the requirement to the “Requirements are traced”
- Do we need another stakeholder elicitation, because a requirement is unclear? We can link it to the “Requirements are clear”
- Do we need to reconsider the priority value or is it missing completely? We can link it to “Requirement have correct priority value assigned”
To link the requirements from review to the checklist module, we can create new link types, or agree to use any of the predefined. Even a simple link-to-link type will do the trick.
Please note - if you are conducting a review from the baseline, you will not be able to save the view.
To link the requirement in the review, follow the next steps:
- Select the requirement that you find incorrect and click on add link
- Select more to choose different link type
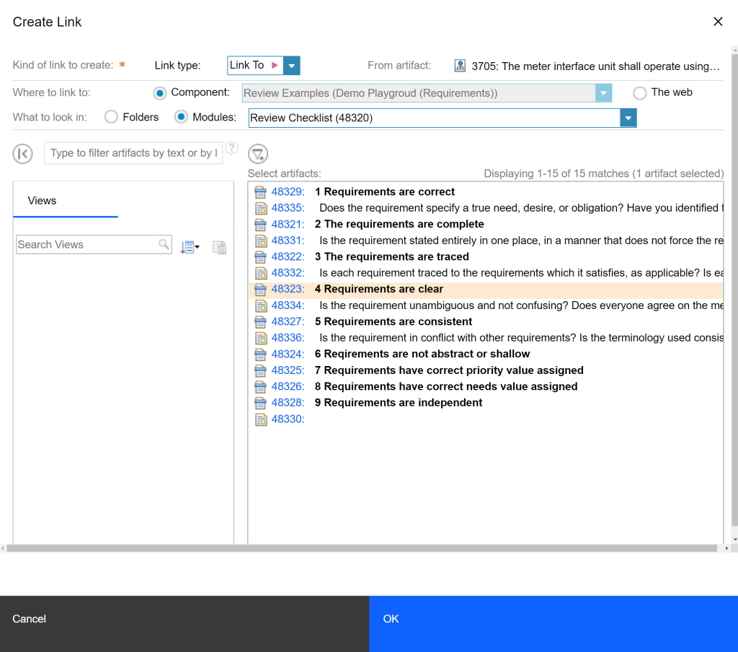
Fill out the create link form:
- Choose link type “Link to”
- Find the module with your review checklist
- Select the option that best describes your problem. As an example, let's say that the selected requirement is confusing, or misses some information, therefore we choose “Requirements are clear”
- Click on OK

17.) Link artifact "Under Review"
18.) Select target of the link
Now the requirement that we considered incorrect is linked to our checklist module. To see requirements that need to be reconsidered/changed, we can view the checklist module and just follow the link. As you can observe in the image below, we see, that we have an unclear requirement and we can jump directly to that requirement by clicking on the link.
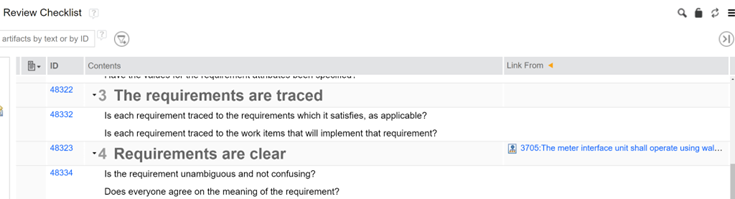
19.) Link in the grid view
Summary
This is the end of the second article from multi-article series where we explore Reviews functionality in DOORS Next. In the next article, we will focus on the methods to increase traceability in the development lifecycle and how to manage the process of delivering changes. We will be working with IBM Engineering Requirements Management DOORS® Next (DOORS Next) application and IBM Engineering Workflow Management (EWM) application both enabled for global configuration.
Softacus Services
At Softacus we are experts when it comes to consulting and service delivery of IBM software products and solutions in your business. We help our clients to improve visibility and transparency when licensing and managing commercial software, providing measurable value while increasing efficiency and accountability and we are providing services in different areas (see Softacus Services).
IBM ELM extensions developed by Softacus are free of charge for the customers who ordered IBM ELM licenses via Softacus or for the customers who ordered any of our services. If you are interested in any of our IBM ELM extensions, you found a bug or you have any enhancement request, please let us know at info@softacus.com.
Related and Referenced Topics
Blog Articles:
Basics of DOORS Next Reviews - explore the essential part of requirements engineering - conducting an effective requirements review process with IBM DOORS Next.
Advanced Concepts of DOORS Next Reviews - learn how to manage changes in your DOORS Next project, increase reusability and deliver changes quickly while adhering to proper change control practices.